


Step 2 ~ For step 2 all you need is a spritz bottle of plain water or a glimmer mist if you'd like some shimmer. I couldn't find my water spritzer so I grabbed a Glimmer mist I had on the shelf that has clear water in it with some pearl glimmer in it. But just plain water works just as well. Lightly spray them on both sides, they do not have to be really wet, just slightly damp. (you could also tint the edges of the blooms with some chalk in before you spritz for an added color depth).....
Step 3 ~ This is the fun part! Just gently crumple them up! They will look like little crumpled up balls of paper.....
Step 4 ~ Now gently undo the petals letting the crumple shape stay in the petals. Leave one of the smaller pieces in a tight bud for the center. They will look something like this.....
Now glue the pieces with a little dab of glue in the center one inside the other, making sure that the petals on each layer alternate with the layer below it......the result is the bloom you see at the top of the page.
You can also slightly twist the petals when they are damp for another more distressed look to your bloom.....here is a picture of a purple bloom Chloe was working on. She lightly twisted each petal after she opened up the crumpled ball (just use your fingers to twist the petals)......
Here are a bunch of blooms Chloe & I just finished making!! Play with different color combinations and inks for different effects! You'll also get different looks by using different shaped punches! There are no rules to make these, any punch/die cut will do and and number of petals on the punch. Chloe made some with extra layers for some really fluffy looking blooms too!
Option #2
Okay! ....this is for you girls who don't have a flower punch! or any type of die-cutter!!! I tried this technique by just cutting out a few circles with a pair of scissors.
Step 1 ~ Cut out a large jaggedy edge circle out of some cardstock. Then cut out 2 more slightly smaller circles. Then I chose a lighter shade of cardstock and cut out 2 more smaller jaggedy edge circles.....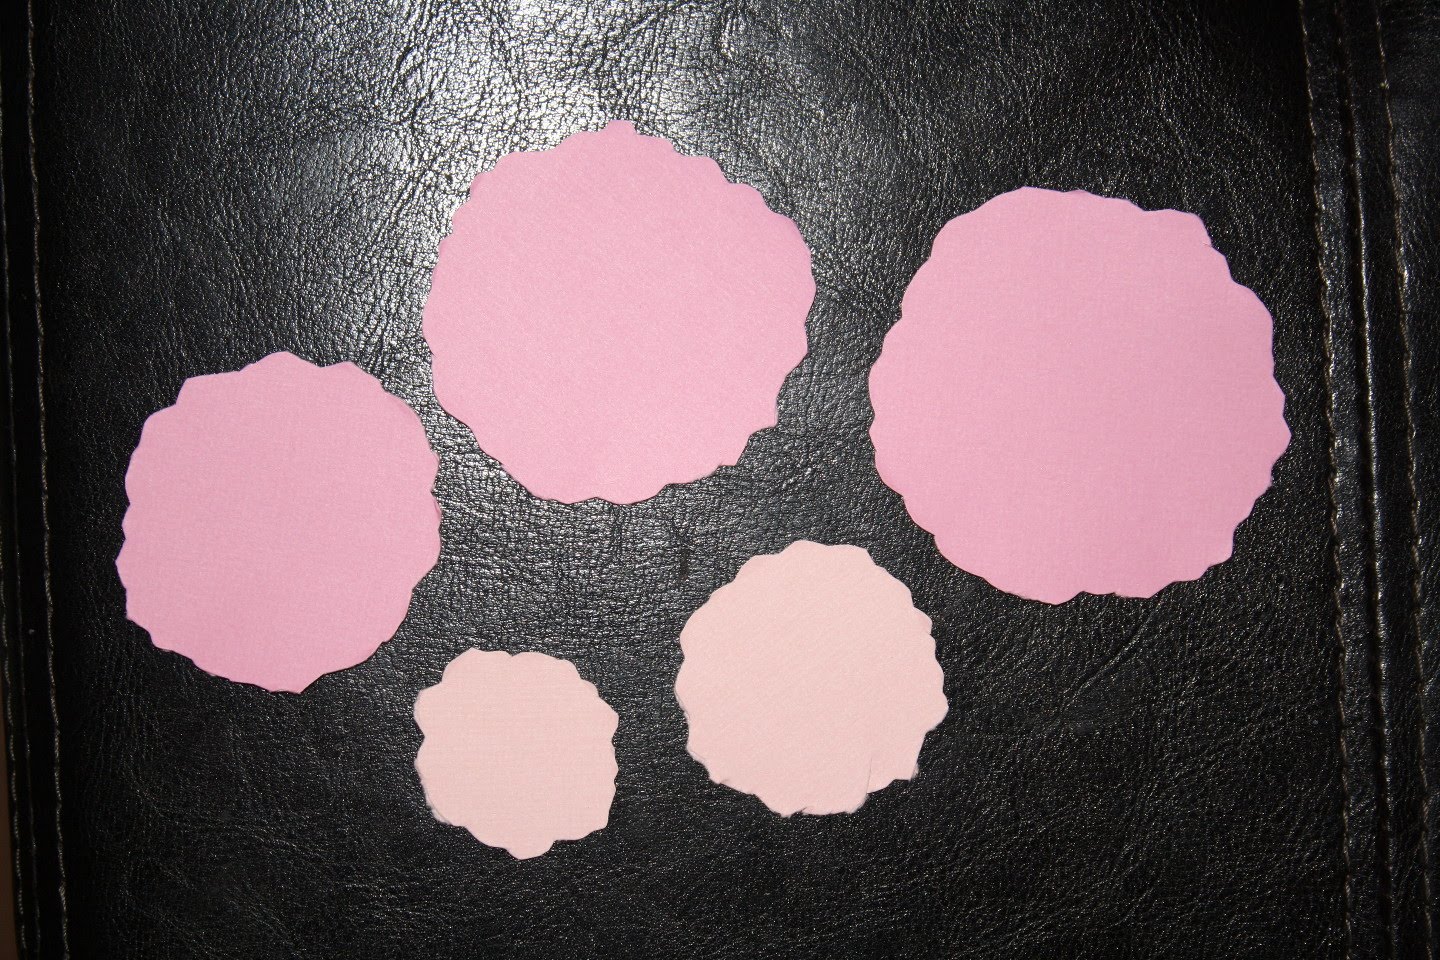
Step 2 ~ Create a slight petal design by cutting small 'V' slits into the edges. I start by making one slit, then I do one on the opposite side. Then I cut 2 more between the 2 I just made. This will give you 6 petals (ink the edges for more depth to your bloom).......
Step 3 ~ Just like above spritz both sides lightly with some water. Then bringing the petals up from the center give them a good scrunching!! .....
Step 4 ~ Open them up and let them dry, they will look like this.....
Glue them all together with a dab of glue in the centers, leaving the center one tight (or you could put a pretty gem in the center for a different look) Here's how mine came out.....
And for you girls who worry about clunky things on your l/o that don't sit flat enough....check this out how nice and flat it is (and believe me, when these are dry, they really hold their shape!)......
So, no need for fancy punches!! this technique can be done with a pair of scissors and water! I had a lot of fun using this technique on some of my upcoming l/o's for my design team work for MCS. I'll be posting the layouts on the 5th, hope you come back for a peek!
~Gabrielle xxx
Gabi What great flowers!!! Poor Chloe...but look at what you were able to do!! I love the idea of using glimmer mist in place of water. I have lots of glimmer mist.. yet not really using it too much! Weeeee now I think I will! Thanks for sharing & continued inspiration
ReplyDeleteAwesome flowers!!! Hope Chloe feels better soon. I've broken my toe and it really hurts and there's nothing the Drs can do for it, it stinks!
ReplyDeletevraiment de très belles fleurs et très originales ! Bravo et merci pour nous faire partager votre passion et votre créativité !
ReplyDeletegreat tutorial. beautiful flowers. hope chloe is feeling better soon.
ReplyDeletewow, these look so awesome & so easy! I will deffinetley have to try these. Hope your daughters foot feels better soon!
ReplyDeleteOh my gosh!! These are WONDERFUL!!! I like that they aren't too fat, but are still dimensional. My books are getting too fat!!! LOL I am definitely going to have to give this one a try!!! Hope your daughter is feeling better!!!! :)
ReplyDeleteFAb tute, Gabi. I agree my albums are getting very fat, so some flatter, softer flowers are just the ticket!
ReplyDeleteКлассный МК!!!! Все понятно и без слов!:)
ReplyDeleteHi Gabi! Poor Chloe,she must be sooo bored.Does she like to read??
ReplyDeleteMaybe some comics or girls magazines??
I looove your flowers,of course I`ll give it a try.
Thanks!
Everything you make is magical!!!;)
ReplyDeleteLove the flowers!Beautiful work!
Hope your daughters toe is better very soon!But when she get bored again.......make sure you have papers and cardtock by the hand!!!
Nice you work togheter to make beautiful things!!
Have a beautiful day Gaby!!!
have fun,Jolanda
Wow.... these fantastic flowers! Thank you Gabi! Oh ... wonderful!:D
ReplyDeleteHope Chloe's little foot is better!!!
ReplyDeleteThese flowers are just beautiful!! loving the glimmer mist! Made these one night at the craft den and just love how everyones turned out!!
Love Chanelle xx
Love these flowers - I want to rush and make some now!! Best wishes to Chloe for a speedy mended foot!
ReplyDeleteBeautiful!!!! it's a wonderful tutorial!!! I love flowers, so I need to practice right now!!!!
ReplyDeleteThank you!!!!
Great tutorial! Thank you :)
ReplyDeleteHow sweet the look at your blog!!
ReplyDeleteLovely step-by-step! I love flowers and will try to do then!!
OMG I like the floweer I love, thanks for tutorial.
ReplyDeleteI am inspired to make some flowers! =)
ReplyDeleteThanks for the inspiration
we girls love flowers yummie...
ReplyDeletebyebye<Lean.
Hi Gabi!! :)
ReplyDeleteOh... poor Chloe. I sure hope she's feeling better. What a sweet mom you are to turn a bad situation into a great one!! :)
Awesome tutorial!! You're always soooooo creative and thank you for teaching us your techniques!! I'm definitely going to make these. Oh... and I'm looking forward to the 5th too... LOVE your work.
Big hugs to you and the girls...
Tracy
these are SO clever and look so professional. thanks for the great tutorial
ReplyDeleteWoW! I just love these pretty flowers, thanks so much for sharing the technique with us. Hope your daughter feels better soon.
ReplyDeleteCoucou!
ReplyDeleteTes fleurs sont Magnifiques.
Merci pour le tuto
bizz
those flowers are beautiful! love how they turned out! will have to give it a try! tfs!!
ReplyDeleteWhen I opened your post today, I thought sure that you had bought some of those Recollections flowers from Michaels. To think I can make these at home from scraps!! They're beautiful. thanks for the directions. Love, love, love your blog.
ReplyDeleteGabrielle, wanted to tell you that I posted a link on some scrapbooking forums today to your blog. Wanted others to see this tutorial for making the beautiful flowers.
ReplyDeleteHope she's feeling better soon. Amazing flowers, love them! Ty for sharing.
ReplyDeleteBeautiful flowers!! Those are great and the tutorial is so easy to understand.. Hope you don't mind, I put a picture of the flower on my blog with a link to your blog for the tutorial.. All credit is given to you... Thank you for sharing with us.
ReplyDeleteHugs,
PattiM
{Pattie's passion}
I Scrap So All Moments Are Remembered!
thank you
ReplyDeleteit's so beautifull
kiss
Sylvie
I love your blog and your works. Thank you for this tutorial.
ReplyDeleteFrancy
Love the flower tutorial! I just did my first one. ;o) Thanks for always sharing. Hugz, Z
ReplyDeletegorgeous flowers and awesome tutorial!! TFS!!!
ReplyDeleteThanks
ReplyDeleteOh wow! Love that second technique, because of the flat flower! I am tired of bulky pages!
ReplyDeleteI love your non-punch flowers.
ReplyDeleteI love these..do you have any suggestions for doing these with fabric??
ReplyDeletesorry it took a broken toe for you to do these, but Chloe's bad luck is our fortune. I can't wait to try them
ReplyDeleteGreat tutorial - thanks for sharing. Your flowers are so beautiful!
ReplyDeleteThank you for this tutorial. I recently made a shadow box for a friend and made some of these flowers for it. You can see them here: http://inlovewithabug.blogspot.com/2011/03/water-distressed-flower-tutorial-by.html. I included a link to your blog for the tutorial. You are so talented! I am a follower too.
ReplyDeleteHugs,
Melanie
very good flowers
ReplyDeleteThese look stunning. Love the way you wrinkle them right up like that. You could get a lot of dimension or a little. Thanks for sharing all your hard work!
ReplyDeletewow.. so great.. I have all 3 sizes of these punch *smiling* I dont have to buy another flower in my life ;P thanks for the inspiration... take care..
ReplyDeleteYou are the best!Thank you verry much!
ReplyDeleteAwesome flowers!!! Hope Chloe feels better soon. I've broken my toe and it really hurts and there's nothing the Drs can do for it, it stinks!
ReplyDeletethank you for information. good share
ReplyDeleteSuper...thanks for the tutorial!
ReplyDeletewow.. this is what i am searching for.. nice post, i need something like this :D
ReplyDeletesorry it took a broken toe for you to do these, but Chloe's bad luck is our fortune. I can't wait to try them
ReplyDeleteThanks for providing this type of very helpful information. I enjoyed reading it,it is excellent! Thanks a lot!
ReplyDeletehad a great share thanks
ReplyDeletehad a great share thanks
ReplyDeleteBeautiful flowers and such a nice tutorial I´ll try as soon as I can.
ReplyDeleteThank you for sharing I love to make flowers
good for sharing by i really learn a lot
ReplyDeletehealthy facts
disease symptoms treatment
health information services
Best article I have been reading for a long time. Laughing my ass up about your blog, every word is worth reading. Thanks!
ReplyDeleteThis comment has been removed by the author.
ReplyDeleteThank you! I'm not really sure how I found your blog last week, but these flowers have been on my mind. I've created a card using this flower technique and I'll be giving you a shout out in my post (7/25/12)!
ReplyDeleteThanks again!
Blog: Rain Puddles Design
Real helpful work indeed.Hope it will work with great efficiency.Any update should be available here and congrats for the work.
ReplyDeleteJust wanted to say that I read your blog quite frequently and I'm always amazed at some of the stuff people post here. But keep up the good work, it's always interesting.
ReplyDeletevanessa hudgens scandal 2009 pictures hot cute emo girls hot model photos veena malik imdb
These are so beautiful! Thanks for sharing your technique with all of us. I can't wait to try this. :)
ReplyDeleteI've tried the non-die cutting flowers and they turned out great. When I showed them to my colleagues they couldn't believe the flowers aren't real. I used a tiny snowflake punch for the center. When stacked and alternated they look like tiny petals too.
ReplyDeleteGonna teach the kids at school how to do this, the girls will love it.
May I thank you with a big hug? >HUG< there ya go.
Fantastic tutorial! It's exactly what I'm looking for. I don't have any flower punches or dies (yet!) but I'm working on it. :) I can't wait to try this! Thanks for sharing.
ReplyDeleteReally nice flowers. I appreciate the work you did.
ReplyDeletePatent Agent
thank you for information. good share
ReplyDeleteThank you for this great little tutorial. Your steps are clear and easy to follow and the results are just gorgeous. Again thanks for sharing :)
ReplyDeleteLooks like I am a few years behind reading this stutorial, but you know I have only recently 'found you'and I am really enjoying catching up with your posts. I love this easy peasy flower tutorial, they are beautiful, so thank you once again for posting them on here for us all to learn how to do them......and oh yea....I hope Chloe's toe is better LOL
ReplyDeleteEileen U.K.
Your instructions for this lovely flowers are so wonderfully explains that you can understand it very well. So you can make many themselves, many thanks for this
ReplyDeleteLove greetings Petra
These are wonderful flowers! I'm always looking for ideas that I can use for card making, scrap booking and sharing with a group of ladies at a nursing home where I volunteer.
ReplyDeleteThese are fun, cheap and easy to do!
gorgeous and who knew...so simple. Thanks for the tutorial.
ReplyDeleteI can see it's not new but thnx so much for the tutorial - looks great! glad it's still around! willbe trying it out tomorrow :)
ReplyDeleteI love it. I am just starting to learn to make flowers and I was so worried they would be bulky in a layout. Thanks for the great tutorial :)
ReplyDelete