

I made this layout of my niece Jenny singing, using a combination of papers and embellishments by Webster's Pages (Ladies & Gents, Magical Wishes, Hollywood & Natures Storybook), the trims are from WP Hollywood Collection, the Netting & Cameo (Silhouttes) of course is Websters Pages. The alpha's are my favourite...the scripted alphabet stickers from Websters Pages!!....and hey! did you notice??? The newest collections from Websters pages have these gorgeous scripted fonts back again!! I am sooo happy about it!! I know a LOT of you are too considering all the emails I get asking where I get my title alphas! :)
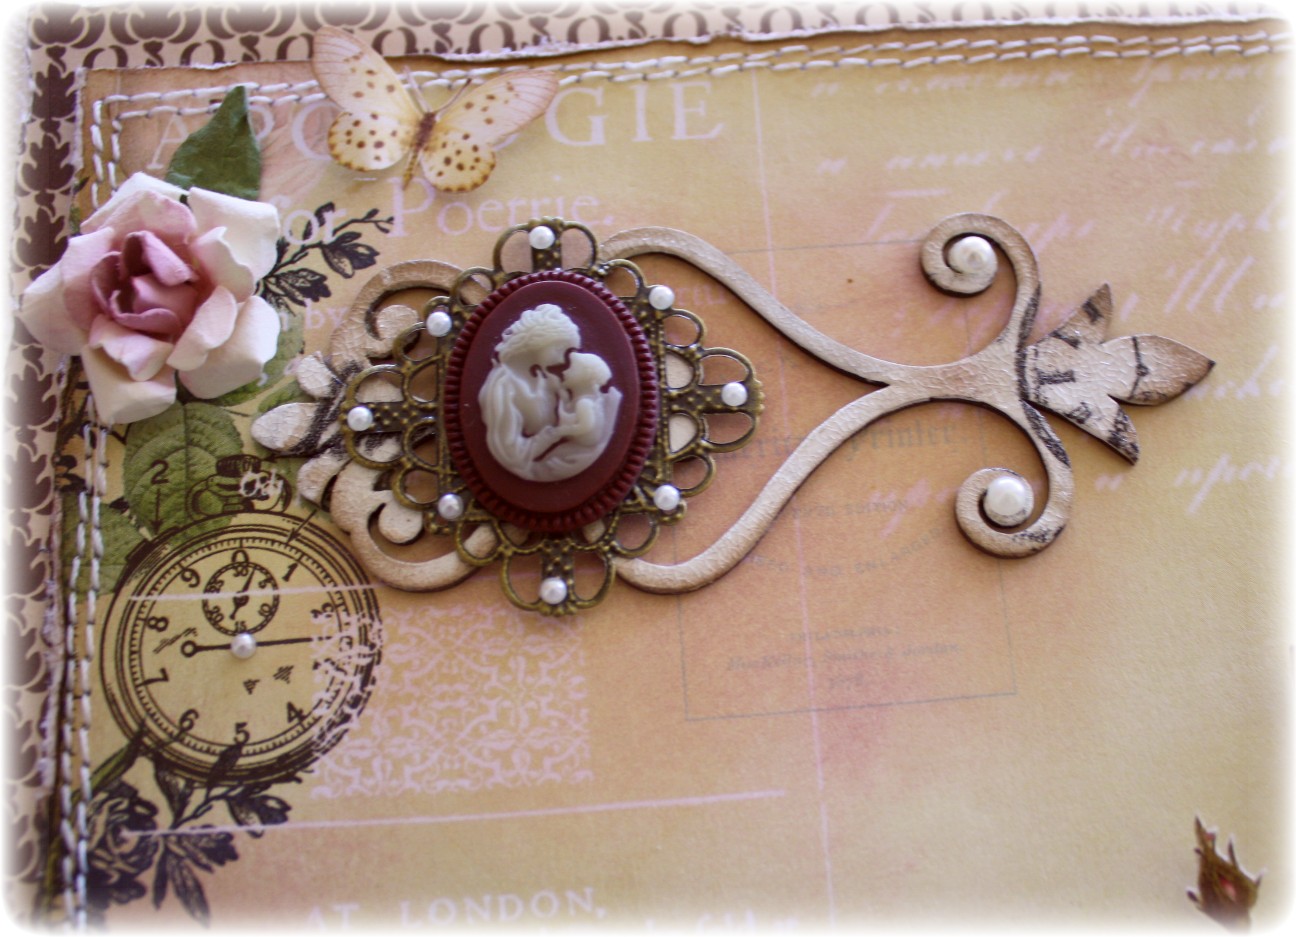
The Chippies are of course Dusty Attic! Both the circular frame and the scroll design, which I again finished with some white paint, brown chalk ink and a little stamping. I coated both of them with Tim Holtz Rock Candy Crackle medium. The blooms are more roses that I handmade using the Rose Creations die cuts by Spellbinders. (Tutorial will follow) Here are a few close-up pic's of the page...


~~~~~~~~~~~~~~~~~~~~~
ROSE CREATIONS TUTORIAL!
Okay, I promised I would share a little tutorial on how I made the yellow roses for a Webster's Pages and Bo Bunny layout I made a while back and since I was making more of them in pink for the above layout I thought I'd take pic's as I went along to show you how to make these. Here is what you will need to make these roses:

I have a Quickutz Revolution Die cutting machine, and I was so happy to find out that I can use these die cuts with my machine! I believe they can be used on most die cutting machines but you may need inserts with them for some other machines. For the Revolution you can use them 'as is'. There are 6 flower shapes in this collection ranging from small to very large. I used the 4 smallest bloom sizes to make my blooms.

Step 1 ~ Cut one of each of the 3 smallest petal designs, but cut 2 of the larger one (using light pink carstock). Ink the smallest cut and just the centers of the larger ones (you don't have to have perfect fading just ink in the center)

Step 2 ~ Take each of the petals and with your right hand press your thumb in the center, with your left thrumb and forefinger pinch the petal in a V and puch toward your right thumb (as shown above) Note: you can very lightly mist your paper with some water to make this step a little easier.
The smallest flower cut will be a little different, you will put the 'good' side down and just give each petal a little cure (see below)....this will create your bud.

Here you can see what the petals will look like when you are done shaping them (Note the smallest shape is a little different, you simply curl each petal up a bit, this will be your center bud). Add glue to your shapes. I put the glue up high on the smallest petal so that when I wrap it around the brad it will create a nice tight bud. I bring the glue high up the petals on the second smallest bloom size also because this one needs to hold tight around the bud. For the rest, a simple circle of glue at the base will suffice. I like to use the Tombow repositionable/permanent adhesive, if you let it dry slightly it stays tacky and will allow you to play with your design a bit.

Step 3 ~ Take your brad, it can be any old brad because it will be hidden in the end. Push it through the hole in the petals center and wrap the petals around the brad. See above...

Step 4 ~ Add the next size up die cut and wrap the petals around the bud. You will then continue with the rest of the petals moving up in size each time. Arrange your petals so that they do not all run the same way, alternating the petals so they overlap. Done! The finished blooms will look like the ones below....

I made some variations in color and size for these blooms. For the partial pink and white blooms I changed the large size and next size down die cuts to a white cardstock and lightly inked the centers with some soft pink chalk ink. For the buds (smaller roses I used the following steps & cuts)....

~~~~~~~~~~~~
I have one more layout to share with you all using my Webster's Pages goodies.....I thought I would get some more pages done before the newest collections get here! This is a photo I took of Meagan at the beach, she was sitting there gathering sand around her legs, and we got the idea to turn her into a mermaid. I used some Websters Pages Yacht Club & Country Estate papers to make this page, along with those fabulous WP Bloomers, Princess Petals & Alpha's. The corner flourish is Dusty Attic.


I got confirmation on my Webster's Pages package, so I'm ready to stalk the mailman lol! Can't wait to play with the new collections! I hope your local scrapstore owners went to CHA armed with lists for these gorgeous collections, so that you all can play along with me! xx

these layouts are absolutely fabulous ! I am stunned !
ReplyDeleteOh my, you did it again...these layouts are both true masterpieces with the most amazing detailing on them. I really love the dreamy feel to your first page and the gorgeous roses you used on it. And the second page has to be one of my favourites of yours ever. The beachy feel to it is simply amazing and I love the contrast the yellow makes. And wow, Meagan's mermaid legs look almost real:)
ReplyDeleteOh my goodness, these are really amazing! Do you put these in a scrapbook with the height of the flowers? I love the tutorial, (now I want those dies, lol) Just wondering about adding to my books.
ReplyDeleteYour layouts are absolutely wonderful! I love your roses, the lace, die cuts, colours, everything! I don't do layouts but after seeing yours I am going to have to give it a try, thanks, Marilyn
ReplyDeleteIt's wonderfull !!! i love it !!! Your first page is so lovely !!! many thanks for the tutorials ! Kiss !
ReplyDeleteWhere do I start? It's all so exquisite! There's a romantic, medieval quality to the mermaid l/o that is just beautiful - almost like a tapestry or parchment manuscript. And a tutorial too - very generous!
ReplyDeleteTanya, I can't say they sit perfectly flat (the blooms) but they actually sit a lot flatter than the traditional roses you get from Prima. They would fit well in a binder but you would have to use spacers in the binding of your album or use a 3 ring binder style album, this allows more room for the 3D elements without crushing them. xx
ReplyDeleteThose are so awesome. The mermaid LO is the best thing ever!!
ReplyDeleteSuch breathtaking layouts again! On the first one--is the butteryfly part of the netting? I just love that! Great photo of your daughter as a mermaid--how clever!
ReplyDeleteWow Gabi!! Both your pages are amazing!! Thanks for the awesome tutorial!!
ReplyDeleteHi Patty....yes! the butterfly is embroidered onto the netting! Pretty isn't it! I had cut a circle out of the WP netting and had that piece left over, I just couldn't throw the scrap out, I figured it would come in handy on another project lol! :)
ReplyDeleteYou are so so tallented , this is absolutely breathtaking.... love the stiched butterfly and the hand made roses are divine! thankyou for sharing xx :)
ReplyDeletethis is totally stunning, Gabrielle, love love love your roses petals :)
ReplyDeleteOh my giddy aunt, I can put my hand on my heart and honestly say that you make the most beautiful scrapbook pages I have ever come across! Oh and your flower tutorial is brilliant, thank you for sharing. Oh my word, I have so many things I want to get now having seen your upload for today!! Being new to all this type of crafting can be expensive business particularly living in Northern Ireland! The US gets crafting materials so much cheaper than we do. Im off to sweet talk the hubby!! Thanks again for the inspiration. Lee xx
ReplyDeleteYour my inspiration Gabi, loooovvvveee the layouts and the flowers.
ReplyDeleteOMG!!! These are totally breathtaking! Love all the chippie elements you have used. And i looks really fabulous how you incorporated the lighthouse. Fantabulous job, Gabrielle, Hugs...Mona
ReplyDeleteWow, these LO's are fantastic. I love them. All that detail is absolutely amazing and thanks for the rose tutorial
ReplyDeleteYour layouts are just WOW. They all are a step above any other I have seen
ReplyDeleteWoow Gabi,those layouts are absolutely precious!!! Love the roses.I just bought those flowers dies,o I´ll give it a try,thanks for the tutorial my friend!!
ReplyDeleteOMG Gabi! Wonderful LOs! I love your works and idaes! Roses are perfect! Thank you for tutorial :) Hugs Andi
ReplyDeleteSuper!!!
ReplyDeleteBeautiful flowers and absolutely stunning lo's. You're the queen of shabby chic pages.
ReplyDeleteThis is one juicy blog post! So much to look at and admire! WOW! The first layout is gorgeous with that DA circular flourish frame....LOVE how you altered it. The rose tutorial is fantastic! If I want to know how to make a flower, I know where to go....to Gabrielle's blog! And the mermaid beach page is wonderful...such a cute cute pic!! Lovely work....I'm inspired!! (P.S. So you enjoyed my mosquito blog post, did you? ha ha! Feel free to join me for a laugh anytime :)
ReplyDeleteAwesome, awesome Gabi! It's all those little things that make your los so beautiful. The inking and stitching and little extras. It's the time and love in all you create.
ReplyDeleteLove that pic of Megs the mermaid.
Well now I'm so glad I inspired you for once! Even if it was to use up your scraps. lol
Hugs
Gorgeous works!!!! The details you add make your layouts so special!
ReplyDeleteStunning...just beautifl..the flowers especially on the second layout are just gorgeous. I'm going back for another long hard look as there is much beauty to see...
ReplyDeleteLuv CHRISSYxx
absolutely gorgeous layouts and what a beautiful flowers you did...loving everything on the pages.
ReplyDeleteOMG..what can I say..your work is ALWAYS stunning but I just ADORE these pages and THOSE flowers..thank you forr sharing you tutoriial XX
ReplyDeleteoh these are exquisite layouts.. and all the details are so gorgeous! love all the hints you give out and all the inspiration you pass on to us.. thank you..
ReplyDeleteBoth of these LOs are gorgeous! The handwork and details on both are just breattaking. Gteat tutorial
ReplyDeleteThank you for sharing! :)
What an inspirational page!!! Just breathtaking. Love it!!!
ReplyDeleteHoly cow girlfriend!!! Those pages are amazing, but those blooms.......I could have that die and still couldn't make them as pretty as yours, you just have the special touch, they are perfect!! Thank you for sharing, I am going to try to find that die anyway!!! Thank you for always sharing your wonderful tips with us, I appreciate it and I know many, many more do as well!!! Hugs!!!
ReplyDeleteI really love how you made a 'flower' out of the flowers on the 2nd LO! TFS, Bonnie :-)
ReplyDeleteJaw dropping beautiful work! Just stunning!
ReplyDeleteHi Gabriella,
ReplyDeleteI cannot stop saying "ooooh" while looking at you layouts.
Such a creative details and beautiful compositions.
Love the crown on your mermaid-daughter! HIHI
Kind regards from the Netherlands,
Corina
Beautiful and inspiring projects ... congratulations!
ReplyDeleteOMG ! Look at yr mermaid girl ! just darling ! lovee all your handmade flower ideas , hun !!! Genius !!!
ReplyDeleteGabi, really like the brad centre ideal to help with the shaping of the flower. Must try the brad, i am sure i could make alot more flower using this technique, rather than playing with may petals as i currently do...gracias
ReplyDeleteava
♥•˚。˚
ReplyDeleteOlá, amiga!
Passei para conhecer o seu blog.
Lindo, criativo, sofisticado e alegre.
Você é muito talentosa.
Amei mesmo!!!
Beijinhos.
Brasil
(¯`v´¯)
`•.¸.•´
●/ ♥•˚。˚
/▌
you make the MOST beautiful, stunning, gorgeous layouts!
ReplyDeleteI liked the second! A truly pretty and adorable LO! You are one talented lady, Gabi. Love your work!
ReplyDeleteAmazing! I love looking at your creations!
ReplyDeleteAbsolutly perfect layouts! I'm stunned every time, and I have to say, that you have the perfect touch. Thanks for flower tutorial. I' m only curious where do you get wooden embelishment? Thanks and greetings from Slovenia! Barbara
ReplyDeleteThanks so much for the tutorial, Gabi! The roses are perfect on your gorgeous layouts ~ I can't wait to make them!
ReplyDelete(((HUGS)))
Barb G.
Your layouts are absolutely stunning! I just can't stop looking at them. Thank you too for the great tutorial. I have my die ordered!
ReplyDeleteThese blooms are gorgeous! I love them! Thank you for the tutorial. I might be able to make something similar using my Cricut. I'll test that theory out when I can.
ReplyDeleteGreat tutorial on the Rose Creation Dies. I like the different looks that can be achieved with these dies. Mine have another look, but I'd like to give yours a try. This is what mine look like- http://misstreez.wordpress.com/2011/04/28/paper-rose-creations-tutorial/
ReplyDeleteThanks for sharing.
Well the sweet talking to the hubby obviously worked a treat because I received the die today!! Whoopee, Im off to have a play. Thanks again Gabrielle for the lovely tutorial. Lee x
ReplyDeletewow how absolutely wonderful ... you are a very talented lady and have thoroughly enjoyed viewing your blog happy crafting and love sandy xx
ReplyDeleteWow, breathtaking layouts. The detail is totally amazing. THank you also for the fantastic tutorial.
ReplyDeleteHugs Ali x
OMG! How do you do it? Your layouts are just stunning. You do amazing work. I'd give anything to be able to do layouts like these.
ReplyDeleteWow how stunning, love your layouts and your adorable flowers, I have this die but didn't know how to use them to good effect, thanks so much for your fabulous tutorial, hugs Liz xx
ReplyDeleteYour layouts are so cute, thank you for sharing these pretty roses. your flowers are always excellent and charming
ReplyDeleteWonderful tutorial and GORGEOUS page.
ReplyDeleteHugs and smiles
Wonderful tutorial and GORGEOUS page.
ReplyDeleteHugs and smiles
Beautiful page Gabrielle! I love your roses- the tutorial is wonderful! Love the pearls on the lace too!
ReplyDeleteFirst of all......Wow on your gorgeous pages!! Awesome roses...and thanks a million for the tutorial on how to make them!! Just awesome..
ReplyDeleteHugs
It was searching the nice approach is visible in this blog that to way of presentation is really great. I am really thank you very much for the nice info in this blog that to utilize the nice info in this blog.
ReplyDeleteBeautiful layouts and I.must say thank you for the rose tutorial. Now I have to get that die set.
ReplyDeleteI just found your webb site. AMAZING. I tried to make your rose creations. I DID IT. I CAN'T BELIEVE I DID IT. YOU ARE SO RIGHT ADDICTING. MY CARDS ARE OUTSTANDING THANKS TO YUOR GREAT DIRECTIONS.THANK YOU THANK YOU THANK YOU.
ReplyDeletePHYLLIS
Hi Phyllis! So happy to hear this tutorial worked for you and that you arr having so much fun with it, thanks for stopping by and sharing your comment! xo
Delete