Tuesday, April 30, 2013

Winner! {Of the Bo Bunny & ClearSnap Bloghop}

Hi Everyone!  Sorry, I got busy scrapping yesterday (trying to finish a layout for tomorrow) and forgot that I was supposed to choose a winner from my blog for the Bo Bunny Clearsnap blog hop yesterday!  My youngest daughter is home from school today with a cold so I let her pick a winner from all you lovely ladies who left your kind comments.  The winner is.....
 
Marianna said...
Love the jewels and color combination. Need to go back and see previous posts so I have signed up to follow. Thanks so much!
April 25, 2013 at 10:22 PM

Congrats! Marianna!!!  Please send me your address and I'll forward your information to Bo Bunny to send you out your prize!

Thanks again to everyone that played along!!

Saturday, April 27, 2013

Websters Pages NEW Circle Stickers! Plus a NEW Homemade Texture Paste Recipe!!

 
One of the fun new extra's that Webster's Pages made for their more recent collections is the new circle stickers!  I used one of the larger blue stickers for my layout.
I wanted to create a more 3D frame with the sticker so I wrapped some twine around the circle sticker (to resemble a vine design) and then applied the circle with adhesive foam pop dots.  I added a few small Dusty Attic white roses and some cardstock leaves to complete the look. (The chain link fence design is from Dusty Attic)
Here is another view of the circle design. 
 
I had so much fun with this page I thought I'd try another design using the smaller pink floral circle. (Below)
I mounted this circle sticker on one of the green patterned papers in the New Beginnings collection and trimmed around the edges with a scallop edge scissor.  I added a small white dot in the center of each scallop using a white gel pen (Signo Unibal, and Inksenntials are both good white gel pens I use). 
I embellished this one with some of my favourite Pink Bloomers from Websters Pages as well as one of the new Perfect Accents Birds in a nest designs. 
I love the new Butterfly cameo's and the colorful variety of frames you can now get from Websters Pages!  Here I added a little handstiched design with the cameo pieces. 
Before I finish today I wanted to share something really cool with all of you!  Remember a while back I did a little tutorial on how to make your own texture paste?  I used a combination of Baking Soda, White Glue, and White Craft Paint?  This created a nice rough texture paste....but I mentioned that I had also read about people using talcum powder instead of baking soda.  I thought for this layout I would try out using the talcum powder for a smoother texture paste.  IT WORKED BEAUTIFULLY!!  It really allows nicely for finer detailing in a mask.  I cut the recipe in half and stored it in an airtight container.  The mixture came out so smooth and nice and really held up well, no chipping, just a nice firm finish!  Here is the recipe...
 
Homemade Smooth Texture Paste
1/4 cup Talcum Powder (I used Johnsons Baby Powder, Make it smell good too!!)
1 tablespoon White All purpose School Glue
1 tablespoon White Craft Paint
Some Water
 
I began by mixing all the above ingredients with a bit of water until I had the consistency I was looking for.  I tested the texure by letting the medium drop from my stir stick.  If it flattened out quickly into the rest of the mixture, I added too much water.  I fixed this by adding more of the talcum powder until I felt the texture would hold nicely when applied to a mask.  Personally, I like the talcum powder version better than the baking soda!  Just use an old credit card to apply the mixture to your mask....you'll love the results!

Friday, April 26, 2013

I'm a Guest Designer for the ScrapThat! May Anniversary Kit!

Welcome to the ScrapThat! 
May Anniversary Kit Reveal and Blog Hop!! 
 
May is ScrapThat's three year anniversary and they want to 
thank all our subscribers and members for sharing their pages and creations with them!!
They are so excited to share the details about their newest kit
 featuring the amazingly gorgeous Prima Divine collection !!

If you came here from 
Scrap That!
you are on the right track!

Should you lose your way, here is the Blog Hop order:
I'm delighted to be asked back as a Guest Designer for the May Anniversary Kit! ~
Gabrielle Pollacco
 May Guest Designer!!!
My name is Gabrielle Pollacco, I'm a mom of 2 sweet girls, happily married to my husband Steve and we have one big fluffy Labradoodle named Zoe, that sometimes makes her way into our family photos!   I've had the privilege of being a Guest Designer for Scrap That in the past year and was delighted to come back to scrap with this year's Anniversary kit! 
ScrapThat! is also so happy to announce our latest addition
 to the Design team as our Video Educator,
Kelly Klapstein !
Some of you may know me online as "Kelly Creates." I am a Canadian scrapbooker living in Edmonton, Alberta. I'm excited about sharing my designs and techniques with you through my video tutorials!"
You can subscribe to my YouTube Channel at www.youtube.com/user/kellycreates
 
Now, without further ado,
 introducing our fabulous May Anniversary Kit,
 "Spring into May"
And what a spring it is! We wanted a very special anniversary kit and this kit is packed with so many fresh and lovely goodies featuring Prima's Divine Collection. There are fabulous textures and soft bling to bring out your creativity!
Take a look:

Main Kit

Embellishment Add-On

Flower Add-On

Paper Add-On
More details on this collection can be seen here: ScrapThat! Store 

ScrapThat! is currently accepting new
Kit Club Members.

For more information,
complete the form on the link below:
New Subscriber 

Look at the beautiful sketch Amarilys has created for May:
See details about the challenge here: Sketch Challenges
Be sure to also check out the details of ScrapThat's monthly DT challenge
 hosted in May by Sarah here: DT Challenge
There is also a Round Robin Challenge to celebrate National Scrapbooking Day this month as well hosted by Tracey G. It looks like it will be a blast!

Everyone is welcome to participate.
All entries for both challenges are due by Wednesday, May 29.
 All winners of our challenges, including Layout of the Week, are eligible to receive 10% off any 2012 Kits ~ including Add-ons!

Here is my first layout using the gorgeous goodies in the Anniversary kit!...

I went with the basic design of Amarilys's sketch design but changed out the circle design for (yep! you guessed it! lol!) a heart!  I was inspired by a little project I recently saw by Ingvild Bolme, she had created these cute little bubbles using an art medium (a puffy paint)....but I thought I'd imitate the look using some bubble wrap!  I simply stuck down the bubble wrap onto the page and then gave it a coat of white Gesso.  It is really hard to make paint adhere to plastic surfaces but the Gesso allows other paints and tints to adhere to the plastic.  I then gave the bubble wrap some dabs of black paint.  When that dried I added spritzes of a rose color tint (Tim Holtz Pink Sherbert alcohol ink in a little spray bottle).  When that dried I lightly brushed on white paint so that it would only hit the raised surfaces of the bubbles.  Here is a closer view....
I used some oil pastels (I got them very inexpensively at my local dollar store!), I used some black and a pink and brushed a few randome lines aroun the outside of the heart to make it stand out more from the page.  ......The blooms?....well they are a little creation I came up with using a fun piece of velum in the kit!  I will be posting a tutorial for this in May so keep an eye out for this fun little floral tutorial! :)
This is one of my favourite papers in the kit!  I love the playful dancing girl image on that Prima paper!  I scrapped a photo of my youngest daughter Meagan, when we were on a forest walk a couple years back.  Joie de vie means 'Joy of Life' in French, I thought the title fitting :)  Here are a couple of close-up pic's....

.....and a third page I made with this beautiful kit, I decided to go a little more into the mixed media designs...
I used a Coordinations white washed cardstock paper from the kit as a base for this page.  I then did a little bit of masking with a new clock mask I had recently bought by The Crafters Workshop.  I had shared a post on my blog a little while ago on how to make your own Texture Paste Medium (in the right column of my blog).....this texture paste was more of a rough texture paste.  BUT I have a new recipe to share, this texture paste is more delicate and great for finer detailing.  I will be sharing my recipe for this on a blog post I'm doing on Saturday, so be sure to pop back in again for a looksee!  Here are some close-ups of the page embelishments and the mask work I did.... 


Well, that's my work with the kit but the Blog Hop features 9 fabulous hop sites showing the work of the entire design team. 
I know they have been scrapping away and are so excited to show you their creations! 
 
The May Blog Hop Prize is ScrapThat!'s 2012 Main Kit,Prima's Nature Garden
 
To qualify for this month's GORGEOUS Prize, 
you must complete the following:
 
* Visit each blog listed on the hop to see what each designer has created using this month's kit and sketch (comments are very much appreciated).
* Each designer's blog hop post will feature a word to make up a secret sentence,
collect these words along the way.
 
* You must become a FOLLOWER of each blog along the way 
and LIKE us on our Facebook Page!
 
* Post the ScrapThat! Blinkie on your blog.
 
* For your last stop on our Blog Hop return here to the ScrapThat! Chat Blog.
Leave a comment letting us know you have
completed the hop.
 
(Please do NOT include the secret sentence in your comments.)
*Email the secret sentence to Tracey Sabella:tracey@scrapthat.ca

The Blog Hop ends Sunday, April 28 at Midnight EST.
The prize MUST be claimed within 3 days of the forum announcement which will also be made on the ScrapThat! Blog.
~ If left unclaimed a NEW winner will be chosen ~
**Winner will pay actual shipping costs for sending the kit from Canada.**
Shipping costs will be invoiced via PayPal unless you are a kit member,
 then your prize will be shipped with your monthly kit.
Prizes won during the month will be mailed out the first week of the following month.
Due to Customs clearance, International mailings sometimes take 30-75 days to receive.
 
My secret word is:
Flower
Next hop over to the super talented designer
Kelly Klapstein
For your final stop, return to the ScrapThat! Blog 
to let us know you have completed the hop.
Remember ~ only send the secret sentence to tracey@scrapthat.ca
Happy Hopping!

Thursday, April 25, 2013

Bo Bunny & Clearsnap Blog Hop! {With Prizes!!!}

Welcome to the Bo Bunny and Clearsnap Blog Hop!!  This is just a quick little blog hop but filled with loads of inspiraton and AWESOME Prizes to be won at each of the blogs! You should have come to me from Juliana's blog but if you started here, then follow along the blog hop list below and just circle around till you get back to Juliana's blog.
 
 
Well, those of you who know me and are familiar with my work, probably know by now how much I love Colorbox inks!!  The Cat's Eye Chestnut Brown has to be my 'go to' ink for almost every project I do!  So I was delighted to be asked to participate in a blog hop that would feature some new ClearSnap products!  I got to try out some of their new mists, glue gloss and their glitter!
 
I used the following Clearsnap products for this page:
~Stephanie Bernard Spray (Banana)
~Stephanie Bernard Spray (Artichoke)
~Glue Gloss Gel Adhesive
~CS Winter Frost Glitter
~CS Chestnut Brown Chalk Ink
 
I misted the right side of my page with some of the Banana and Artichoke Stephanie Barnard Spray Inks.  These inks have a really rich and strong pigment so a little goes a long way!  I also inked all the edges of my cut-work and papers with the Colorbox Chestnut Chalk Ink. Another fun thing I added was some glitter accents to my page using a combination Glue Gloss wand (looks like a lip gloss applicator! :) and the Clearsnap Icing Glitter.
Step 1:  I used the Clearsnap Glue Gloss Gel Adhesive with the Clearsnap Winter Frost Glitter to give a shimmer to my egg design. Just draw on the area's you want to give the shimmer to with your Glue Gloss applicator.
Step 2:  I sprinkled on some of the ClearSnap Icing Glitter (then poured back the excess into the tube)

I was left with a pretty little shimmer on my egg designs!  Above is a close-up photo of the finished design on my page.

Did you notice the cute papers and embellies I got to use on this page?  Yep!  It's the NEW Bo Bunny Trail Mix Collection of papers and embellishments!!  It's one of the NEW Mid Season releases!!  I just love the distressed papers and the beautiful nature images (like birds, pic-nic baskets, lanterns) in this collection!!  I know I'm going to be using this one again and again!
 
Here's my supply list for my page:
Patterned Paper: Trail Mix (Field Journal, Woodland Picnic)
Noteworthy: Trail Mix
Trinkets: Trail Mix
Jewels: Trail Mix
Buttons: Forever Fall
Blooms: Zinnia (Clover, Natural Earth), Daisy (Natural Earth, Clover)
Jewel Flourishes: Chocolate Jewels
Paper Doilies: 4" Small
Lace: Clover
Clearsnap Supplies:
~Stephanie Bernard Spray (Banana)
~Stephanie Bernard Spray (Artichoke)
~Glue Gloss Gel Adhesive
~CS Winter Frost Glitter
~CS Chestnut Brown Chalk Ink
 
I hope you enjoyed my project!  If you leave a comment between now and April 27th (end of day, Midnight EST), I will do a random draw and choose a winner for a wonderful Bo Bunny Prize!   Increase your chances of winning more prizes by hopping to all the blogs in this hop! (EACH BLOG IS OFFERING A PRIZE!!)  Want to know what prizes are up for grabs?  As you hop along to each of the design team members blogs you have a chance of winning this prize from each of them (each blog will pick a winner and post it at their blog, I will post my winner on Monday April 29th)....
 photo girlsprize_zps9ad8703c.jpg
 
....and this Grand Prize will be given away to the Bo Bunny Blog....
 photo mainprize_zpsc316fecf.jpg  
 
Your next stop will be the blog of the super talented....
 
 
Happy Hopping!! xo 

Wednesday, April 24, 2013

A Little Romance {With Maja Designs}

It's Gabrielle here with you today!  Spring is in the air so I thought I'd have a little fun doing a romantic layout this time!  It's funny how I sometimes go through stages in my scrapping.  A while back I was all about circles.  There was a time when almost every layout in my gallery had circle designs in them.  In the past few months I've found myself haveing fun with hearts!  And what's more romantic than a heart design right?
I love this beach wedding photo, sometimes just capturing an indirect shot like the feet of a bride and groom can be so much more intriguing than a straight on photo.  I love the soft blues and fawn colors in this photo so I decided to play up these colors in the layout.  I used papers from 3 different collections: Vintage Spring Basics (the blue stripe),  Ska vie ta en Fika? (the Coffee color dot) and Walking In the Forest (the leafy paper). 
I added lots of intricately cut chipboard from Dusty Attic and finished it with some white paint and brown chalk ink and then gave them a coat of crackle medium.  The wrought iron fence I gave a coating of black paint and then dabbed on some Meadow Paint from Dusty Attic and some Scribbles Bronze 3D paint.
I created a little birds nest trinket that I made out of 3 turquoise beads and some 26 gauge wire. 
It's a fun little trinket to make and it's again, something cool I found to make on Pinterest!
Here is a link to my Pinterest Board where I like to pin cool and clever ideas My Pinterest Board.  And this is a link to the video tutorial on how to make this cute lil bird nest trinket above (tutorial by Julie Bean from Beadaholic).  For my purposes I turned back the hanging loop because I used it as a center piece for my bloom (see below). 
Supplies:
Patterned Paper - Vintage Spring Basics (7th of March, 6th of May-butterflies), Ska vie ta en Fika (Sockerkaka), Walking in the Forest (Birdsong-bs). 
Chipboard - Dusty Attic Designs (Sweet Pea Frame Set, Wrought Iron Fence, Small Scroll#2, Grass Clusters #2, Mini Script ABC set).
 Blooms - Recollections, Prima, Dusty Attic (leaves). 
Extras: Paper lace doilee - Bo Bunny.  Trinket - Prima.
 Lace and pearl trim - no name off the roll.

Thanks so much for stopping by today! xo

Tuesday, April 16, 2013

Layouts in Under an Hour {With Bo Bunny}

This may seem like a layout that took over an hour to create, but it wasn't!  I was asked to make some pages using the newest collections for Bo Bunny's booth at CHA but I was under a tight time crunch....my solution?
~ First I started with a page design that I had created before and just followed the design for this page. For me what takes the longest is all the fussing about, moving pieces, deciding on what to put where....so using the a design that I created before really helps in cutting the time factor down.
~ Bo Bunny makes loads of amazing and beautiful coordinating embellishments that makes dressing up a page fast and easy! Chipboard, blooms, lace...all made to match your layout, just peel and stick!
~ and finally I gather together all the materials I'll need to make up my page, inks, paints, sewing machine, punches....and have them ready to go. So I don't spend a lot of time while I'm making my page look for stuff. Following a preset design helps make it easy to know what things you will need as well.  Here are some close-up pics.....


Extra Tip: Another time saving thing I like to do is when I'm just sitting and watching TV I'll take some Clover Green Double Dot paper and just punch a whole lotta leaf designs from it and keep them in a little baggie ready to go for when I'm making up a bloom cluster for a page)

Supplies:
Patterned Paper: C'est La Vie (Voila, Belle)
Cardstock: Chocolate Dot Clover Dot
12x12 Chipboard: C'est La Vie
Layered Chipboard: C'est La Vie
Brads: C'est La Vie
Trinkets: C'est La Vie
Buttons: C'est La Vie
Noteworthy: C'est La Vie
Blossoms: Blush Zinnia, Blush Daisy
Paper Lace Doilie: Large
 
If you haven't gotten your hands on some of the NEW Bo Bunny C'est La Vie collection, let me just tell you, this collection scraps itself!  It's so beautiful and easy to work with!  And do give my tips a try for speading up your layout making process, whether you re-do a design you've already done or scraplift a design you like! xo 

Wednesday, April 10, 2013

Some Summer Warmth with Maja Design & Dusty Attic!

First off I wanted to share with you all the New April Mood Board Challenge for April from Maja Design, it's a really beautiful board based on the new Vintage Spring collection.
 
As I've mentioned before, if you'd like to play with this mood board and have a chance at winning a lovely Maja design collection, you can find the information on the challenge HERE.
 
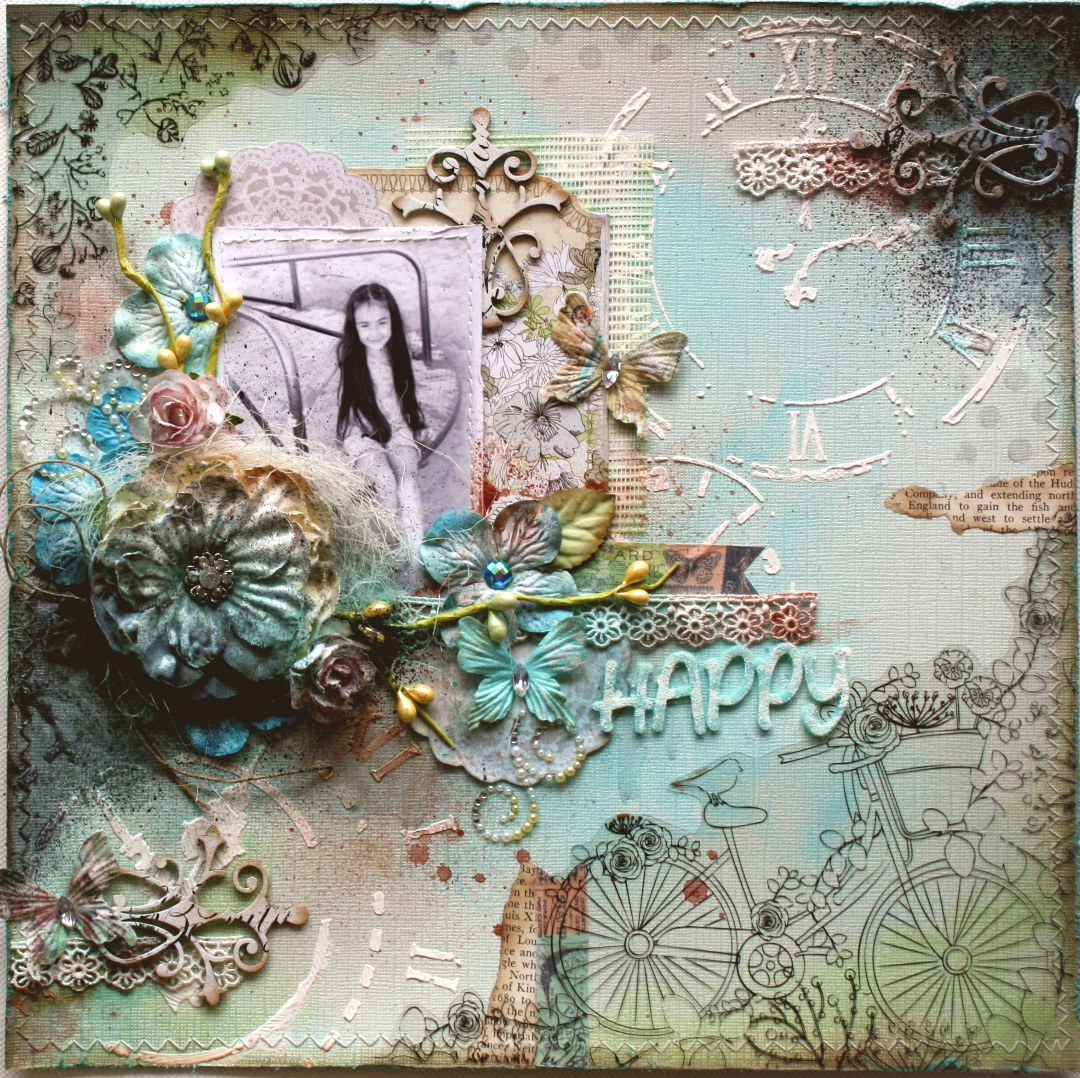
I've been wanting scrap this cute photo of my little Great-niece Kiera for while now....and I just knew I wanted to use that awesome fishnet chippie from Dusty Attic Designs....actually I used a whole lotta the Dusty Attic for this one.  I used the Grass Clusters #1, Grass Clusters #2, Ornate Corner, Shells, Mini Bird Houses, Fishnet Panel, Birds a Field, Corrugated Card, plus a number of the New Dusty In Color Paints (Navajo white, Bisque, Meadow Green, Hot Chocolate and the New Mixed Media Crackle finish....AND some of their new Mini-roses!! 
I painted all the pieces white to start with...then used a variety of inks and paints to lightly color the chippies.  The papers are a mix of the gorgeous Maja Design papers from their Vintage Summer Basics collection and their Vintage Spring Basics collection. 


The blue and white blooms I used here are from a bargain bin at Michaels, and I just added leaves from Dusty Attic to finish up the bloom clusters.....I love these for the perfect finish for a cluster. 
I painted the little bird house with Navajo White, inked with some brown chalk ink and added a coat of the DA Crackle medium.  For the shell I mixed a little sand into some Gesso to add a little texture to the shell.  I added a little sea glass to finish the beach look. 
For the corner chippie I did a little script stamping and again added the Dusty Attic Crackle medium on top of it.  Here's a full list of the goodies I used to make up this page:
 
Supplies:
Chipboard: Dusty Attic (Grass Clusters #1, Grass Clusters #2, Ornate Corner, Shells, Mini Bird Houses, Fishnet Panel, Birds a Field)
Corrugated Card: Dusty Attic
Paints and Mediums:  Dusty Attic (Navajo White, Hot Chocolate, Meadow, Bisque), Dusty Attic Crackle Medium
Flowers: Dusty Mini-roses (Caramel, Sky Blue), Dusty Leaves, Petaloo (white flower), Michaels Bargain bin blooms.
Patterned Paper: Maja Design ~ Vintage Summer Basics (1905, 1934), Vintage Spring Basics (April 7th)
Stamps: Bo Bunny Script Stamp
Rub-on: Daisy D's
Other: Burlap, Cheese-cloth, loose buttons, Shells, Sea Glass, Bo Bunny Jewels
 
Is everyone else as ready for the beach as I am?  Goodness!  We went to the Maple Syrup Festival here in Ontario and it was soooo cold!  We had a blast and ate some great food but boy, am I ready for summer! 

LinkWithin

Related Posts with Thumbnails