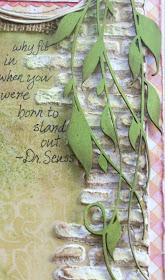
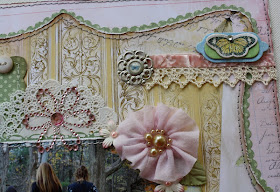
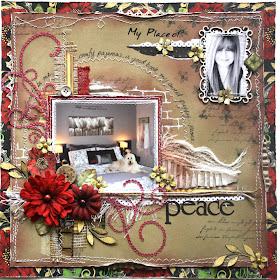
I've been wanting to play with texture pastes for a while now but the penny-pincher in me was holding me back a bit! I was all set to bite the bullet and go out and pay the $25.00-$35.00 it was going to cost me to pick it up from Michaels but then I thought I'll do a little research and see if there are any recipies out there for making home-made texture paste! I found one that looked pretty easy so I thought I would give it a go, and guess what? It worked perfectly! (I'll share the recipe and some pic's of me using it on this page lower down but first I thought I'd share some close-ups of the page I made)....
For this page I used a combination of Webster's Pages Park Drive and Once Upon a Halloween collections (using the non theme sides of this paper collection). I also used some of their beautiful embellishments as well (Cameo) and the focus of the page is the title design!
I am a HUGE fan of the Webster's Pages Alphabet Sticker sheets (they are called Storytellers). I'm particularly fond of the scripted design. In fact many of you send me emails asking what die cutting font I use for my title work and the answer is so easy! I don't! I use the Storytellers! Here is what they look like when you buy a Websters Pages Collection kit (they can also be purchased seperately) I love the large amount of vowels you get, my sticker sheets go a LONG way...
For the above layout I used the scripted and the regular printing paper font for my title work. I thought it would be fun to use the larger letter stickers as a mask. I placed my alpa's where I wanted them but didn't press down to adhere them to the page. First I flipped them downward and spritzed with a little glimmer mist to create a 'mirror reflection', then I flipped them back up and adhered them to the page. I thought it was kinda cool because the title was 'You Shine' and the reflection design kind of reinforced the idea :)
Okay, now for the HOME MADE TEXTURE PASTE/MEDIUM!! It's a really easy recipe, quick to make and super inexpensive! (Now I have to admit I have no experience with storebrand texture mediums so I can't say how they compare but I thought this stuff worked nicely!)
TEXTURE PASTE/MEDIUM RECIPE
1/2 cup Baking Soda
2 Tablespoons white school glue
1-2 Tablespoons White Acrylic Paint
(some water may be necessary)
Instructions: I took an air tight container and put in my baking soda. I then added the glue, acrylic paint and started mixing. I used a couple of disposable chopsticks to mix it up (we like take out sushi heehee) ....I just mixed to get a smooth consistency, I added a few drops of water to get it to the consistency I wanted. There are many types of texture mediums in the store, from light to heavy, so the amount of water you add will depend on the heaviness of the texture you are looking for. Done!
(The mixture keeps well in the air tight container....I made this layout a few weeks ago and kept it on my craft shelf, I just checked it and it's still perfectly usable....some of the moisture was floating on top, I just gave it a stir and it was good to go!)
In my research I also saw some recipes that used talcum powder instead of the baking soda, I haven't tried it with talcum powder but I bet it would give a slightly smoother texture. For my design below, the slightly rougher texture was perfect for my brick design.
So here again, me and my thrifty ways! LOL! I find where I live, I find it hard to find masks, but I did have the Dusty Attic Brick Wall chippies in my stash. I throw next to nothing out. I used the negative space left from my brick chippies that I've used in past projects and used it as a mask. Just filled in with the paste. Below you can see the result when I lifted the 'mask'
I found that the medium chipped off a little here and there so what I did was brushed a little Gesso over the design to bind it better. (I think next time I make it I'll add a touch more glue). I then rubbed a few different chalk inks on the design (after it dried) to pick up the texture more.
Supplies:
Patterned Paper: Parkdrive (Through the Lens, Blanket, Trails, Margaret),
Once Upon a Halloween (Haunted House, Whooo's There)
Perfect Accents: In Love
WP Bloomers: Pink
Dazzle-Me-Gems: Everyday Poetry
Digital Motifs: Parkdrive
Storyteller Alphabet Stickers: Western Romance, Sweet Holiday
Dusty Attic Chipboard: Brick Wall Panel, Swirl Vine #2, Mini Scrolls, Cameo Sliders
And before I close I wanted share a super CUTE little freebie from Websters Pages Digi!! Aren't these just the cutest little cards? I used to put little notes in my girls lunches when they were littler ...wish I had these back then!.....here's a little peek!...
And before I close I wanted share a super CUTE little freebie from Websters Pages Digi!! Aren't these just the cutest little cards? I used to put little notes in my girls lunches when they were littler ...wish I had these back then!.....here's a little peek!...
You can pick up your free Lunchbox notes to download and print off HERE! But that's not all!! Websters Pages has brought out a NEW super-cute (and inexpensive) monthly treat, just for you! The SPRINKLES CRAFTBOX!! Check this out!
Do you want a little peek to see what is in the September Sprinkles Craftbox? Check it out! (You will be seeing some cute sample projects done with the Sprinkles Craftbox Starting on Monday at the Websters Pages blogsite)....
You can find out about this wonderful little monthly treat, that will be available in limited quantity on the first Monday of every month HERE! And guess what? Yep! you get the cookie too! :) :)
Thanks for stopping in, hope everyone has an awesome weekend! We're going to have one more nice family weekend before the kids are back to school! :)


