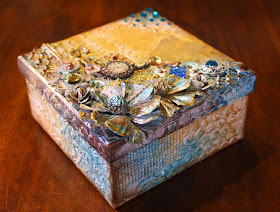
Hi all! I've got another fun little project to share with you today, and I made a video tutorial to show step by step how I made it! I had picked up a variety of plain craft boxes at my local dollar store and decided it was high time I decorated one of them up. My other trinket boxes are overflowing and I needed another pretty box to store my crafting goodies.
I used a variety of the new Bo Bunny Mixed Media products to make up this Vintage/Steampunk style box. I began by doing a little stenciling with Bo Bunny's Stickable Stencils (Brocade stencil)...I used the script stencil and the honeycomb stencil with my homemade texture paste. Then I painted the whole thing with Gesso, added my embellishments and began spritzing with 3 of BoBunny's new Glimmer Sprays (Gold, Bronze and Frost (Blue)....I added some accents with their new Pearlescents as well (Brilliant Blue and Chocolate). At the end I added some dabs of Glitter Paste in Gold to the tips of the petals and a few of the trinkets. Here is my video tutorial to go with this project....Enjoy!
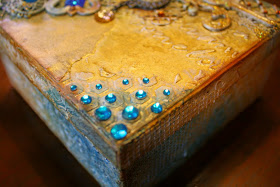
I hope you enjoyed watching my tutorial as much as I enjoyed making it! Bo Bunny makes so many fun products and I'm happy they've added mixed media products to the mix! Here are a few more pic's of the project so you can see from other angles....
Some of the things I like to keep in my 'keepsake' boxes are odds and ends I find lying around the house...pop can tabs, old keys, buttons, broken bits of knick knacks and trinkets....(I have so many trinkets left over from older Bo Bunny collections. I put them in this box to use for projects like this).
I love that Bo Bunny now makes their Gem/Jewel packets by color,they are called Double Dot Jewels. I used some of their Aqua and Mocha jewels to decorate my treasure box. This is a design idea I had first seen on a project by one of my fabulous friends on the Bo Bunny Design team Ilene Tell. She had embedded her jewels into some texture paste on one of her projects and I just loved the look!
Another thing I love about all the new Bo Bunny mixed media products is the way the color change, almost chameleon-like as you change the view of the box!
I liked the way that the Gold Glitter Paste added another element of texture and shimmer to the tips of the petals and some of the trinkets. It looks white and creamy when you apply it, but after a few minutes of dry time it becomes sheer and super glittery!
I hope you enjoyed checking out my latest project and hope I've inspired you to give Bo Bunny's new mixed media product a try!
Bo Bunny Products used in this project:
~ Stickable Stencils: Brocade
~ Glimmer Mists: Gold, Bronze, Frost Blue
~ Pearlescents: Brilliant Blue, Chocolate
~ 6x6 paper pad: Rose Cafe (optional)
~ Various trinkets
~ Blossoms: Zinnia's (blue)
~ Wood Embellishments: Iron Works, Clockwork
~ Double Dot Jewels: Aqua, Mocha
~ Glitter Paste: Gold
Thanks so much for stopping by my blog today, I always appreciate all the sweet feedback I get from you lovely ladies, you make my day!


Wow stunning creation, love it, beautiful use of the products hun,
ReplyDeleteWishing you a very Happy Christmas and A fab New Year,
hugs Liz xx
This box is just breathtaking, Gabrielle and thank you so much for making the video!
ReplyDeleteDiane x
This is a great piece. Love it!
ReplyDeleteVery lovely!
ReplyDeleteThanks for the video, it was great to watch. I have not seen those pearl paints here yet. Will look out for them. Your box is beautiful.
ReplyDeleteOh wow, this looks truly breathtaking! I just love the jewels and the elegant feel to your project!
ReplyDeleteYou are so busy just before Christmas! Your box ist wonderful, great work, dear Gabrielle. I wish you and your family a merry xmas and a happy new year! Love from Germany! Lilli
ReplyDeleteGorgeous project!!!
ReplyDeleteOh my gosh, I am new to your blog and have been watching lots of your videos - all of your pieces are absolutely amazing and gorgeous. I will be trying a piece after the holidays - when I have time to sit down - although right now it seems quite intimidating! Happy Holidays.
ReplyDeleteWOW what a stunning box
ReplyDeleteMerry Christmas!! Thanks for sharing. Beautiful use of texture and color and the embellishments are delightful. Sigh.....
ReplyDeleteYet again you leave me speechless! Fantastic project and great tutorial! x
ReplyDeleteSo pretty Gabi!! Love all the colors and shimmers! On Christmas Eve my last project as Guest Designer for Unique Laser Designs will go live. It is a keepsake box that was inspired by your last one! You will be mentioned, not only because of that, but because I used your pretty lattice stamp from the daisy stamps! I would love to view the video tutorial on this one but we don't have unlimited internet. I have to either do it at the library in town or at my friend's house! Hopefully I can do that soon!
ReplyDeleteI hope you have a wonderful Christmas and Happy New Year! Hugs from, Elizabeth
Hi Elizabeth!
DeleteI look forward to seeing your project...I'll make a mental note to drop by your blog! Thanks for letting me knoe hon! xo
This is just gorgeous! Beautiful work!
ReplyDeleteoh wow Gabrielle, love this altered box and the steampunk look you've created!
ReplyDeleteHi again Gabrielle.
ReplyDeleteOh dear.. Now again repeating myself !! I'm in awe.... Again ! As I'm each time you share a project. Love your color choices, all the background. And of course a video makes it all extra superb !!! Thanks a LOT .
Hugs from Monica... Spain
Your colors are just beautiful Gabi, and I love the textured effect of the flowers.
ReplyDeleteGorgeous box, Gabi! Love the metallic look of it.
ReplyDeleteWow Gabrielle! That box is completely awesome! Gasp gasp gasp!! I'm super excited to try this one out! I just made my Gabi Pollacco inspired art pallette! Woot! your creativity inspires me to try new stuffs! Love love love your amazing talent!
ReplyDeleteoh so beautiful Gabi! your talent is awesome. I love this! I have to keep my storage boxes without embellishments because my sweet cats might too attracted to them - LOL!
ReplyDeleteWow, it came out so gorgeous! I just love all your videos - so fun to watch and I always get so many great ideas. (And thanks for the shout out :)
ReplyDeleteWow. That is so gorgeous. What great colors and texture.
ReplyDeleteAbsolutely stunning box. I wish i had all those bits of trinkets laying about. Beautiful.
ReplyDeletePaula (from across the pond)... xx
I love this! Absolutely Fantastic!
ReplyDeleteGabi, Such an amazing box. I love all the shimmer and the colors also. Have a great Christmas and I hope you get well soon TFS!
ReplyDeletebeautiful job as always Gabrielle I have a question though, when you are working with a canvas do you prime it with anything first? Thanks so much keep up the beautiful work! Francine
ReplyDeleteHi Francine,
DeleteIt all depends, if I'm glueing on strips of patterned paper first, then I don't prime. Otherwise yes, I usually work on a primed base (using Gesso). Sometimes I do my texture work first and then gesso on top of it all. Hope that makes sense to you?
Gorgeous!! Absolutely Gorgeous!! Thanks so much!!
ReplyDeleteWow Gabi totally stunning and fab! I so love watching your tuts. Keep the inspiration coming it does so much for my mojo.
ReplyDeleteHuggies!!!!
Oh my goodness Gabrielle, another master piece, I am so going to try something like this soon! How does one get into designing for Design Paper companies I would love to be able to work for/with DPs?
ReplyDeleteAgain thank you for giving me such inspiration!!
Merry Christmas to you.
Hi Sandy, thanks for your kind words! ...Most Scrapbook manufacturing companies put out yearly design team calls, where they ask people to apply with some samples of their work. There are some websites dedicated to announcing these DT calls, for example this one http://designteamcalls.com/page/2/
ReplyDeleteOr you can follow particular Companies you'd like to be on their creative teams, on Facebook and on their blogs. These design team calls are often announced there. Hope this helps! xo xo
Hi Gabrielle, thank you so much for the link and the information, I will follow it up shortly. Once Christmas is over and with a new year starting I would love to branch out into something different and your blog is so full of inspiration, enthusiasm and a love of what you make, I can't help but be inspired too! Thank you again xx☺️
ReplyDeleteHi Gabielle, thank you so much for the link and the information I will check it out soon. Thank you for the inspiration, enthusiasm and love you put into your blog, again thank you...
ReplyDeleteWow! That box is gorgeous! Thank you again for your wonderful inspiration and ideas.
ReplyDeleteI love all your ideas and the fact you just go for it and your finished project always looks stunning. I watched the video and wondered what the glue was you used to stick the metal and wood findings on with please?
ReplyDeleteTfs
Sylvia
Hi Sylvia, ...I used Beacon 3 in 1 adhesive, its got a super strong hold. I got it at my local scrap store. I would imagine they would have it at Michaels as well. ;)
DeleteThank you. I really must go for it and colour that canvas I made sometime ago - I have been too afraid to start painting and spraying it.
ReplyDeleteSylvia
beautiful project, thank you so much for sharing it, real inspiration, Yvonne Tune
ReplyDeleteStunning, stunning project! Just beautiful! Best wishes to you and your family for a super 2015! xx
ReplyDeleteWhat a gorgeous project Gabi! Love watching the tut. Thanks for the inspiration. Keep it coming.
ReplyDeleteHuggies!
The following quote is a very sarcastic joke: "Piece of cake. I can make this in my sleep!"
ReplyDeleteJust kidding! Lol I am attempting a keepsake box from this tutorial with my own spins, aND as awesome as this tutorial is, my spins aren't working out so well. Lol I will post the outcome on www.scrapbook.com username jessica.jrm22
:-D