Pages

Friday, March 27, 2015

Garden Journal Cards {Bo Bunny & Tresors de Luxe}


I'm just crazy in love with this beautiful new collection by Bo Bunny called Garden Journal!  It's so easy to create pretty cards using the patterned papers like 'Notebook', "Journal' and 'Postcard' to create whimsical cards.  I purposely left the type of card as blank so that I can use them for whatever purpose arises.


For this card I used some leftover 'Wonder' paper as my card background, then I layered a couple of the postcard designs from the 'Journal' paper.  I then added a bloom cluster from Tresors de Luxe, really sweet handmade blooms from my friend Lucy's etsy shop! (thanks Lucy!!).  And I finished with some natural hemp twine and some coordinating buttons from the Garden Journal collection. 


For my second card I used some paper from the Garden Journal 6x6 paper pad (green) as my background.  I had some leftover paper from a project I recently did using the weathered wood design from Bo Bunny's Heritage Collection called 'Register', I cut out a few of the wood planks and put them on the card with foam adhesive dots, laying them on in an uneven pattern.  I then layered on some images from the 'Notebook' paper from Garden Journal.  Again I used a little natural floral cluster from Tresors de Luxe, some natural twine and another coordinating button from the Garden Journal collection.


Products used in these 2 Cards:
Patterned Paper:  Garden Journal/Wonder, Notebook, Journal, Pastel, Heritage/Register (Bo Bunny)
6x6 Paper Pad: Garden Journal (Bo Bunny)
Garden Journal Buttons (Bo Bunny)
Blooms: Tresors de Luxe
Other: cheesecloth, hemp twine

Thanks so much for stopping by my blog today! These gorgeous Bo Bunny collections are in stores now!  And if you are looking for beautiful lace, trims and blooms, have a peek at the lovely offerings at the Tresors de Luxe Etsy Shop HERE.   We have the Maple Syrup Festival this weekend, hope the weather won't be too cold to have some fun!  Have a great weekend everyone!


Wednesday, March 25, 2015

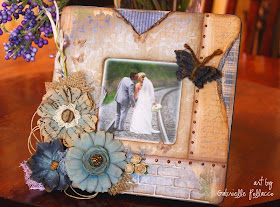
Tattered Frame {Maja Design}


Hi there! I thought it would be fun to share with you today a frame I made using the Maja Design Walking in the Forest collection papers.  I have to say this collections is an old favorite of mine, I love the tattered, worn look of the papers.

  Walking-in-the-forest-P

I began by picking up an inexpensive unfinished wood frame at a local craft shop (Michaels).  It cost me only $1.50 (I love me a good bargain!)  I then had the daunting task of choosing which papers I wanted to use to create my frame.  I say daunting because there are so many gorgeous papers in this collection that I had a hard time choosing which I wanted to put together.

Tattered_Frame_Gabrielle_Pollacco_Maja_Design_Closeup2While I was shopping for my frame I came across these pretty tattered looking blooms (Recollections brand). When I saw the colors I immediately thought of the papers and colors in the Walking in the Forest collection.  I just love those faded denim colors and the worn craft colors.  I added a little hemp twine and some bits of burlap to finish the rustic look.  While I was digging around in my papers I came across this bit of brick mortar chipboard (left over from a brick design I had done a little while back)....well, you know me, I try to use everything...so I thought it would be nice to add a little texture to the frame by gluing on this bit of leftover chipboard.

  Tattered_Frame_Gabrielle_Pollacco_Maja_Design_Closeup1

Included in the floral package was this cute triple layer butterfly!  I also did a patchwork design on this frame so that I could use a variety of the patterned papers in this lovely collection.   I used some Bronze metalic dimensional paint to add 'rivets' to the cut edges. I also used a little water on the edge of the paper so that I could gently pull back the edge to reveal the Flannel Shirt paper.

I hope you enjoyed my project today.  I'm often asked where do I get my inspiration.  I often pull my inspiration from the products I work with. In this case I saw the blooms and my mind begins thinking about what papers would look nice with these, and what design  or project could be made with this.

Thanks for stopping by my blog today, and thanks so much for all the lovely feedback....I say it a lot but I mean it, you all make my day! xo xo


Monday, March 23, 2015

NEW Kit Page! Masculine/Romantic {The Scrapbook Diaries} PLUS a NEW Stamp!!!


Spring is on it's way (hard to tell here today, the temperatures are still below zero), but I know that lots of people have wedding anniversaries coming up.  So I thought it would be nice to scrap a Kit Page for The Scrapbook Diaries that would work nicely as a romantic page or can be adapted to use as a masculine page as well (lots of fun chains, clocks, cogs and gears in this one!  I also thought it would be fun to use a very cool mixed media background paper.  I've always wanted to try playing with Tim Holtz inks and embossed resist papers.  The background design was created using 2 Tim Holtz distress inks (included in the kit) and a KaiserCraft embossed resist paper.


There is loads of yummy chipboard in this kit, and in the video tutorial (which you get unlimited access to with the purchase of the kit), I show you how to get this verdigris/rust patina on the chipboard pieces.


I chose very rustic looking blooms for this page (burlap and metal) so that they would not look out of place even if you were to use an all masculine pic for this page.


There are some really awesome accent embellies in this kit as well, I just love those sugar dots, the splash of color they add to the layout is even more shimmery in real life!


As always the kit comes with a full VIDEO TUTORIAL to which you will have unlimited access to (with the purchase of the kit).  Just follow along and recreate this page or tweak it to suit your own tastes.  You can find this kit today at The Scrapbook Diaries HERE.  (It's available as a Basic or Complete kit, depending on whether you need the inks etc....Janene likes to help you save where you can :)   Be sure to check out the Scrapbook Diaries Blog as well to see the gorgeous bonus page that Janene Meyerowitz created for the kit as well, this is a Stunner! (love the way she incorporated the butterflies and the way she used the Tim Holtz inks!)

Before I close off today I wanted to share another bit of exciting news with you all!  I have come out with another stamp set!  This is another texture style stamp set!  Being a scrapbooker myself I know the type of stamps I would like to play with, so I got to work sketching out some texture designs....I did a peeled paint finish, a crackle design and a chicken wire design, as well as a barb wire strip!


Have you ever been in a hurry when making up a project but didn't want to scrimp on design?  I thought the crackle and peeled paint designs would work beautifully to add a nice textural element to your chipboard pieces!  And chicken wire, who doesn't love a bit of that on their pages, right?  And I thought it would be nice to add a barbed wire border design to the stamp set to round it out, so I hand drew out a barbed wire design to be used on masculine style pages (not that you can use it on a feminine page as well, lol).  

You can find my stamp set at The Scrapbook Diaries HERE!  And and update on my first texture stamp set (the water droplet/brick set), Janene completely sold out of this set and ordered a new run of them, so they are now again available in her store as well! NOTE:  There has been some confusion in the past as far as shipping rates on my stamp sets.  Here is a quote from Janene on how to go about ordering stamps for International customers.....

International Customers…
Shipping of 1 stamp set is $8.88 (Canada – a bit less for you). Shipping of 2-5 stamp sets is usually $11.48.  If interested in the kit and stamp set, shipping will general be about $18.50.  You can email us for a price quote (please specify the items you wish to purchase and where you are located) or you can place order and click – “Bill me actual shipping”. Once we have your order filled, we will email you a Money Request form PayPal for the specified shipping (all shipments sent via US Postal Service).
We made this a bit easier for you when it comes to finding the various products Gabrielle has created for us:
  • Available Kits (these are full kits still available for purchase)
  • Gabi’s Products (you can find all my stamps here in case you want to take advantage of shipping pkg)
  • Video Tutorials (these are the video tutorials only, for past kits that I've created)
Thanks so much for stopping by my blog today!  I always appreciate  and read all the kind feedback and hope to answer any and all questions. xo


Saturday, March 21, 2015

Combining Collections {NEW Bo Bunny}

Scrapbook page by Gabrielle Pollacco using Bo Bunny's Garden Journal collection mixed with Heritage, Star-crossed and Sweet Life

Sometimes I like to just stick to one collection and use all the embellishments made to coordinate with the collection. It makes a page design come together easily.  But other times I like to play around and pick a bit of this collection and a little of that!  That's what I did with this page.  I used a wood panel paper from the Bo Bunny Heritage collection for my background paper.  Then layered a paper called 'Gratitude' from the Garden Journal collection. I then used other papers from the Garden Journal collecton for my matting and coordinated with embellishments from the same collection. Then I wandered over to the Sweet Life collection by Bo Bunny and picked out a butterfly from the Noteworthy die cut pack to add as an extra embellishment to this page.


I used film strip sticker from the 12x12 sticker page from Garden Journal to create a horizontal page design.  This shot shows products from 4 collections (Butterfly from Sweet Life, woodgrain paper from Heritage, Stickers, chipboard stickers and papers from Garden Journal and alphabet stickers from Star-crossed (LOVE those alpha stickers!). 


I went with the greens and neutrals from the Bo Bunny Blossom collections to embellish around my photo.  I also added a hemp twine bow and some bits of cheesecloth to add to the tattered look.

Bo Bunny Products used on this Project:
Patterned Paper: Heritage/Register, Garden Journal/Wonder, Gratitude,Pastel 
6x6 paper pad: Garden Journal
12x12 Sticker Sheet: Garden Journal
Combo Sticker: Star-Crossed (alphabet Stickers)
Layer Chipboard: Garden Journal
Noteworthey: Sweet Life, Garden Journal
Jewels: Double Dot Emerald Jewels, Primrose
Blossoms: Clover Bouquet, Clover Dahlia, Natural Earth Zinnia
Stamps: Distressed Textures, It is Written

Other products: 
Wyncinanka Wood embellishments
Tim Holtz Distress Paint: Victorian Velvet, Bundled Sage
Hemp Twine
Cheesecloth

Hope you enjoyed my project today! And hope you all have a lovely scrappy weekend!  Thanks so much for all the sweet comments and feedback! xo

Friday, March 20, 2015

A Labour of Love


This is a layout from my early days of scrapbooking, (really early!)....back then even my editing skills left a lot to be disired....I would take a scan of half the page and then the other half and then try and link the two sides together with my editing software (It's not hard to see where I linked them up! LOL)....so happy we now have digital cameras to take pic's of the layouts!  

Recently it was my parents 57th wedding anniversary, so I had the idea to put a bunch of the layouts and photos in a video clip for them (I burned it to a disc as well for them).  This way they can see a scrapbook of themselves and their kids (my brothers and sister) and their grandkids as well without having to lug out some heavy albums.  Here is the video I made for them....


Ya, it's a 19 minute video, mainly meant as a gift for my family....but all are welcome to see.  I have to smile at some of my first attempts at scrapbooking mixed into this montage :)

Thanks for stopping by my blog today!  Hope you all have a wonderful weekend! xo xo


Wednesday, March 11, 2015

Getting Grungy with Dusty Attic and Maja Design


Hello my friends, I've got a fun layout to share with you today some of my all time favorite Maja Design papers, and a cool technique that I used on my Dusty Attic Chipboard!  As many of you already know about me, I'm a mom of two girls, so most of my scrapbooking is done in a feminine style.  But recently a friend of mine sent me a whole bunch of photos of her children that she wanted me to scrap. Although she has beautiful little girls, she also has an adorable little boy! So I was thrilled to have the opportunity to do a masculine 'boy' style page.

  Walking-in-the-forest-P
When I saw the cute little plaid shirt that her son was wearing in the pic, I immediately thought of the perfect 'Flannel' shirt and 'Jeans' papers from the Walking In the Forest collection.  I added in some of the clock elements from the Vintage Autumn Basics collection and I had some lovely papers to get started.


Dusty Attic Product used on this page:
- String Circle frame set (small)
-barb wire #2
- Zippers
- Jumbo Cogs
-  Cogs #1
- Nuts and Bolts
- Chicken Wire Panel small
- Word Pack #6 (not shown above) Title
- Dusty In Color: Hot Chocolate, Sunburnt Orange, Gingernut, Raisin
-Rusting Powder

I used a variety of Dusty Attic product for this page design including some of their paints and their very cool Rusting Powder.  I actually created this page kit for a special retreat that Jennifer Hedger (owner of Dusty Attic) and a bunch of the lovely ladies in Australia have been on for the past few days.  Sadly I was not able to make the time to join all the sweet ladies in Australia for this retreat but I was happy to create this page kit for them to enjoy as part of their fun little getaway!  I believe Jennifer will be offering this kit to the public when she gets back from their retreat....(I'll keep you all posted on that).  

  closeup 1

All the chipboard I used on this page is from Dusty Attic Designs.  I had a lot of fun with my chipboard pieces.  I thought I would go for a nice rusty finish....they look like real rusty metal don't they!  What I did to get this effect is first I painted the chipboard pieces with some Dusty Attic paints (Hot Chocolate, Raisin and Gingernut), I kind of dabbed on the colors with a sponge dauber, randomly placing my color.  While the paint was still wet, I sprinkled some Dusty Attic Rusting Powder over sections of my chipboard, allowing some of the paint color underneath to show through. This gave my pieces a nice mottled look.  The next step in rusting is to take a spray bottle and put some white vinegar in it....spritz your pieces with the vinegar, then allow your pieces to begin rusting. The process takes about 20 minutes to a half hour.  I sped up the process a bit by hitting it with the heat gun. I also dry brushed some Dusty Attic Paint in Sunburnt Orange over a section here and there to get an even more mottled rusty look to my pieces.


Here is another close-up of the rusted chipboard pieces.  I also tucked in clock cut outs from the Vintage Autumn Basics (XVI) collection, applied with some foam pop dots and then used some Stickles (Platinum) around the edges of the clocks.

  closeup3

I created the rusted ruler by cutting out a strip of chipboard and then using some of my homemade texture paste and the Tim Holtz 'Measured' stencil on it.  I then painted the piece and used the rusting powder on it the same as I did for the other chippies. I also made use of a Crafters Workshop stencil, appropriately named mini 'Specimens' which I used to create more design behind the photo on the 'Jeans' paper.

Another design element I went with was the zipper opening.  I used this twice on the page, at the top right corner of the page and a small 'V' cut in the 'Flannel Shirt' paper on the right side of the photo. I just cut a little tear into the papers and inserted another Dusty Attic chipboard piece into the groove (Dusty Attic Zippers)....I treated these pieces with some metalic paint as well.

  closeup4

I took one of the chain chipboard pieces and gently bent it to get this curved hanging chain look.  I painted the piece with some bronze dimensional metalic paint (Scribbles) and then added a bead of the 3D paint along the straight lines of the chain to give more of a 3D look to the chain.

Oops, how did that lace get in there?! LOL....well, at least I resisted adding blooms right?  So there is my take on a masculine 'boy' style page.  Hope you enjoyed seeing my project and that I've inspired you to scrap the boys/men in your life. xo


Monday, March 9, 2015

Together - NEW Video Tutorial {Dusty Attic Chipboard and Shimmerz Paints}


Hello friends! I'm so happy to be sharing with you today a page which was my 'attempt' at doing a 'white space' page.  I often admire the look of the layouts that utilize only a small portion of a page but do it in such a way that the eye is drawn right in to the photo.  I, being  an over embellisher find that my attempts at this style does not always come out as I had envisioned!  In this case I think I came closer to what I was envsioning so I guess I should be happy with that. (maybe next time I'll start with a smaller photo?)


Here are the lovely Dusty Attic chipboard designs I incorporated into my page.  Some you may not recognize because I chopped it up a bit and used small pieces of it (Vine Corner). 


I designed this page using the Dusty Attic's March Inspiration Board as a jumping off point.  Every month Dusty Attic has a great challenge (with prize!) going on centered around their Inspiration board.  Just create a page using Dusty Attic chipboard utilizing the colors and moods set on the inspiration board for the month. 


These are the Shimmerz products I used to create this page, using the Dusty Attic Moodboard as my color inspiration. **Pleas NOTE: I said in the video that I used "Bamboo Leaf" Spritz, when it should have said Olive Branch...sorry about that!**   Here is a full step by step video tutorial I created on how I made up this page. Enjoy!


I hope you enjoyed watching my video tutorial!  I've got some close-ups of the page for you to view at your leisure below....


I used some of the Punked Up Purple Spritz to add a soft hint of color to my Rodanthe Blossoms from Prima.  I always love a nice white blossom that you can change up to match your page with just a few dollops of color!  I've got to say, that Dusty Attic frame (Decorative Scroll #1) has to still be one of my all time favorite Dusty Attic pieces!


Another design technique I really like to use in my work is laying down a couple of layers of color with my Shimmers mists and then stamping on top of it. In this case I used a well used stamp I have from Bo Bunny called 'It Is Written'.   The pretty Moroccan looking chipboard is a piece from Dusty Attic called Marrakesh Trellis panel.....and the circle frame is an old favorite of mine called Decorative Scroll #1.


I did a little bit of fussy cutting from a labels paper I had from the House of Roses paper from LemonCraft. The title sticker is a Heidi Swapp epoxy sticker.


To achieve a shabby chic look, I like to first paint my chipboard pieces white, then do some random stamping in black using an archival ink (so it doesn't run when you hit it with other mediums).  I used my Paris/Beauty stamp for this. Then I rub a little brown chalk ink along the edges of the chipboard to give it a well worn look. Finally I add a coat of Crackle Varnish.


And I don't want to forget to talk about the yummy tinted texture paste used here, it's the gorgeous green color of Texturez called 'Artichoked'.  I used this with a Tim Holtz Harlequin stencil, I think it adds a nice festive touch, don't you?

I hope you enjoyed today's project, I had a LOT of fun making it!  Remember, if you are looking to purchase Shimmerz Paints products, DONT FORGET TO MENTION MY NAME 'GABRIELLE' in your 'Instructions to Merchant/Seller' part of your order to receive a FREE/Bonus Shimmerz product in the color of your choice!  You can find the Shimmerz Paints online store HERE.

If you would like to play along with the Dusty Attic Inspiration board challenge, be sure to post a pic of your layout at the side panel of their blog using their link button.  A good reason to play along?  How about a $100.00 Gift Certificate to spend in their online store?!  Hope to see you play! xo
Thanks for stopping by my blog today, your kind words and feedback always make my day! xo xo


Sunday, March 8, 2015

Whimsical Party Favors {Bo Bunny Garden Journal & Flutter Stamps}


Hello everyone! I'm excited to share with you today a fun party favor project I made using the NEW Bo Bunny Garden Journal collection and their NEW Flutter Stamps!  We have a big wedding anniversary party coming up for my parents next weekend (their 57th anniversary!) and I thought it would be fun to prep some whimsical party favors (Chocolate flavoring spoons for stirring into coffee or hot chocolate) using the new Flutter Stamps and the Garden Journal collection.  

Party Favors by Gabrielle Pollacco using BoBunny's Garden Journal collection and new Flutter stamps.

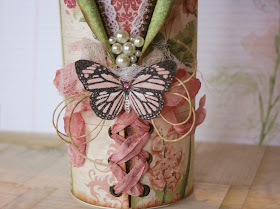
I started out with this empty Panko tin I had saved (I don't throw out these nice smooth sided tins, I find they are great for off the page projects).  I began by painting the rim of the tin with some Gold Pearlescents to give a nice shimmery edge to the tin.  Then I glued a section of the Garden Journal 'Wonder' paper directly to the tin using a combination of white craft glue and water. I then cut out a piece of the Garden Journal 'Notebook' paper to perfectly fit around the tin.  I really wanted the curled out part of the paper to be green (the revers of that paper is blue) so I first glued on a little section of the green floral paper from the Garden Journal 6x6 paper pad....then I curled back the two top corners.  I added 6 metal eyelets and then adhered this paper panel to the tin, tying up the corset design with some crinkle ribbon.  

Party Favors by Gabrielle Pollacco using BoBunny's Garden Journal collection and new Flutter stamps.

I added some lace (and a chipboard zipper) as well as some pearls and topped the design with a butterfly embellishment I made using the new Flutter stamps.

embossed butterflies using Bo Bunny Flutter Stamps

I made my butterfly embellishments by stamping one of the butterfly images onto one of the green floral papers from the Garden Journal 6x6 paper pad, and the pink one's were made by stamping onto the Garden Journal 'Wonder' paper.  I added a shimmery black, gold and amethyst embossing powders.  I added a little jewel from the BoBunny jewel packets for the heads and cut out each embellishment.


Next I prepared my favors by laying out some plastic spoons, melting some semi-sweet chocolate and a couple drops of oil and pouring it into the spoons.  I decorated with some colorful sprinkles....


I then wrapped each spoon with some plastic wrap and decorated with one of the embossed butterfly embellishments

Party Favors by Gabrielle Pollacco using BoBunny's Garden Journal collection and new Flutter stamps.

I set them all in my embellished tin and my little project is finished!

Bo Bunny Products used in this project:
Patterned Paper: Garden Journal/Wonder, Notebook
6x6 Paper Pad: Garden Journal
Pearlescents: Gold
Stamps: Flutter Stamps
Jewels: Think Pink, Emerald, Mocha

I hope you enjoyed my 'off the page' project today and hope I've inspired you to play with Bo Bunny's new Flutter stamps Garden Journal collection!

Thanks to all who come by my blog and leave your kind 'rays of sunshine' behind, I appreciate all the lovely feedback on my projects! xo

Saturday, March 7, 2015

Take the March Maja Mood Board Challenge!


Have you ever played in the Maja Moodboard challenge?  Each month Maja Design puts out a beautiful Mood board, a design idea that is meant to spark your creativity in your own crafting projects.  You are given an inspiring photo, a color inspiration, a quote and prompt words that will help you to create a beautiful project.


Here is this months (March) mood board. Loving the pretty, feminine color combination of brown and pink! I really love the quote too, there is something cozy and yet happy about it at the same time!


For my card I layered a bunch of the patterned and plain papers from the Summer Vintage Basics collection and made a homemade bloom from some of the papers as well. I used another piece of Tattered Angels Glimmer Glass (the owl) from some old stash I had sitting around and added a Webster's Pages cameo to the center of the owl.  The frame/Moroccan background die is a new die from Bo Bunny.  The clocks were cut from a paper called XVI from Maja's Vintage Autumn Basics collection.

If you would like to have some fun and play along you can find the full instructions to enter the challenge at the Maja Design Blog today.  Come join the fun, there is a full Maja collection pack (in the collection of your choice) up for grabs each month!

Thanks so much for stopping by my blog today, hope you all have a fun scrappy weekend! xo