

I made this layout using the new Webster's Pages Winter Fairytales collection. The die cut paper, the netting (butterfly design netting), the bloomers, the new trims (pink velvet/sheer ruffle), the gold lace trim, the Gems (beside the journaling) and the alpha's are all from the Webster's Pages new releases from this summer's CHA. Every month Websters Pages picks a person to feature their body of work, this month it is Nerrida Mitchell, and the design team is asked to make a project up that is inspired by the designers work. The above page is my l/o inspired by Nerrida, I like the use of bloomers and bloom/butterfly embellishments on her page. If you would like to see more of Nerrida's beautiful work and the rest of the DT's take on her work you can find the forum thread HERE.
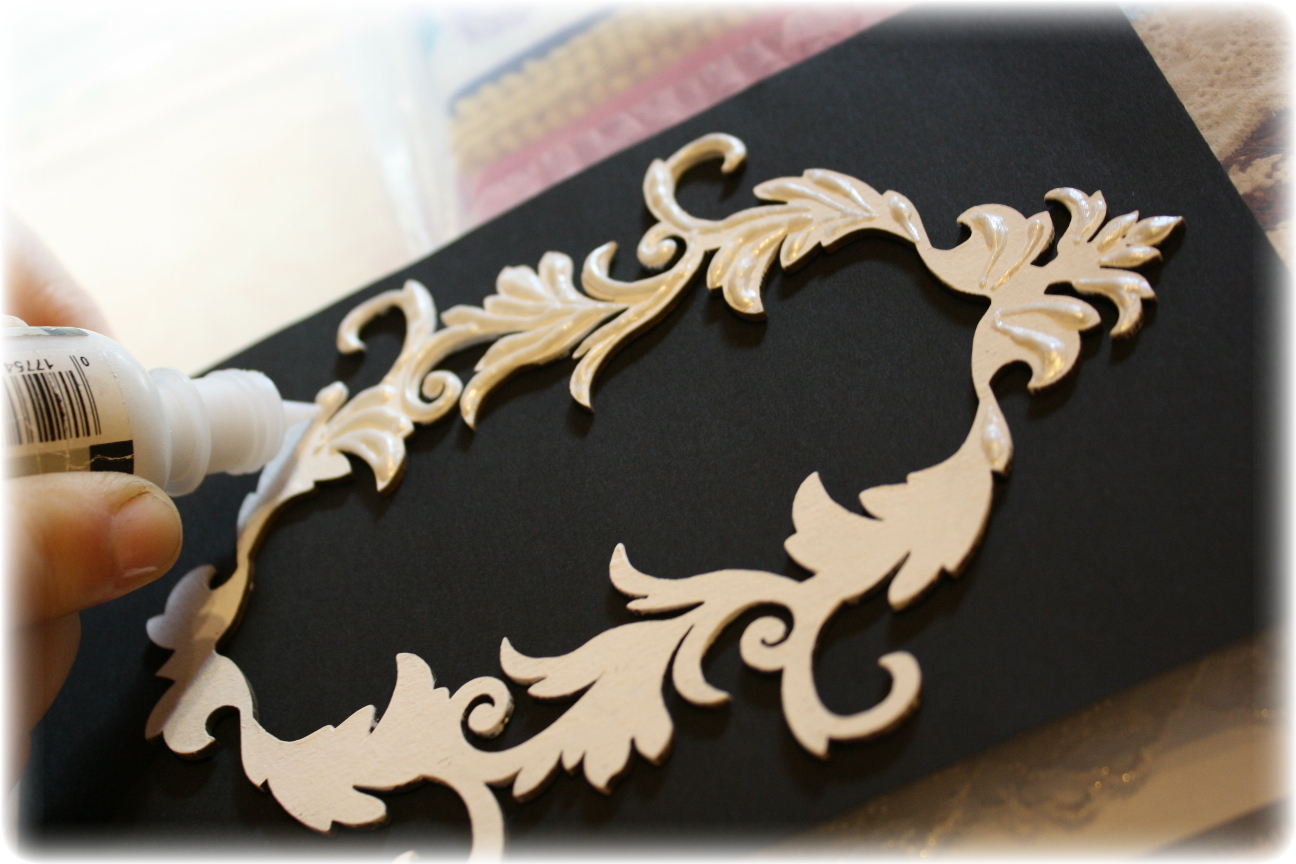
I also used one of Dusty Attic's Ornate frames on this layout and thought I would try to get a the look of a carved or molded frame on it by adding some pearl white 3D paint. Here are a few easy steps in achieving this look.
Step 1 ~ Paint entire frame with a base coat of white craft paint.
Step 2 ~ Following the design of the laser cut piece, add swirls of white/or pearly white 3D paint (I used a brand I bought at Michaels Craft shop called 'Scribbles', you can find it in the T-shirt section of the store)
Step 3 ~ I added a touch of Colorbox brown chalk ink to the edges of the frame. Done!

Here's a close-up look at the embellishments on my layout....


I want to take a second to thank you all for your thoughtful and kind comments here at my blog and I want you to know that I read your comments and would like to answer some of your questions. Tracy asked in the last blog post how I made the cardstock design around my layout called 'Natural Beauty'? The postage stamp design is actually the shape of the die-cut from Websters Pages. I simply matted the die cut paper with some darker pink cardstock and trimmed the cardstock following the design of the die cut with a pair of regular scissors. Sometimes you can get away with using just one sheet of cardstock if the die fits within the perameters of the 12 x 12 cardstock. In this case I had to do it in 2 pieces to fit around it. (I cut out the center of the cardstock behind the piece and use it to matt photo's etc. I don't like to waste) Tracy also asked about my layout in the post before that one called "Chloe & Zoe' , she wanted to know how I made the wavey edge on the patterned paper. Super easy Tracy, it's just a wavey edged scissor that I got at my local craft shop. I find myself using decorative scissor's a lot lately. They are inexpensive ($2-$3.00 at Michaels) and can add an easy and interesting edge to a page. Hope this answers your questions. If anyone ever has questions that about any of my layouts, don't hesitate to ask and I'll do my best to give you a clear answer. :)

Wow! I would have never thought to use 3-D paint. I was wondering where you got that frame. I thought it came that way! Your layouts are so elegant and pretty. And I love how you use your creativity and everyday tools to achieve this look. Thanks for sharing! :-)
ReplyDeleteSuch great textures!
ReplyDeleteOh my gosh this is stunning and what you have done to that frame is awesome.......Love this
ReplyDeleteSo perfect!
ReplyDeleteThe frame is truly beautiful! Love what you did!!!
great!
ReplyDeleteexquisite.. elegant .. stunning... feminine...beautiful....
ReplyDeleteSo absolutely gorgeous (as always)! I am always amazed at how many different ideas you come up with! I never would have thought of 3D paint--will have to give it a try.
ReplyDeletegorgeous layout and photo....and the DA looks amazing :)
ReplyDeleteMY GOODNESS..you always do stunning work..this is just beautiful..Thank you for another wonderful tutorial. xx
ReplyDeleteJust fabulous and so inspiring,
ReplyDeletethank you !!!
love and hugs
chris richards
xxxx
That is such a beautiful page what you did with the Dusty what a great idea.
ReplyDeleteThank you for the insiration
Wow! Once again you made a layout that is so full of pretty details and wonderful colours. You can easily see how much love you put into making this page about Chloe. It's absolutely gorgeous!
ReplyDeleteOMG Gabi I have to say that the first thing that came into mind when I saw this was: this is not a scrapbook page this is ARTWORK ! You are an artist my friend !
ReplyDeleteDear Gabrielle, you're so very nice, kind and loving that there's no surprise you've got such HUGE talent and such beautiful daughters. Only a very good person can be so gifted))) I love your works so much, they're pure magic.
ReplyDeleteWhat a stunning layou!!! TFS your tips and tricks!!
ReplyDeleteHello,
ReplyDeleteI´m Isa of Spain. My English isn´t very good .. Now I´m in love !! Your blog is BEAUTIFUL !! Wowwwwwwww
Absolutely gorgeous, amazing textures and details. Love your idea of the 3D paint on the diecut. TFS
ReplyDeleteThe detail on your work is just beautiful! You are a truely talented lady!
ReplyDeleteWow, another stunning creation Gabrielle. I love the shape and the frame is fabulous. Lee xx
ReplyDeleteOMG...I am always amazed & awed by you! Love all the details and textures. I would love to know how you store your creations once you've finished with a layout.
ReplyDeletehugs,
Stephanie
What a GORGEOUS layout!!! Wow, very inspirational!
ReplyDeleteGorgeous lo Gabi, as always! I always love your color combos. At first I thought the frame was a resin! Brilliant idea with the Scribbles...can't wait to try it.
ReplyDeleteI was wondering, where do you get all the gorgeous butterflies you use on your lo's? Do you add their antennae? They are so delicate and lovely. TFS your art and tips!!
Ann Marie
I have just come across your blog for the first time and I am totally knocked out by your work. It is just amazing. So gorgeous. I will definitely be visiting on a regular basis to see all of your wonderful creations.
ReplyDeletewowsers this is so stunning my friend love what you have did with the frame
ReplyDeleteIt´s just gorgeos! Ans thank you for sharing the frame idea, such a beautiful effect!
ReplyDeleteHoly Cow girl!!! It doens't get any better than this!!! Gosh, you just keep turning out these amazingly detailed paged with touches that only you can do!!! This is just gorgeous my friend! Beautiful!!!
ReplyDeleteAbsolutely stunning, Gabi... WOW!
ReplyDeleteAlicia
So beautiful...
ReplyDeleteFantastic layout!
ReplyDeleteI'm going to have to add myselt as your follower so I can see more of your work (than just Bo Bunny)!!!
Charlotta / Sweden
A truly amazing page touched by the Gabi magic! love what you did with the DA frame, looks absolutely fantastic! could have sworn it came that way. 3D paint huh! Awesome details as always, love every single itty bitty element so so elegantly pulled together into this stunning layout! xoxoxo
ReplyDeleteDear Gabi,
ReplyDeleteyour site and your works are so lovely!!!! Thank you for sharing us this beautifull creations!!!
If you may, I have stardet my kreative Website since Juli 2011. Please take a look! Many Hugs from Marina
Bettyscardsandpaperdesign.com
Just beautiful!!! And such a great tutorial.
ReplyDeleteStunning! So much detail. You are sooo talented
ReplyDeleteY0ur los are always amazing and so beautiful and thank you for always sharing tip and tuts. I find myself using a lot of your tuts!!!
ReplyDeleteyour work is always amazing and very useful for getting a great idea. A truly amazing page touched by the Gabi magic! looks absolutely fantastic! The details also awesome.
ReplyDelete