Pages

Friday, June 22, 2012

Mixed Media fun with Bo Bunny! Template & another Video tutorial!

I'm so excited to be sharing with you another mixed media canvas I made up!
This one was for a "Field Trip Friday" assignment over at the Bo Bunny Blog (this is actually the first canvas I made up, they just got posted in a different order lol!)  The idea of 'Field Trip Friday' is to try something new that is different from the norm for you.  As I mentioned on my last field trip Friday post, I tend to be a 12x12 layout kinda gal so last time I did an OTP (off the page) project, and this time I did a mixed media canvas.  I used 'Gabrielle' collection papers for the background of the canvas (you can watch the video posted below on how I applied it all) and I used papers from the 'Little Miss' collection for the couture figure as well as some Bo Bunny Stamps and Rub-on's (Country Garden).

The quote I used for this one is...

"She turned her can'ts into cans
and her dreams into plans"

I got the quote...guess where?  Yep! Pinterest! ha! love that place!  I've got lot's of quotes saved on my quote board there if anyone is looking for some quote inspiration, you can find my Pinterest boards HERE.  The figure design was inspired by the book "Collage Couture" by Julie Nutting.  Here are a few close-ups of the page.... 


Below I've posted a copy of the template I drew up from the couture figure I sketched out if any of you would like to play with it!  So much fun picking out papers to create the cloths!  Try to keep the paper for the body in a neutral design (in the book I read the auther uses book print paper for the body, so cool!)    So you can just right click on the picture below and 'Save Picture As' to your computer, then print out the design on a piece of 8.5x 11 inch standard paper.  Cut out the pieces and trace them onto the patterned paper of your choice! and have some fun! xx
Okay....so here is my Video Tutorial on how I put this mixed media canvas together, I hope you have as much fun watching it as I had making it! xx


Thanks for stopping by!  Hope everyone has an amazing weekend! xx

Thursday, June 21, 2012

Mixed Media Canvas (With a Video Tutorial!!)

I've really enjoyed dabbling with mixed media designs lately and although I've done some mixed media designs on my scrap pages I thought it was time to try out a mixed media canvas! And I'm so excited to share with you the step by step video I prepared to share with you how I put this project together!!  I've been reading books on mixed media, exploring different techniques and one that I just have to give a try was this couture figure mixed media design.  I was at Chapters over the weekend and had picked up a book called Collage Couture by Julie Nutting, so I would say this is where I drew much of my inspiration for this canvas design I made up here.  For this mixed media piece I used a whole lotta Websters Pages In Love collection papers and some Dusty Attic Chipboard as well.
I first began by sketching out a figure on some paper and then sketched out a dress design.  Below is a picture of the sketch I made... 
I then layed a piece of white paper over my sketch and began drawing out the individual pieces that would make up my couture figure.  Below is my template for the figure..... 
I know that sketching doesn't come easy to everyone so if you are not up for drawing out your own figure, you are welcome to print off the above template to make up your own couture figure.  If you right click on the picture above and 'Save Picture As' to your computer, you can print out the template and cut out the shapes to make your own couture canvas.  Just print it out on an 8.5 x 11 inch piece of paper, cut out and then trace the pieces on the patterned paper of your choice.  ....Here are some close-up photos of my finished layout (You can watch a video below and see how I put the whole canvas together).... 


The quote I used for this one I thought was fitting because of the playful movement of the figure I drew up, I found the quote on Pinterest.....it says....
"There was something in her movements that made you think
that she never walked but....
Always danced"
So, grab yourself a cup of coffee and enjoy a little video I put together showing a step by step on how I put this mixed media canvas together, I hope you enjoy it!


Mixed Media Canvas with Gabrielle Pollacco from Gabrielle Pollacco on Vimeo.
I'd like to take a moment to thank all the kind people who leave their sweet comments here at my blog, I read them all and really appreciate them....sometimes the comments are annonymous or they don't link back to your blogs so I can't always respond,  but I'd like to say how much your comments mean to me, thank-you!

I'm making a  series of these canvas's as wall decor for my scraproom (I've got another one to share with you all tomorrow!)  Hope you'll come back for a peek! xx

Tuesday, June 19, 2012

Making a Gift for Family...

A little while back my nephew sent me a whole bunch of beautiful engagement photos of him and his beautiful fiance (now, just recently, his wife!)....I just now had a little time to start putting together some layouts with them.  I plan on doing a few of them and framing them as a gift for them.  For this layout I used some of my all time favourite chipboard pieces from Dusty Attic, the Baroque Frame - Square, the Hinges and the Sentiment words (Love)....and of course the perfect papers for this photo was from the 'In Love' collection from Websters Pages!  The quote I used here I thought so perfectly reflected the photo, it says
"There is only one thing I want to change about you" he said, "Your last name"

Here are a few close-up shots of the page.   
Each month the Websters Pages design team gals are asked to do a project that is inspired by the Guest designer for the month, and this months guest designer is Jennifer Gallacher, she has a beautiful clean style of scrapping (a bit different from mine lol!) but I really loved this cute handmade embellishment she added to her page, it was a folded pin-wheel design (You can find Jen's layout at the Websters Pages Inspire Me site), so I used that as my inspiration to create the folded fabric blooms on this page (above).  I shared a tutorial a little while back on how to make these folded blooms, if you want to check it out you can find it HERE

And here are some pic's of the Dusty Attic Chipboard pieces I used to embellish this page..... 


While I was working away at some layouts I just couldn't resist playing with some of the NEWEST Dusty Attic chipboard pieces!  There is a new collection of Bamboo designs in the May/June release, as well as a cute new Flourish #8 and a new Hanging Sign #2 (I also used some of my favourite Chicken Wire Panel chippies and the Grass Cluster #1 chipboard pieces.......

The photo's I scrapped here were some I took a few years ago of my youngest daughter Meagan playing mini-golf, this little one plays by her own set of rules, it's almost always her turn, she can take as many shots as she wants (but they always add up to '1'), and I just had to giggle at her form!  ....The papers I used for this page are from the Websters Pages 'Game On' collection, I thought these playful papers would make the perfect backdrop for these photos.  Here are a few close-ups.... 


Above is a photo of all the different types of chipboard pieces I used for the 'Mini-Golf' layout.  If you are interested in seeing some of the newest chippies for this month from Dusty Attic you can find them HERE.

Hope you enjoyed seeing my latest pages.....and hope you'll come back at the end of the week, I've got some really fun video tutorials to share with you all!!!  Thanks for stopping by! xx 

Wednesday, June 13, 2012

Bo Bunny Ambrosia Mini Album (Plus a blog class!)

A few months ago Kris Silvester our Design team coordinator at Bo Bunny asked me if I would do the Ambrosia mini-album up for her June blog class.  I was so happy she asked me to do this one because this mini-album is so gorgeous all on it's own that it was really easy to put together a pretty album in no time!  Have you ever watched one of Kris's Monday blog classes?  I have been following along for the past few months watching her recreate a different album each month and have to say I thoroughly enjoy watching her classes.  She has a friendly warm style, you feel like you are sitting with a friend and just enjoying some stress-free scrap-time.   But you also learn a LOT along the way, she shares loads of tips and techniques that can not only be used on your mini-albums but on your other scrapping projects as well! 

Here are the pages from my mini-album.  Kris will be showing you step by step how to recreate this album, in minute detail!  She is really great about not missing the tiniest thing, from product names to how to apply a technique! 


Kris began the class this past Monday (June 11th) ...here is the link to the first installment for her blog class Ambrosia Mini-album blog class (Week One).  Remember to pop in next Monday for the second class, grab a cup of coffee and enjoy a relaxing and informative blog class.  And be sure to pop into the above link to find out how you can have a chance to win a new 'Little Miss' collection pack!!

Thursday, June 7, 2012

A Tour of My Scraproom!!

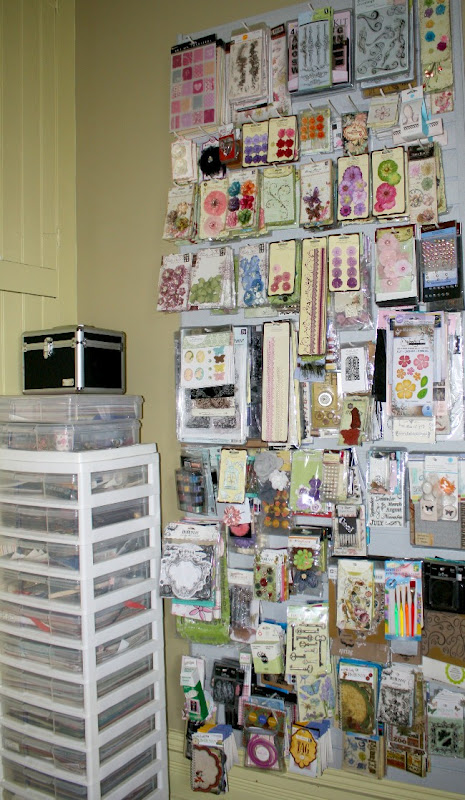
As promised, here is a little tour of my scraproom!  Each month Webster's Pages asks one of their design team girls to show a little glimps of their scrap space and about a month ago I volunteered for this one...GULP! That put the fire under me to get my room cleaned up a little better! So you'll see a post about my room over at the Websters Pages blog as well today.   My scraproom is pretty much like I've had it for years, but I did finally take out the old shelving that used to be on the right side of the room and put in an Ikea cubicle shelf system (there was also an old toy closet that I cleared out....the girls are getting a little old for some of the toys that were in there, I did however put some of their more classic toys in storage, it's hard to let go of those baby/toddler years). 
I think probably the most outstanding feature of my scraproom is the slatwall my dear husband installed for me a few years ago.  This has been a great organizational tool!  I can work on a layout and then at a glance pick out a few items that I feel will nicely compliment the layout I'm working on.  One thing for sure about me....I'm a messy scrapper, when I'm in the middle of making a layout the room can look like a bomb hit it.  BUT, I always clean up after each and every project.  I feel too overwhelmed to start a new project if my space is upside down, so once I'm done, everything goes back into it's place, ready for the next time.  Pictured below is my slat wall (My childens friends call it 'Your Mommy's Store'! lol!) 

Hmmm, I do use Ikea a lot for my scraproom...the little shelves here for my little jars of odds and ends blooms are from Ikea, as are the little glass jars. 
The desk and shelving is from Ikea as well.  I love flat drawers for storing scrap goods, I don't like my drawers deep because I feel like digging for stuff makes them all messy, I like to see at a glance the product I have available to me.  Here's a little peek in a couple of the drawers.... 
And here is another view of the cubicle shelving on the opposite side of the room.  The pink bins are awesome for storing the 'eyesore' type stuff (loose ribbon, fibre, lace etc).  I also store my albums (standing up) in the lowest shelves.  My albums get pretty thick and I like to store them standing up so that the weight doesn't crush the more 3D embellishments. 

Speaking of 3D embellishments....one of the most often asked questions I get is "What do you do with your 3D layouts?"  Well, as I said, some of them I do store in albums and binders....but I also keep some in those plastic Iris boxes made for 12x12 papers that you can get from Michaels.  These I take and rotate out to hang in the frames I have on my wall.  I'll change out the layouts every couple months or so.  Here are the ones up on my wall at the moment..... 
So all that leaves for me to answer is..."How do I store all the papers and embellishments I get for my design teams?"  Those I like to store in the clear plastic Iris containers (you can see some of these boxes beside my slat wall in the above photos)....I store my design team product by collection, so that when an assignment comes up, all I have to do is pull out the box that holds for example "Everyday Poetry" and I'll have all the papers and embellishments at my finger tips.

And before anyone comments on the red chair that really does not go at all with my room....it's comfortable!! LOL!  Actually I had meant to make a cover for it that is more in keeping with the room but time got away from me....if anyone has any great suggestions on how to make a nice cover for the chair let me know!

I hope you enjoyed this little peek into my scrap space and hope that it's helped spark some ideas for you! xx

Tuesday, June 5, 2012

A Quick little Bo Bunny Card & Sketch!

I had so much fun working with the beautiful sketch (below) by one of my talented fellow design team members Juliana Michaels.  I used the Bo Bunny Little Miss collection papers, 6x6 paper pad and the coordinating sticker sheet to make up this card.  Easy peasy!  Want to try it out? Be sure to post your card at the Bo Bunny blog!! 

Pssst!  Just wanted to let you all know that I'll be posting pic's of my scraproom on Thursday, so come by if you have a chance for a little peek! xx