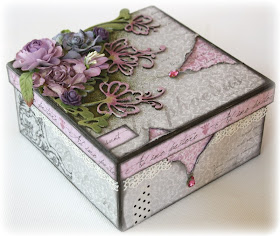
One of my all-time favorite color combinations is smokey plums with dusty greys. So when I was looking to dress up my box to keep trinkets in, I was immediately drawn to the papers in the Crea Diem collection from Maja Design, lots of lovely vintage greys and smokey plum/pinks.
What is one of the most frustrating things when you are making up an altered box like this one? It's what do you do at the corners! Some tuck them under other layers of papers, some try to just have them but up against each other, but after looking at the Crea Diem papers I noticed that they have this lovely smokey, vintage edging. I thought I'd take this edging idea and use it on my box design, keeping the paper application really simple!
I began by using my black ink pad and rubbing it along the edges of the box. (the box I got very inexpensively from my local craft shop).
I then cut a square of one of the grey patterned papers in Crea Diem (Efter regn-bs). I made the cut just slightly smaller than the full edge to edge of the box top. Softly ink the cut edges so they match the inking on the outer edges of the patterned paper. I used Aleene's white glue adhesive to apply the paper panels. (Make sure you bring the adhesive right out to the edges.
What I found was really cool was that the cute little strips that you cut off from the bottom of the patterned papers? .....They are the PERFECT fit for the edge of the box top edges! Continue to apply the rest of your panels to the box, adding decorative detailing with other patterned papers, lace and some flourishy rub-ons. I used pieces of the Crea Diem pinkish/plum paper called Fylid av Karlek-bs to insert into little tears I made in some of the panels (this should be done before you adhere the panel).


Fantastic Work :) I am loving this.
ReplyDeleteI have it in my store. Charlotte's Web Papercraft in South Australia and I think we are the only store in Australia with this beautiful range.
JUST LOVE Crea Diem! From bold blacks to light pinks, greens and blues - LOVE, LOVE, LOVE!
Gorgeous!! I love the idea of inking the edges instead of fussing with all the corners. Love that you can store little pretties in it.
ReplyDeleteIt's really really beautiful
ReplyDeleteVery very pretty, love the colors!
ReplyDeleteThis box is gorgeous. Love your work.
ReplyDeleteThis is so pretty. You must have put this box on a special place to keep on looking at it. Thank you Anneke.
ReplyDeletewww.annekescardart.blogspot.com
Oi Gabrielle!!!
ReplyDeleteParabéns pelos maravilhosos trabalhos!!! Você é uma pessoa de criatividade sem limites. Que Deus lhe abençoe sempre!!!
Beijos
Oh wow! You make it sound like this box was really easy to create, but it looks sooo gorgeous! I just love this colour combo and your lovely cluster of flowers and chipboard.
ReplyDeleteGorgeous! One of my favorite things to do is alter cigar boxes :)
ReplyDeleteNew follower, your work is amazing,
Paula
Gorgeous box!
ReplyDeleteI have just found your blog via a pin on Pinterest. I just wanted to say that your work is absolutely stunning. I love your use of colours and textures. I have just spent an hour looking through some of your blog. Beautiful work, just beautiful.
ReplyDeletesuch a stunning box -Bravo
ReplyDeletebev XX
Hi Gabrielle, this box is gorgeous! I love the papers you used. Thanks to you and your beautiful creations, I was enabled to purchase my very first Maja papers and they are gorgeous Thanks for your tutorials and wonderful inspiration. I Love your work!!! God bless.
ReplyDelete- Letty
This is beautiful. I made a button box a couple of months ago that I absolutely adore. Your color choice is stunning!!
ReplyDeleteYour box is so very beautiful!! Wonderful piece!!
ReplyDeleteOh how beautiful, those flowers are exquisitely beautiful. and love the papers you have used too.. a gorgeous box for your goodies!
ReplyDeleteSimply gorgeous! Love the tear aways .. so unexpected for a trinket box!
ReplyDeleteThis is gorgeous!!! You make everything seem easy peasy!!
ReplyDeleteLove love love it!!!
ReplyDeleteThe papers and colors, along with your beautiful embellishing
techniques, are amazing!
(I have done a few mini boxes in my day - but this one is so...
detailed!! ~full of your unique creativity!
Thanks for the lesson - I know I've
learned a lot of great tips~
This is soooo gorgeous, a fantastic and creativ decorated box, love it!!!
ReplyDeleteDelightful! I especially like the torn paper with the gem on the top of the box....such a touch of inspiration. You are amazing!
ReplyDeleteOh, this box is simply gorgeous!! ~ Blessings, Tracey
ReplyDeleteGarden of Grace
Hi Gabi. Totally GORGEOUS!!!! I love the bellies and how this project was completed. Thanks for the inspiration.
ReplyDeleteHuggies
Rachelle
xxx
Hi Gabbi!! I just love this box and I'll made something similar for me. Just a little question, the pink jewels you added, which kind of embelishments are? Greetings from Mexico!!
ReplyDeleteHi Liz, thanks for your kind comments!....the pink jewels are from the Charms collection pack from Websters Pages (from the WInter CHA)http://www.websterspages.com/charms/scrapbooking/charms/charm-bulk-pink-rhinestone
ReplyDelete