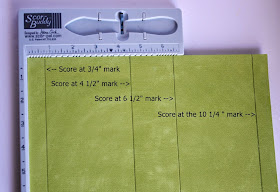
If you are like me, you love a quick and easy project. This favor box is so easy to make from an 8 1/2" x 11" paper....not cutting, just a few easy folds. I have lots of that pretty Double Dot paper from Bo Bunny, (I have a love of dots!!) so I grabbed a piece of Mint Double dot 8 1/2" x 11" piece and scored it as follows.....
Score at the 3/4", 4 1/2" mark, 6 1/2" mark and 10 1/4" mark. If you are like me and only have the Score Buddy (meant for cards)....I just measured in 3/4" and 4 1/2" from each side edge. Now turn on the 8.5" side and score as follows
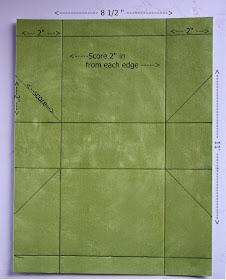
Score at 2 inches in from each side. Then you will want to mark 4 angles....measure 2" ALONG the edge from the two center marks. Now draw a line from your mark to the inner corner as shown....score this line.
I personally found it a little hard to score the angle line so what I did was brought the point of the middle fold up to meet the edge of my side fold and then used my finger to make the angle fold.
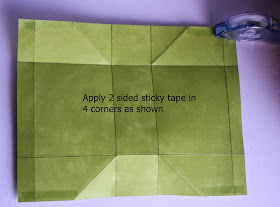
I opted for the dotted design to be on the outside of my box, so I added 4 strips of 2 sided sticky tape to the four corners of the plain side as shown above.
Once you've applied your sticky tape, bring the two sides in, it will look like the picture above. Now bring the two side flaps up and you have formed your box....
It will look like the pic above! Now the fun part....decorate!
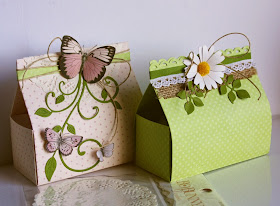
For one of my boxes I used an edge punch and cut a scallop edge across the top. I added a band of green cardstock (BoBunny Clover Dot) to hold the top together, and added some hemp twine, burlap, strip of lace and a die cut Shasta Daisy (Cheery Lynn Designs) and some leave cut from the Clover paper.
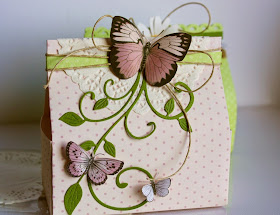
For my second box I used some left over paper I had from the Primrose collection (that collection had such pretty dot papers and butterflies!!). I fussy cut a few butterflies from the patterned paper and cut a Fanciful Flourish from Bo Bunny's Clover Dot paper.
Hope you enjoyed today's project and that you give this easy-peasy favor bag a try the next time you want to give a good friend a little gift! Thanks for stopping by my blog today! xo





When you receive a gift in such a gorgeous way, the content of the gift hardly matters anymore ;) Your bags both turned out completely gorgeous!
ReplyDeleteThese are gorgeous, must have a go TFS.
ReplyDeleteJulie x
great idea. thanks for this tutorial ;-)
ReplyDeleteFantastic!!!!Love it!!!
ReplyDeleteThese would be wonderful gift bags, and so pretty too.. thanks for sharing!!
ReplyDeletemerci pour le partage! bises
ReplyDeleteI think the recipients of these beautiful gift bags will be doing a happy dance! Thank you for sharing the tutorial/measurements!!
ReplyDeleteThose are both so pretty, thanks so much for sharing!!
ReplyDeleteSo gorgeous Gabi! Such a easy peasy gift boxes. Love your inspiration as always.You are the BEST!!!
ReplyDeleteHuggies!!!
The Double Dot Paper is so timeless! Your project is a great way to use it for something other than a layout or card. TFS
ReplyDeleteGabrielle, hermosos todos tus trabajos, felicidades y gracias por compartir...saludos!
ReplyDeleteHello Gabrielle,
ReplyDeleteThese bags are lovely, and so useful for small Easter gifts (and other occasions, of course).
Thank you x
Wow, these are beautiful!!
ReplyDeleteGorgeous gift bags!! Your decorated them just beautifully! Thanks for the tutorial!
ReplyDeleteHave a great day!
Sherrie k
very nicely written information with beautiful pictures about favor boxes
ReplyDelete