Pages

Wednesday, November 28, 2012

Two Handmade Blooms with Webster's Pages Trim & Some NEW Dusty Attic!!

Photobucket
For this page I used a couple of older Webster's Pages collections (In Love and Everyday Poetry).  I also added a couple of the newest Dusty Attic chippies to embellish my page with....I just love the new Branches and Berries and the new Leafy Scroll chipboard pieces, they are so intricate and pretty....Here is a photo of them unfinished....
The treatment I gave these chipboard pieces was to double coat each of the pieces with some white Gesso, then I lightly brushed the tips of the leaves with a soft green.  The daisy I just painted a yellow center on it.  Then I took some soft Chestnut brown chalk ink and inked the edges.  For the berries, I added some Stardust Stickles and added a blob of Glossy Accents to give the berries a rounded look.
 

I thought I'd play a little with some of the Webster's Pages trims to make up a couple of blooms for my page (above).  I took a section of one of the lace trims on the Once Upon a Halloween trim, I cut out a section, (5 circles in length ...see below) and cut the strip in half to make two different blooms.. 

Photobucket Photobucket Photobucket
After I cut the strip in half, I gathered one strip with a needle and tread and brought the two ends together, I stitched the piece to a small circle of felt on the back to stabelize the flower and snipped a small tattered pink rosette from one of the Websters Pages Bloomers strips for the center.  ( also added a small bow made from a strand of pearl trim before I attached the pink rosette.  For the other bloom I again gathered the bottom edge with  needle and thread, this time I used a Webster's Pages Perfect Accents rose to the center.  The pink of the rose was a little darker than I wanted to I just lightly dabbed the resin rose with some white chalk ink.  With one small strip I ended up with two cute shabby-chic blooms!
 
To put the page together I created a ruffled edge on the 'In Love' pink paper (you can find a small video tutorial on the right side of my page on how to make the ruffled edge).  I then figured out where I'd like to put my photo and embellishments and then strategically added some background stamping...Here is an image of what my paper looked like with the stamping before the photo and embellishments were attached... 
Photobucket
The stamps I used for my background are the Websters Pages/Unity Stamp 'Beauty' Stamp, the Websters Pages Diamond Tag stamp, The Bo Bunny Midnight Frost script stamp and the 7 Gypsies ledger stamp. 
Here are a few close-ups of the finished chipboard pieces and the embellishment clusters on my page...
Photobucket Photobucket Photobucket
The layered circle design is something I saw done by one of my fellow design team members over at Dusty Attic, Natasha made these cute circles on one of her layouts a while back and I thought I would give them a go on this page...I liked the result!Photobucket
If you'd like to check out the newest Dusty Attic Stamps you can find the Dusty Attic Store HERE ...or you can find a USA and Canada retailer in the rightside column of this blog.  For some yummy Websters Pages goodies you can purchase product at the Websters Pages Website HERE.  They are having a HUGE Warehouse Sale at the moment!  Check it out, it's a $150.00 value for only $25.00!! 
Photobucket
 
I hope everyone has a wonderful Wednesday!! Thanks so much for stopping by and thank you kindly for all the sweet comments! xo 
Photobucket

Thursday, November 22, 2012

What is Your Favourite Winter Comfort Drink?

Photobucket
I think it's a fun thing to scrap about favourite things!  Kris Sylvester, our super sweet design team coordinator at Bo Bunny made a comment that really resonated with me, she said that 'she would have loved to have something like this about her parents when they were her age'.  That got me thinking about how cool it would be to have a scrapbook from my grandparents showing the trendy things they liked when they were growing up.  Scrapping doesn't always have to be about a photo of a person, it can be about something that you just really enjoy! 
 
For me the 'go to' winter comfort drink is the Salted Caramel Hot Chocolate from Starbucks.....only thing is that it can add up price-wise especially when you have the kiddies along and they want the same thing too!   Then last winter I stumbled on a Pinterest post that explained what the yummy sprinkled topping on the whipped cream topping is made up of!  It's simply some Demerara sugar (crystalized brown sugar) and sea salt mixed together (I just do equal parts).  So I tried making it at home!  I just use the Nesquick chocolate powder when I'm in a hurry, but you can go the whole cocoa powder route if you like.  I just add it to warm milk to make the hot chocolate, put it in a pretty glass, spray on some real whipped cream (note I said real whipped cream, I can't stand that oil based 'topping' stuff....you can use the spray whip from the can as long as it's the real whip cream)....then I just sprinkle on some of the salty/sugar topping and drizzle with some caramel sauce...I just use the type you buy to put on ice-cream.  It's sooooo yummy!  The salt in the topping really brings out the chocolate and caramel flavours! 
 
For my page above, I wrote my little recipe on a tag and stitched a little pocket into the background paper to hold the recipe tag... 

Photobucket
Here are a couple more close-ups of the page I made up for this.  I used the Bo Bunny blooms to decorate my layout but to give a more 'frosty' effect to the page I used some Tim Holtz Glossy Accents on the blooms and dunked them in some Diamond Dust (I got a jar of the stuff at Michaels)...

Photobucket Photobucket
Supplies:
Patterned Paper: Powder Mountain (Lodge), Snow Day (Trees, Flurries, Cards, Sunshine)
Cardstock: Double Dot (Island Mist)
Combo Stickers: Snow Day
Layered Chipboard: Powder Mountain, Snow Day
12x12 Chipboard: Powder Mountain
Brads: Snow Day
Flowers: Dahlia (Natural Earth), Daisies (Denim), Zinnea (Natural Earth)
 
So, what is your favourite winter drink of comfort food?  I'd love to hear! 
Photobucket

Tuesday, November 20, 2012

Playing with tags!

Today at Webster's Pages, the design team girls were asked to make tags reflecting things we are thankful for.  For me a biggie is my family.  I just thank God daily for them, and the joy they bring me.  I found this quote on Pinterest that I thought would perfectly fit the sentiment of the tag...
 
"Gratitude turns
what we have
Into enough"
 
It's easy to be thankful for all the big things in our life, but it's the little things that often mean the most,.... my youngest coming in the door after school and asking how I'm feeling (when she knew I've been fighting a cold), dancing to a fun song while making the girls their breakfast, my oldest DD still willing to share with me what's going on with her and her friends, Steve calling and asking if I need him to pick something up on the way home.  I love my family and never want to take for granted the privilege I have of being a wife and mother.
 
For this layout I used a bunch of scraps I had left-over from my Best Friends papers and did some misting, doodling and stitching to finish the tag.  I also embellished with some Websters Pages trims and Perfect Accents (resin heart).  I kept this tag extra thin without a lot of 3D embellishments so I could use it as a bookmark.  What do you like to do with your tags? 

Friday, November 16, 2012

Introducing.....The Dusty Attic 2013 Design Team!!

Dusty Attic's new Design Team for 2013!


I'm so happy and delighted to say that I am once again on the Dusty Attic design team for 2013!!  This is my 3rd go around for this team and I have to say it never gets old for me!!  I just love using Dusty Attic's beautiful chippies on my projects and I'm honored to be asked to stay on the team for another year!  As I mentioned in an earlier post, this year Dusty Attic opened up the design team call so that we would have some new designers added to the team.  So without further ado, here is the list of the new design team for 2013 (new members and returning members)!

Please welcome our new Team Members:

Audrey Underwood - Australia
Geraldine Pasinati - Australia
Karen Shady - Australia
Louise Collins - England
Olga Znamenskaya (Pastila) - Russia
Tina Dalton - Australia

and our returning Team Members:

Belinda Spencer - Australia
Helena Johansson - Sweden
Jenny Burns - Australia
Mistra Hoolahan - Australia
Michelle Grant - Australia
Natasha Naranjo Aguirre - USA

Big congrats to all the newest members, I look forward to getting to know you al better!!  I just want to say a fond farewell to the girls who were on the 2012 team and are moving on to other exciting adventures!!  We have so much fun behind the scenes, I've had a blast with you girls and I know I'll be seeing you around on the scrapbook boards!

Tuesday, November 13, 2012

Using Bo Bunny;s Winter Collection in a Non Winter Layout

 
The Challenge:  Use the NEW Bo Bunny Snow Days collection in a non Winter layout.
 
Challenge Accepted!!  Heehee, I always have fun using collections in a non traditional way.  For my layout above I decided to use two photos I took of Meagan a few years ago when she cut her long long waist length hair for Locks of Love.  Since these pic's were taken in June I went with a more summery look.  I used lots of the Bo Bunny Blooms and cut out a few blooms from the Bo Bunny Double dot cardstock papers to bring more focus to the flowers rather than the subtle snow flakes on the page.  The die cut floral design was inspiration I took from the work of one of my talented friends on my Dusty Attic design team Natasha Naranjo Aguirre.  The blooms were cut from Bo Bunny Double dot paper using the Spellbinders Rose Creations cuts.  I then hand stitched around the edges of the centers. 
 
The chipboard I used was of course my favourite Dusty Attic chippies (Scroll #8, Skelleton Clock Frames).  I thought for this page I would try using a sketch so I went through some of the sketches posted at the Dusty Attic Ning site for 2012 and found this really cute sketch by the super talented Michelle Grant, it was perfect for incorporating two photos!  
Here is a list of supplies I used for the above page:
Patterned Paper: Snow Day (Drift, Mittens)
Cardstock: BB Double Dot (Sweet Pear Dot, Island Mist Dot)
6x6 Paper Pad: Snow Day, Et Cetera
Brads: Snow Day
Stamps: Powder Mountain, Enchanted
Blooms: Zinnea, Daisy, Dahlia (All in Clover color)
Jewels: Snow Day
Title Alphas: Powder Mountain
Butterflies: Country Garden
Chipboard: Dusty Attic (Scroll #8, Skeleton Clock Frames)
 
Before I close off today I have one more project to share with you all.  I usually try to have my blog posts for my different design teams spaced out but these two projects fell on the same day.  Today is the day we announce the Guest Designer for the month over at Webster's Pages and the design team is asked to create a project inspired by the current months guest.  Our guest for November is the wonderfully talented Ashley Cannon Newell.  Ashley shared a number of sweet cards she made that we could choose from and here is the card I created inspired by her work.  If you would like to see Ashleys work with Websters Pages products as well as some other design team inspiration you can find it HERE.
 
Some dear friends of ours are having their 25th wedding Anniversary and I wanted to make them a nice card.  The wider horizontal design was just what I needed for adding in a gift certificate to the card.  I never know what to give as a gift for 25th anniversaries!  By the time you are married for 25 years you pretty much have everything you need for your home right?  And giving a decorative gift is a matter of taste....so we decided to get them a gift certificate to their favourite restaurant....Hey, that just gave me a thought!  I think I'll stitch in a little pocket on the back for the GC to fit into! (heehee, just when I thought I was done! lol! 

Friday, November 9, 2012

Mixing and Matching Collections!

On one hand it's easy to just grab a single collection pack and start scrapping, I also think it is fun to mixed it up sometimes!   For my page today I used some of the scraps I had from working with the NEW Best Friends collection and mixed it up with a bunch of papers from other Websters collections like Park Drive
One of my favourite papers in the Park Drive collection is the one that has the floral elements with the white script design over top.  I just cut out a bunch of the floral elements and used them as my page decorations.  I like to mix paper fussy cut flowers with textural 'real' florals when adding a cluster of embellishments to my page. 
Here's a close up of the bloom cluster (sometimes the flowers cast shadows when I take my full photo of the page so it's hard to see the detailing.  The butterfly is part of a cute charm packette from Webster's Pages.  The white thready looking stuff is from a roll of knitting yarn I bought from Michaels craft shop, I bought a huge roll of it for a few dollars...it goes a long way for layouts! 
The pink Bloomers trim strip from Websters pages is one of my favourite colors from the WP bloomers, I love the soft pretty color and the tattered edge on the bloom strip.  Here's a list of the products I used to make this page :)
Supplies:
Patterned Paper: Best Friends, Park Drive, Royal Christmas,
Perfect Accents: Girl Land
Phrase Stickers : Best Friends
Trim: Girl Land
Princess Petals: Best Friends, Girl Land
Cameo Stick Pins
WP Alpha stickers
WP Charms (Butterfly/green gem)
Bloomers: Pink
Pearl Flourishes: Zva Creative
Martha Stewart Corner/Edge punch (Swirling Lace)
 
I hope everyone has a wonderful and creative weekend! xo 

Friday, November 2, 2012

A Bo Bunny Layout Challenge!!..and Some NEW Dusty Attic!!

So here was the challenge that Bo Bunny gave to a few of the design team members....
 
Here is the challenge: Separate Cluster Techniques
Separate clusters on your page. You will need to use at least 2 photos.
Create at least 2 clusters with at least 1 photo in each cluster.
 
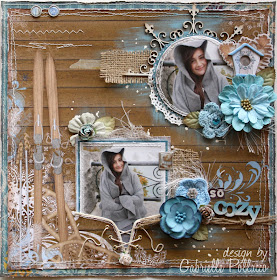
I just recently got the NEW mid-season release collections from Bo Bunny and have been itching to start using them!  I just love the colors in Powder Mountain (Greys, blues and browns) and the designs are so pretty too!  The above background paper was the one I was immediately drawn to....the one where the excercise is done and the ski's are up against the cabin and I'm all warm and toasty inside having a cup of cocoa! LOL!....yep, as I get older the indoor stuff appeals more :)    ...Even though the photo's I used are not typically 'snow/winter' pic's, I thought they were still a good fit with the paper.  The photo is one I took of Meagan when we went for the weekend to Niagara Falls a few weeks back.  It got a little chilly and as usual 'mommy' has to give up her warm shall because one of the kids are cold :) ....Meagan of course has to ham it up, wear it on her head and dance around in it until some tourists stopped to take pic's of her! 
I wanted to create a different and unique element for the page so I made this little pocket to slip one of the photo's into.  I just cut this extended 'V' shape into the paper with an exacto knife, and then stitched along the edge with the sewing machine.  I then glued on some fabric piping behind the edge to give it a nice finished sewed on look.  Popped in some eyelets and added twine. 
I used the Dusty Attic Wrought Iron Design Set chipboard piece behind the photo because I thought it looked kind of like a snowflake.  I then clustered some of the NEW Bo Bunny Blossoms and some BB layered chipboard (birdhouse) around the photo.  I later tucked in a bit of burlap behind the whole thing to give the page a more rustic appeal. 
TIP:  Don't glue down your elements until you have the full design in front of you and you are satisfied with the look of it.  This allows you to add or take away as you go.
 
ANOTHER TIP:  When creating seperate clusters on a page, a great way to differenciate the area and draw the eye into the grouping is to do a little dry-brush painting behind the photo as I did above....the same thing can be achieved with stamps as well. 
Here I added some more Bo Bunny Blossoms and some rustic elements along with the title (Bo Bunny alpha stickers and Dusty Attic chipboard alphas) along with some coordinating Powder Mountain brads and rub-ons.  Here is a more detailed list of the supplies on my page:
Supplies:
Patterned Paper: Powder Mountain (Lodge), Snow Day (Snow Day)
6x6 Paper Pad: Powder Mountain
Brads: Powder Mountain
Cardstock Sticker: Snow Day
Layered Chipboard: Powder Mountain
Flowers: Denim Blue Bouquet Blossoms, Demin Blue Zinnia, Denim Blue Pansy
Rubons: Powder Mountain
Chipboard: Dusty Attic ( Wrought Iron Design Set, alphabets, and fabric leaves)
Other: Burlap, eyelets, cheesecloth, twine, paint (Heidi Swapp ~ Sea)
 
Oh! Speaking of new releases!!  Another of my design teams just put out a ton of new goodies!!!  Dusty Attic put out their October 2012 Release!  Over 80 new designs!! Here are just a few of my favourites!...


There are also loads of new mini's and cool decorative textures like Honeycomb, Marrakesh Trellis, and Cyclone Wire.  Want to see the whole lot of new goodies?  You can find them HERE!  I also have a bunch of retailers listed at the left of my blog that sell Dusty Attic chippies....you may want to email them to let them know what designs would appeal to you!
Do you want to play along and try out the Bo Bunny Layout challenge?  check out today's post over at the Bo Bunny Blog and join in on the fun! xo