Goodmorning everyone!! A little warning, this post will be photo heavy and have not one but TWO Video Tutorials to enjoy. So grab a cup of coffee/tea, sit back and enjoy, I hope you have as much fun checking it all out as I had creating these projects!
When I got my package from
Graphic 45 to do a guest spot for them, I was overwhelmed by the gorgeous products and their kind generousity!! For my first project I did a layout using the beautiful Botanical Tea collection. I've been waiting for the perfect collection to scrap this photo of my nephew Jared and his two little girls,
Botanical Tea had all the pretty elements I was looking for.
I began by fussy cutting a bunch of the lovely design elements in the patterned papers. I cut out the tiny pink flowers and attached them to a Dusty Attic Branch.
I made the flowers by using a Spellbinders die and a pink paper from the small 6x6 paper pad that coordinates with the Botanical Tea collection papers. I also added some of the amazing metal embellishments (Keys, key holes) from Graphic 45's Staples collection.
Here is a close-up of the key-hole,...I just love their metal embellishments, so intricate and beautiful! I bordered my photo and patterned paper with some of the brown cardstock paper that coordinates with this collection. I trimmed with a scallop edge scissor and added a dot of white gel pen to the center of each scallop.
I used a few Cheery Lynn die cut pieces for my corner designs and moistened the paper with a little waterto pull down the edge. I finished by adhering a butterfly cut from the patterned paper.
There are so many wonderful coordinating pieces that come with this collection including cardstock stickers...here I used some for embellishing.
For my second project I thought I would do a fun 'off the page' project using Botanical Tea collection. I took a few (empty) liquor bottles and turned them into painted Vintage Decor Bottles. Here is a quick little step by step video to show how I made them....
These were a lot of fun to make, I hope you'll give it a try! Next I decided to do some projects with the fresh and beautiful
'By The Sea' collection....
I've always wanted to make a 'reverse' style canvas, that is a canvas turned around using the backside, it creates a kind of shadow box design. For this project I began by fussy cutting a bunch of the picture elements from this collection...love the mermaid, shells and starfish!
I used one of the postcard designs as the background and added some Dusty Attic chipboard elements (painted and stamped) to embellish the frame.
I cut out some of the sea elements (starfish, shells) and used a scissor handle to create a 3D effect . Here I made another little step by step video on how I created this canvas...
.....and finally I have a couple of nautical style cards to share with you that I made using the 'By the Sea" collection....
I have a lot of 'girly' style cards I've made in my stash, ready to use, but I wanted to make a more masculine card for the men in my life. I used the gorgeous stamp set that coordinates with the By the Sea collection as my centerpiece to the card...
You get such a nice crisp image with the rubber stamp don't you think? I also added a chipboard button and more of their Staples metal accents (brads) with some hemp twine.
I like to use lots of natural products like burlap and twine with the navy and sky blues in these papers. I feel like they are colors and textures that work well with a masculine style card.
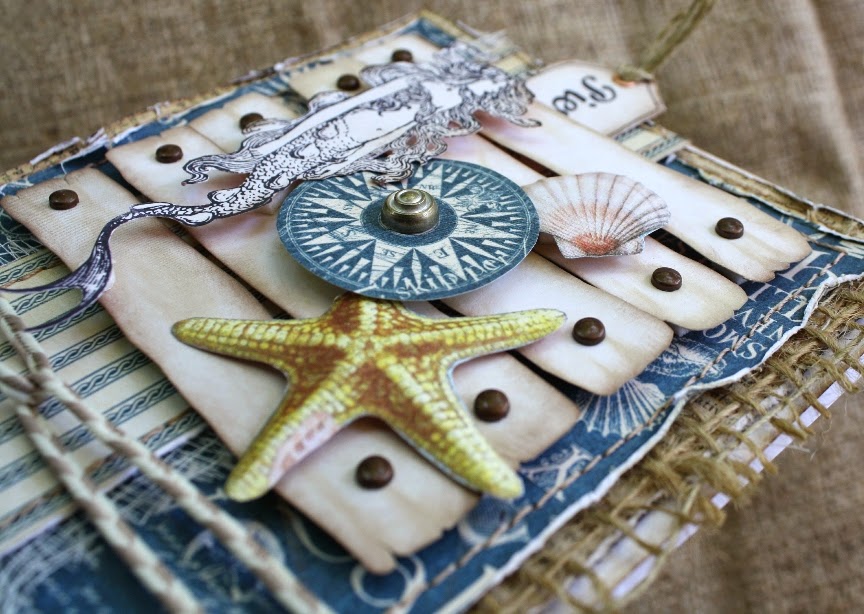
For my other card I used a similar color combination but I made this one so that it can be used for a girl or guy. I ended up using this as a card for my niece who is into boating and loves nautical designs.
I made the plank design by just cutting strips of the cream color cardstock in the coordinating 6x6 paper pads and inking the edges with a bit or soft brown chalk ink (Ingvild Bolmes pastel brown). I also love the nice thickness of the patterned paper because it allows you to form it into 3D shapes as you can see with the starfish design I cut out of one of the patterned papers.
I hope you enjoyed checking out all the projects I created with Graphic 45's beautiful products! I want to thank Graphic 45 for this wonderful opportunity to guest design for them and their generousity in the product they sent. I know I will be making many more projects with these goodies in the future! xo