Wednesday, December 18, 2013

Memories {Maja Design & Scrapbook Diaries Kit/Video Tutorial}

 
Hi everyone!  I've got another layout today that I made using Maja Design papers for The Scrapbook Diaries.  I did another paper gather technique for this one and as always you can have unlimited viewing of the video tutorial with the purchase of this lovely kit from Scrapbook Diaries.

 
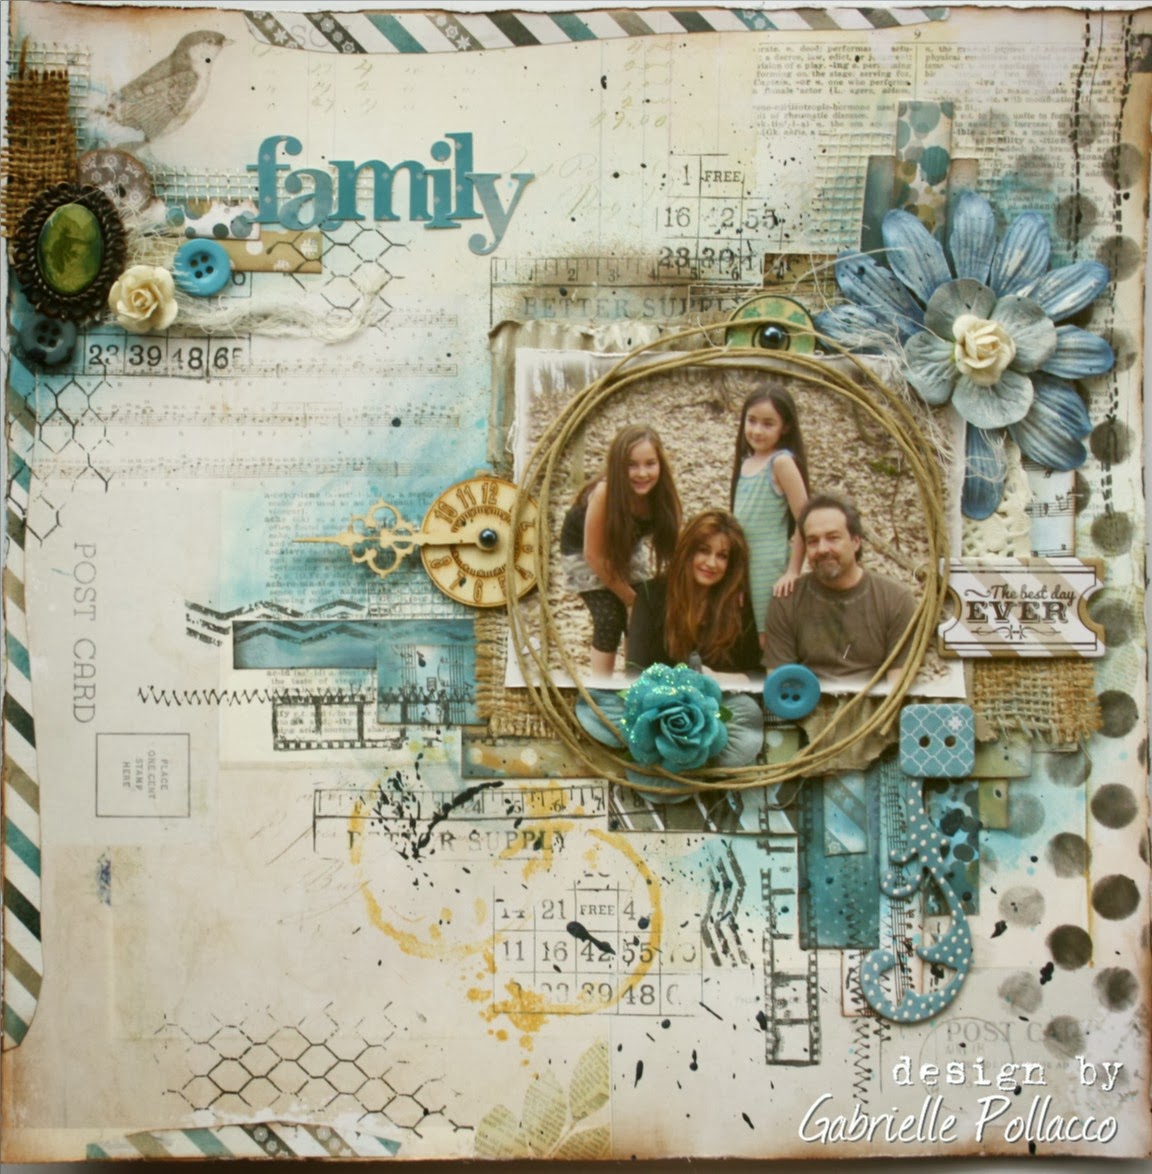
I did some fussy cutting from one of my favorite papers from Maja Design 'Vintage Autumn Basics', the floral paper labelled 'No. II', I also cut out a number of the clocks from the paper labelled 'XVI'.  I did an underlayer of gathered paper using the 'Heritage' paper from the same collection.  And finished the design using some of the lovely new 'Mini Hinges' from Dusty Attic.

 
Here is a close up look at some of the fussy cutting and the gathered paper design that I have peeking out of a tear in the paper. 

 
A close-up view of some of the embellishments included in this page kit.  In video I show how I used the Tattered Angels Mist and package of Bo Bunny stamps (included in the kit) to create the background desing on this page.
 
 
I created a quick template that you can save to your computer, for cutting out the heart design I used on this page.  Just right click on the photo above and 'save picture as' to your computer.  When you go to print, print on a standard 8.5 x 11 inch paper.
 
NOTE:  This is a slightly more advanced page design but I feel with the video tutorial you won't have a problem creating the design....but if you would like to keep it more simple you can put the patterned paper in as a single flat layer as well and still have a lovely page design.
 
If you would like to try creating this page and purchase the materials I used to create this layout you can check out The Scrapbook Diaries,  Janene's kits are always an amazing value and have so many wonderful and unique papers, embellishments and mixed media items.  You also get unlimited access to the video tutorial I created to go with this page design.  You can find out more info and  purchase this kit from The Scrapbook Diaries HERE.
 
Hope you enjoyed my project today and feel inspired to get your scrap on! xo
 

Saturday, December 14, 2013

Happy Memories {Dusty Attic and Websters Pages}

 
I found this old photo of our dear Mocha (she passed a few years ago), she was a super sweet dog, fiercely protective but did not have a lot of tolerance for children's shinanigans (did I actually use that word? lol!) ....If there were too many kiddies running around like at this summer resort, she would quickly tuck herself under your legs to hide (not the best of things when wearing a skirt!!)  Well, I tried to come up with a good title for this one but my husband finally came up with 'Leg Warmers' which I thought was a good fit :)

 
To make this page I used some papers from Websters Pages 'Postcards from Paris II' and 'A Christmas Story' collection.  I embellished with some new goodies from Dusty Attic designs.  Above you can see the Cyclone Wire fence chippies (I like to cut them up in little bits to use on my pages).
 
 
Another new chipboard design that Dusty Attic just put out is the 'Chevrons' in a variety of sizes.  For mine I first gave them a coat of Gesso, then added a coat of 'Oceania' Dusty in Color Paint and used a white Gel Pen (Signo Unibal) to put some dots on the design.  I finished it by adding a nice thick coat of Dusty Attic Gloss medium.

 
Here is another view of the chippies and floral embellishments.  I first gave the base of the page my own unique background design by starting with a basic soft brocade paper.  I then added some inking on the borders with some Tim Holtz Broken China Distress Ink applied with a make-up sponge.  I used a Crafters Workshop 6x6 Circle Grid Stencil/Mask and black ink applied with sponge in corners and edges fading in as I go...I dabbed a little of the Broken China with the black ink.  I used a make-up sponge to apply the Broken China ink around the area of my photo/embellishments as well.

 
I also used another couple of stencils on this page with texture paste.  The 6x6 Crafters Workshop 'Ledger' stencil and the Tim Holtz "Measured" stencil (under the photo area).  One of my favourite chippies from Dusty Attic has always been the Vintage Hinges, well now I'm so excited because they have come out with the 'Mini Hinges' as well!  I love them!  Although I used them for a layout here, I can totally see me using them in cards, ATC's and OTP's (of the page projects!).  I dabbed on some copper 3D T-shirt paint and some more of the 'Oceania' Dusty in Color paint to get the above effect.
 
 
I hope you enjoyed my project today.  If you are looking for Dusty Attic products you can check out their website HERE, you can find retailers for Dusty Attic in  North America listed in my right side panel of my blog (I believe Janene from The Scrapbook Diaries has the mini hinges in right now :).  And you can find Websters Pages collections HERE.  Thanks so much for stopping by!  xo
 

Saturday, December 7, 2013

Getting Messy with NEW Bo Bunny {Pincushion Collection}


I just love this photo of my DH Steve and our youngest daughter Meagan (taken a few years ago)....she's always been Daddy's girl, always seen skipping along beside him, ....and yes! the little bouquet of rag-weed (Goldenrod) in her hand was picked for her Daddy! lol!  
 
I thought I'd have a little fun with this page and get messy!  I really love the fun Toile designs in this new Bo Bunny collection so I used the one above as the base of my page.  I wanted the design to be a little less busy in the center of the page where I would be adhering my photo and embellishments so first I gave the page as soft wash (dry brushing) with some white Gesso....fading out the gesso as I move out to the edges.
 
 
I then started layering on some colors sprays in coordinating colors and layered on some stamp designs with a variety of stamps (I've listed the Bo Bunny Stamps I've used below).
 
 
I made the rose using one of the floral papers in the Pincushion collection with a flower die cut. And the li'l dried floral cluster is another one of Lucy's cute little embellishments from her Etsy shop called Tresor's de Luxe!   When my page was done, I did a little dry brushing with some aqua paint, dabbing here and there to bring in an extra color value.
 
Bo Bunny Supplies:
Patterned Paper: Toile (both sides), Tailored, Sew Fun/Pincushion
6x6 Paper Pad: Pincushion
Buttons: Pincushion
Trinkets: Serenity
Flowers: Harvest Orange Bouquet
Lace: Natural Earth Lace
Jewel Flourishes: Licorice Jewels
Stamps: Bo Bunny Gabrielle, Enchanted, Powder Mountain, (Vine design stamp is Somewhere In Time from my local dollar store), Tim Holtz 'Heartfelt' Stamps.
Mists: Tattered Angels (Cinnamon)
Mask/Stencil: Heidi Swapp
Floral Die:  Spellbinders 'Spiral Blossom #1'
Dried Floral Cluster:  Tresors de Luxe
 
Thanks so much for stopping by again today, as always I'm so grateful for the kind feedback and comments! xo xo

Wednesday, December 4, 2013

VIDEO TUTORIAL: Scrapping Softly {Monochromatic Page}

 
So I took this sweet li'l photo of my youungest daughter Meagan and her cousin a few years back, I just love the sweet soft look of the picture.  I thought I would make a monochromatic style layout to compliment the photo.  I used a variety of Maja Design papers (listed below) along with some new Dusty Attic chipboard (Lavender) and gorgeous lace trims, bloom and vintage button from Tresors de Luxe.  And I thought it might be nice to do another video step by step to share how this page was put together.  I usually do my videos at a fairly quick speed but this time I thought I'd slow it down a little to hopefully make it a little more comfortable to absorb.  Grab yourself a cup of coffee/or tea and Enjoy!


 Here again are a few close-ups of the page....


Supplies:
Patterned Paper: Maja Design - Vintage Spring Basics (7th of April, 6th of May), Vintage Summer Basics (1904, 1932), Vintage Autumn Basics (XVI), Sofiero (The Elegant Wine House). Note: you can find Maja Design papers online at The Scrapbook Diaries. http://www.thescrapbookdiaries.com/product-category/collections/
Flowers and Lace:  All lace trim, large fabric flower and vintage button are from Tresors de Luxe Estsy shop http://www.etsy.com/shop/TresorsdeLuxe
Ink: Versa Mark 'Spring Pastel Collection' Chalk Ink
Stamps: Bo Bunny (Distress Textures Stamps, Midnight Frost Stamps (script), Prairie Chic stamps), Title stamp:  My Little Yellow Bicycle
Trinkets: Key-K and Company, Envelope-Prima Marketing
Stencil/Mask: Crafters Workshop (I got mine from The Art House Studios online store http://www.thearthousestudio.ca/#home
Chipboard: Dusty Attic (Lavender)
Washi Tape: Tim Holtz
Martha Stewart Leaf Punch
Green Adhesive Gems:  Recollections
You can find my home-made texture paste recipe at my blog http://gabriellepollacco.blogspot.ca/2013/06/a-tranquil-moment-with-new-websters.html
 
I hope you all enjoyed my project and video tutorial, if you have any questions, don't be shy to ask!  Thanks so much for stopping by today! xo

Tuesday, December 3, 2013

Gathered Paper VIDEO TUTORIAL {Card Making ~ Watch the Process}

 
Bo Bunny's new 'Pincushion' collection is now out in the stores and ready to play with!  I love the cute sewing and stitchery designs in this collection.  So I thought it would be fun to do a gathered paper technique that is reminiscent of gathered fabric. 

 
The last few times when I've done a gathered paper technique, I got a whole bunch of messages asking if I would show some of these techniques in a video.  So I thought I would do a Video Tutorial showing all the steps in creating this card from start to finish.

 
I will list all products used in creating the card directly below the video tutorial. (Note: I used 2 die cuts to make this card: Spellbinders Spiral Blossom #1 and Cheery Lynn Designs 'Fanciful Flourish', which I premade/cut before filming the video).  Hope you enjoy! 


Supplies:
Patterned Paper: Polka Dot Pattern, Tailored/Pincushion
Cardstock: Tutu, Clover/Double Dot
6x6 Paper Pad: Pincushion (green plaid)
Buttons: Pincushion
Noteworthy: Pincushion
Stamps: You're Invited, Distress Textures, Powder Mountain (script)
Dies:  Cheery Lynn Designs "Fanciful Flourish", Spellbinders Spiral Blossom #1
Other: Hemp twine, Stamping Ink, Tim Holtz Edge Distress Tool, Fiskars Shell Punch

 
For my second card I thought I would play up the pretty black & whites in this collection (Pincushion) and mix it with one focus color, in this case I used an aqua. 
 
Supplies:
Patterned Paper: Pincushion, Sew Fun/Pincusion
Cardstock: Ocean Double Dot
Stickers: Pincusion Combo Stickers
Flowers: Bouquet/Denim Blue, Zinnia/Denim Blue
 
I hope you enjoyed my 2 projects and that my video tutorial has been helpful!  Thanks so much for sweet comments and kind feedback I've been getting, I appreciate and read them all! xo

Friday, November 22, 2013

Do You Like to Watch? {Maja Design and The Scrapbook Diaries Kit Page & Video Tutorial)

 
I just love this photo of my sweet niece, taken a few years ago of her and her dog Dahlia.  She has recently gotten married and Dahlia is getting up there in age, but I think it's so sweet the way she cares for and love's her first pet. 
 
I made this page for The Scrapbook Diaries, a very unique kit store.  Janene had me create a page and make up a step by step video tutorial that comes with purchase of the kit (you get unlimited access to the video when you buy the kit), ....she puts together a kit just filled with all the yummy goodies I used to create this page, pretty much everything you need to make this layout other than glue.  I used lots of pretty Maja Design papers for this one as well as some really fun mixed media products, 2 colors of Lindy's mists/sprays, one of my all time favourite Bo Bunny Stamp sets, Prima flowers, metal accents, pebbles, lace, some very beautiful chipboard, wood accents and more.  You can find more information on this kit and video at The Scrapbook Diaries Blog.
 
 
Here is a close-up of some of the lovely goodies you'll find in the kit....I'm loving the page pebbles and the delicate little wood accents I used to frame the clock designs.  Here are a few more close-ups of my page....


If this page is something you would like to try out, you can find the kit here ... The Scrapbook Diaries Kit "Love Beyond Measure".  Her kits are always an amazing value given all the unique and premium products she includes in them.  You are given 2 options, the Complete Kit and the Basic Kit (the Basic kit is a great money saving option if you already have some of the elements I used for the page like the stamps or mists...both options of course include unlimited access to the video tutorial that goes with the kit.  Or you can always shop for item's a la carte in her store as well (she has a great supply of Maja Design papers!).

Thanks so much for stopping by my blog today!  I appreciate all the lovely feedback, I read them all and try to answer your questions and suggestions to the best of my ability. xo xo


Wednesday, November 20, 2013

Making Cards with Webster's Pages!

 
Today I'm sharing with you all a couple of cards I made using the new Webster's Pages collection called A Christmas story.  For the card above I went with the pinks and golds in the collecion.

 
I wanted to go with a nice fabric feel to this card so I used Websters Pages pink Bloomers along the top edge of the card, added some gold lace trim from older Websters collection, and a small swatch of fabric (actually an indurstrial cleaning cloth). I accented with one of Websters Pages famous cameo's (Perfect Accents) and their new metal charm frame.
 
 
For my 2nd card I went with the blue/aqua colors in the collection. I simply cut 3 of the patterned papers in different sizes, distressed the edges with a Tim Holtz edge distressor and machine stitched the edges.
 

I took one of the Perfect Accent resin frames from Websters Pages and gave it a quick coat of slightly watered down gesso....then wiped away the relief areas, exposing some of the aqua color underneath.

 
I hope you enjoyed my 2 projects I shared with you today.  It's going to be a busy posting day for me today, if you have a chance, pop back in later in the day I have another fun project to share with you! NOTE:  Update....I will be postponing my 2nd post for today until Friday, needed to tie up some loose ends before I get this one up.   xo xo

Monday, November 18, 2013

Websters Pages New Holiday Collection & Tresors de Luxe

 
You can always spot one of Brandin's (Webster's Pages owner/designer) collections at a glance, they are always full of lovely feminine design elements: gorgeous flowers, flourishes, damask patterning and beautiful color palettes.  For me the pinks and golds in the 'Christmas Story' collection are a total favourite!  For this page I scrapped a photo I came across of my youngest daughter Meagan when I was shuffling through some older photos from a few years back.  I did a bit of inking with one of my favourite ink pads, the Tim Holtz 'Victorian Velvet' distress ink pad as well as adding a little texture with the 'Damask' 6x6 stencil from Crafters Workshop.


I've always loved the beautiful cameo's (Perfect Accents) from Websters Pages and now I'm so happy to see that they put out some gorgeous metal trinkets and frames that work beautifully with the cameos, they just click right in!  Didn't even have to glue it. 
 
 
Another fun little metal trinket is this one from the Christmas Story collection.  There are so many cool things you can do with this one.  It's hard to see in the photo above but IRL there is a lovely glossy effect on the center piece of the trinket. 
 
 
The photo above better shows the jewel-like glossy effect I was able to achieve in two easy steps.  See below for 2 easy steps to making your own unique trinket.
 
 
There are so many ways to make your own trinket design to compliment your page design....try cutting out a section of patterned paper, glue in place and cover in Glossy Accents....or put in a coat of glossy accents and fill with a variety of glass beads....the options are endless!
 
 
I also added a few accents to the page with some Dusty Attic chipboard, Baroque Corners is one of my all-time favourite chippies, it's one of those accents that fit in anywhere and add a touch of elegance to a page.  I also used one of the Elegant Frames to frame my title.  NOTE:  If you are looking for a great shop to purchase Dusty Attic Chippies in North America (USA & Canada), my friend Vicky Alberto is have a 20% off sale on all purchases over $25.00 from now until December 1st.  I noticed she has a lot of the newest DA chippies in as well!  You can find her Estsy shop here ~~> Simply Paper & Embellishments
 
 
And last but certainly not least, I have to tell you about these cute lil natural floral accents I got from Lucy at Tresors de Luxe Etsy shop!!  I got hit hard with the flu yesterday while working on this page and I wanted no more than to just crawl into bed and rest!  So I had to work quickly to get this page done.  I grabbed a couple of loose blooms I had in my stash and then took one of Lucy's natural floral accents and was quickly able to put together a nice floral cluster.  No fussing about with tying twine, bundling blooms or wire accents....all I had to do was glue it down.   If you haven't seen her etsy shop you are in for a treat, her shop is just packed with gorgeous laces, doiles, blooms and floral sprays!
 
Well, that's my post for today....I'm off to get me a little bit of rest, hope this flu doesn't stick to long.  Thanks everyone for stopping by today! xo

Friday, November 15, 2013

Bo Bunny Design Team Blog Hop!

 
Hi everyone! Welcome to the Bo Bunny Blog Hop!!  AS AN EXTRA BONUS I'VE DONE UP A VIDEO TUTORIAL to show my process in creating this page!  I've had a lot of requests from my blog readers to create some videos showing my thought process as I make up a page.
 
  If you've come from the Bo Bunny blog you are on the right track, below I've listed the blog order with links in case you get lost along the way. Today our theme is something we all hold near and dear to our hearts ~ Family!  I wanted to do a page with a picture of my whole family together....but realized with me behind the camera, I have so few photos with all of us together. I had to go back a few years for this!  Still, always fun to scrap memories isn't it.  One thing we always did from the time the girls were babies is go on nice long forest walks together.  We have so many beautiful areas to hike in and have always had a dog (to get us off our butt's and out in the fresh air), ...to this day the girls still love to go and do this together as family. ....  I used the beautiful NEW 'Woodland Winter' collection for this one.
 
 
I did a fair bit of stamping and spritzing for this one, as well as embellishing with the new Kraft collection Wood Clocks and clock hands (One of my absolute new favourite Bo Bunny embellishments!). Here is another close-up...
 
 
There are lot's of lovely coordinating goodies to go with this collection, buttons, alpha stickers, chipboard.  Before I go into a lot more detail I'll just point you to my video tutorial. 
NOTE:  I hesitated posting this tutorial because once I finished taping it I saw that there were some lighting issues that can be a little distracting.  Appologizing in advance for the lighting (I'll be sure to tape in the daytime from now on! :)


.....so as you can see....my process is not always perfect! LOL.....In one of the parts I tried using a fan paint brush to flick splatters on my page (a really fun trick the super talented Limor Webber shared in one of her amazing tutorials)  Limor's splatters came out perfect...mine, an epic fail! lol.....I think I should've added some water....all I managed to do was get ink all over my photo and had to get another one printed.  But I figured I'd leave it in so you guys can see all aspects of the process :)
 
Supplies:
Patterned Paper: Bo Bunny "Woodland Winter" collection papers and 6x6 paper pad
Stamps: Bo Bunny Stamps: Geometric Patterns, Distressed Textures, Stained Textures, Mama-razzi II stamps, Weekend Market stamps
Stencil: Crafters Workshop 'Circle Grid' 6x6
Chipboard: Bo Bunny Woodland Winter
Buttons: Bo Bunny Woodland Winter
Wood Embellishments: Bo Bunny Kraft Collection (Clocks)
Title Stickers: Bo Bunny Woodland Winter
Sprays and Inks:  Lindy's Stamp Gang "Baby BLue Eyes", Art Anthology "Mocha', Donna Salazar Distress Ink pad (Patina. blue),
Flowers: Prima and Recollections
Bo Bunny Trinket
Other: Burlap, Cheesecloth, Natural Hemp twine,
 
 I hope you enjoyed my project and the video tutorial.  By the way, I appreciate all the kind and encouraging comments (both public and private) for my video tutorials, they mean a lot to me xo).  Now, as promised here is the blog hop list. Be sure to find the answer to the question that each of us asked at the Bo Bunny blog, then when you are done email your answers to thebobunnyblog@gmail.com, a random draw will be made and the winner will recieve a lovely Bo Bunny prize!
 
Blog Hop Order

 
2.  Gabrielle  (me)
3.  Ilene
4.  Irene
5.  Juliana
6.  Kaori
7.  Back to Bo Bunny to answer questions using Rafflecopter Widget.


Now it's time to hop over to Ilene's blog (link above), her work is always a treat to see, I'm sure you'll be inspired!  Thanks so much for stopping by! xo xo
 

LinkWithin

Related Posts with Thumbnails