Saturday, October 29, 2011

Websters Pages DT page & Glue Arts!!

Websters Pages was doing a match-up with Glue Arts this week so our design team was delighted to recieve some Glue Art products to use on our projects!   I basically used a little bit of each of the products sent to me to create the above page that I made with Websters Pages 'Western Romance' Collection.  Here are the some of the ways I used these awesome Glue Arts products...
I used the GA Pro Glider to attach all my patterned papers to each other. 
The Glue Arts 1/2 " Adhesive squares ROCK! for adding embellishments like blooms and cameos! 
They have wonderful glue strips to attach your ribbons and lace! 
And their Adhesive foam pieces work grea for adding dimension to a project! 
Which is my favourite?  I love love love the 1/2" adhesive squares for adding embellishments!  Those things really STICK!!   Here is a list of supplies I used to make the above page:
From the Western Romance Collection: Fabric Tickets, Fabric Ribbon, Alphabet Stickers,
Websters Pages whimsies (heart & rose), Silhouettes (Cameo), Princess Petals, Sparklers.
Chipboard corner flourish:  Dusty Attic
Lace trim & Pearl Strands from local fabric store
Adhesives: Glue Arts

Here are a couple more close-ups of my page (TIP:  I used a decorative edge scissor to make the edge for the second layer of patterned paper)....


For lots of wonderful ideas in using Glue Arts products you can check out their blog site HERE!  And if you'd like to see more projects done by the Websters Pages design team using GA & Websters Pages products, come have a peek at the Websters Pages blog, you'll be happy you checked it out!

Tuesday, October 25, 2011

Paper Flower Tutorial ~ Websters Pages & Glue Arts!

I thought I would share a tutorial for a flower I've used on my layouts over this past year.  I've shared some information on how to make water distressed blooms but I've gotten emails over this past year saying that some of you don't have the flowers turn out the same as mine. So I thought it would be best to actually show you each step in a video.  I also thought I would share a little tip with you all on an awesome adhesive I've found that works really well for adhering flowers and embellishments to your projects.  Glue Arts 1/2" adhesive squares...super strong!
I used the Websters Pages Western Romance collection to make up the above page.  I love that buttery yellow colour in the paper and bloomers!  Here are some close-up pic's of the layout and the blooms I'm going to show you how to make....


Just click on the video clip below and watch how quickly and easily these blooms come together...
I hope this video will help you all in tweaking those blooms to get them to look the way you want them to! ....This week the Websters Pages design team and the Glue Arts design team have teamed up together to present some exciting and beautiful projects.  So be sure to check out the Websters Pages Blog and the Glue Arts Blog throughout the week to be inspired!  Thanks for stopping by, ...and let me know how your blooms come out!


Friday, October 21, 2011

Bo Bunny Challenge..... & I Made a Sketch!

So my assignment with Bo Bunny this week was to create the layout sketch and create a layout to go with it as well.  Well, I was a little nervous about it, I'm new to making sketches, but with a little trial an error I managed to put a sketch together.  Usually I would make my page first and create a sketch from the page I made but I didn't want the other girls that were doing the assignment to have to wait on my sketch, so the sketch came first.  The above l/o is the page I came up with using my sketch..  I wanted to go a little more monochromatic with this page so I went with some papers from the Bo Bunny Et Cetera collection and tried to stick to neutrals with just a hint of blush pink.  I added just a little bit of Bo Bunny's Timepiece into it too (I love the 6x6 paper pads, I used the clock paper and cut out the clocks to use as embellishments....just added a little Stickles in Platinum color to dress them up a bit)

I also added in a few pieces of my favourite chippies from Dusty Attic too!   The Vintage Keys, the Chicken Wire (that's the last of my chicken wire in my stash! now I'm waiting on my next DT package...can't wait!)  the corner flourish and title chippies are all from Dusty Attic.   The larger blooms are handmade by simply gathering some pieces of lace.  Here are a few close-ups of the page details....

NOTE:  I used Tombow liquid adhesive (green & white bottle) to attach my pearl strand.  I find this works beautifully for adding fussy strands to a page.  All you do is use the fine tip end and draw out the design you would like your pearl strand to go in.  Let the adhesive dry slightly, it becomes gummy/tacky.  You can then lay your pearl strand onto the page over the line and it will stick without slipping!

For the circle design I used the Crafters Workshop circle template and cut the circle design from one of the Bo Bunny patterned papers.  I made marks for my brads and then added some kitchen twine twisted around the brades to create the above design. 
I used a corner stamp and key-hole rub-on from the Bo Bunny Timepiece colletion to dress up the corner of my layout. 
Supplies for this page:
Patterned Paper: Et Cetera - Mail Room, Et Cetera, Symphony, Gabrielle - Cut Outs
Cardstock: Tutu Dot
6x6 Paper Pads: Timepiece (clock face embellishments)
Noteworthy: Et Cetera
Stickers: Et Cetera Combo Stickers
Rub-on's: Timepiece
Trinkets: Gabrielle
Stamps: Timepiece
Buttons: Bo Bunny Buttons & Bling
Blooms were handmade by gathering strips of lace.
Chipboard pieces: Dusty Attic Designs
Lace & Pearl trims are off the roll from local fabric store.
Cheesecloth, twine, ink & Stickles.

If you like the page design please feel free to use my sketch and give it a go!  Here is the sketch for this page...
If you use the sketch design, I'd love it if you drop me a link here in a comment so I can come have a peek!  I'd love to see what you all do with it!  And be sure to drop off a link to your page at the Bo Bunny Blog (by November 3rd) for a chance to win some yummy Bo Bunny goodies!!  xx

Thursday, October 13, 2011

Websters Pages Projects & My NovelTree!!

First off I thought I would share a couple of projects I recently made with a couple of the yummy new Webster's Pages Collections.  The above layout I made with the All About Me collection.  I think this collection is so fresh and pretty.  I found this old photo of my younger sister when she was little and know I just had to scrap it with this collection.  The two of us are only a little over a year apart and are not just sisters but best friends.  I thought I would make this page as a special gift for her.  I used a variety of the All About Me patterned papers, the matching die cut paper (I cut out the edges of the die cut paper for this layout ....I was inspired by a page by Robin Shakoor), WP Sparklers, WP BloomersWP Fabric Tickets and Journaling Cards as well as Whimsies and Cameo Push Pins. Here are a couple of close-ups of my layout...


I provided links to all the Websters products I used to make up this page so that if anyone would like to order it you can do it directly from the WP site!  (Not all of us are lucky enough to have scrapstores near our homes :)   I also have another little project to share, a little card I made using the Western Romance collection.  I made this card for my project that was inspired by our featured Guest Designer this month Stacey Young.  Her work is so beautiful and I love the way she used kitchen twine on dt work!

And now I'd like to share with you all a special new project that Brandin has been working on for sometime now called My NovelTree!  Lets face it...we all LOVE Websters pages designs and projects but not all of us have the time to put together layouts and albums we'd like to share with our families.  Websters Pages is passionate about helping everyone preserve their memories in a beautiful way.   At My NovelTree you will find the most beautiful premade Photobooks, Pocketbooks and Scrapbook Pages!

 These albums are the perfect solution.  Check out the My NovelTree Gallery HERE for the many styles available!  Just click on the album photo and it will flip through each of the pages in the album.  These are also great for scrapbookers who want to give gifts, make multiple albums or specific theme albums!  

So pre-order yours today & become a founding member! This is a limited time offer...you can not miss this opportunity ♥

Now stop by and LIKE US at our NEW Facebook Page, share our badges or FB Page and you could be one of the lucky winners we'll be choosing if we spy you sharing myNovelTree!  I've been reading some of the posts there by members who have already purchased these beautiful products and let's just say the are uber-excited and thrilled with the product!

Wednesday, October 12, 2011

Focus on....Bo Bunny's Noteworthy!

I just love these pieces that are available with each of the Bo Bunny collections!  They are these amazing die-cut pieces that you can use as special matting, framing for your photos and titles, journaling tags or to create one of a kind embellishments! 

For my layout above I used papers from the Bo Bunny 'Welcome Home' collection along with Noteworthy pieces from the Welcome Home collection (to frame each of my photos) and and extra piece of Noteworthy from the Et Cetera collection as matting (I added a little machine stitching to them to add texture).


This page is about my oldest daughter Chloe and the interest she had taking in cooking and experimenting with recipes.  Above is one of her favourite grill cheese sandwiches.   (Rather than using the usual cheese for her grill cheese, she layers on the Jarlsberg, sliced fresh tomato (salt & pepper), fresh basil leaves and a drizzle of honey!.....sooooo good!  Try it, you won't be sorry you did!)

Bo Bunny Supplies used on this page:
Patterned Paper: Welcome Home Porch Swing, WH Welcome Home, WH Home Decor.
Noteworthy: Welcome Home & Et Cetera
6x6 Paper Pad: Welcome Home (behiind photo and in the torn strip at top)
Stickers: WH Combo Stickers (title & strip), and Layered Stickers Welcome Home
Tinkets: Welcome Home
Chipboard: Et Cetera (title alphas)
Welcome Home Jewels flower centers and on sticker strip.

For more inspiration on how to use Bo Bunny Noteworthy pieces, you can check out todays blogpost at the Bo Bunny blogsite!  Thanks so much for having a peek today!  :)

Friday, October 7, 2011

The Color Room #79 & Some Dusty Attic Goodness!

It's another gorgeous palette to inspire you over at The Color Room!  This weeks palette (#79) is a lovely combination of a soft rosey plum, a warm caramel, a dove grey and a hint of muted teal.  Here is the inspiration for the palette....
I always love to challenge myself to see if I can find all the colors I need from my old stash and get the colors as close to the palette as I can (you should see me with my computer screen up and holding all my items against the screen! lol!  It makes me happy to know that I'm using up product that I already have.  I think I managed it!  But I have to admit that I used new product in the Dusty Attic piece's I used (but at least I didn't go out and purchase anything new for this page! yay!)  The basic rules of the Color Room is to use all the colors in the palette (only) and you can also use neutrals with it (like white, black or craft paper). 

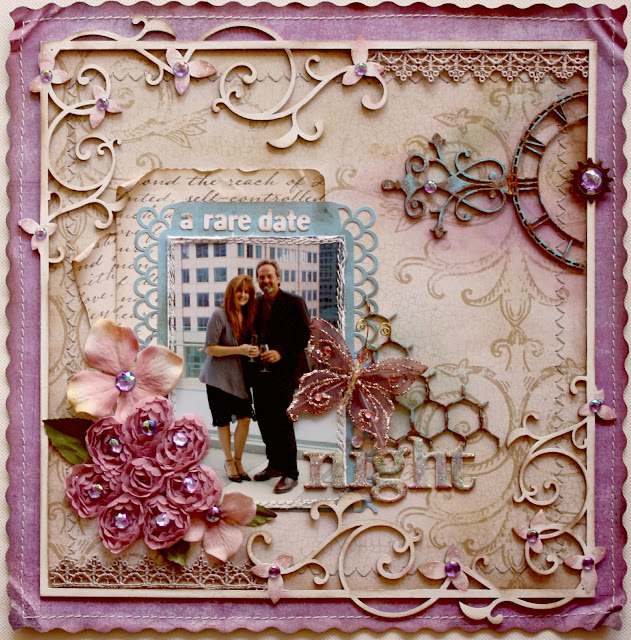
This page is to represent one of the few date nights my dear husband and I manage every once in a while.  We tend to do so much as a family but it really is nice to get out just the two of us sometimes.  Here we were at a party for Steve's brother in downtown Toronto (the CN Tower was directly behind us in the photo but my BIL took the photo at the wrong angle).  The food was crazy AWESOME!! .....here are a few close-ups of the page elements.....

 I used lots of Dusty Attic Chipboard on this page.  I had a piece of the Skeleton Clock Face left over from another project I did and I split a piece of French Flourish in half to create the design above.
 For the above piece I added a little piece of the Dusty Attic Chicken Wire (one of my favourite pieces, it's so versatile) and below you can see a corner of the intricate new Sweat Pea Frame design from Dusty Attic.  If you are looking for Dusty Attic products, just look to the right of my blog site, I've listed a bunch of the retailers there for your convenience.
As for the rest of the supplies, I used some BasicGrey Kioshi (the mauvy background frame paper), The script paper and flourish paper are both Recollections (from Michaels), The teal paper is Tim Holtz, The lace, butterfly and ribbon bloom is Prima.  Gems are Recollections.  The chipboard alphas are Bo Bunny from the Et Cetera collection.  If you want some tips on how to do the Verdigris Aged Patina that I added to the flourish and clock you can check out my tutorial by clicking on the words (or find it on the rightside column of my blog.  Come join us in the challenges over at The Color Room, give the above palette a try and remember to post your layout in the gallery there, you might just get featured in next weeks newsletter!


LinkWithin

Related Posts with Thumbnails