Thursday, August 1, 2013

Exciting NEWS!!! Announcing the new 2013/14 Bo Bunny Design Team!!


I'm so thrilled to be sharing this wonderful news with you all today!  Bo Bunny has announced their new design team for 2013/14!!  I was so honored to be asked back for another term, I've been with Bo Bunny for a number of years and each and every moment spent on the team has been a joy!  I look forward to the upcoming year and am excited to get to know the newest girls on a more personal level.  We've got such an International group of ladies again, more likely than not you will be seeing designs by someone that lives near you!  I think you will all be thrilled to see some of the talented girls that will be sharing their Bo Bunny work with us over the upcoming year. I know that this was not an easy decision for the folks over at Bo Bunny, there were so many worthy and talented entries!  But I have been told that they will also be having lots of guest designers over the next year, so if you didn't make the team, don't dispair, there's always a good chance we'll get to see your beautiful work on a guest designer spot!  So without further ado, here is the new team....


BoBunny Design Team

1. Agnieszka Bellaidea - Canada
2. Amy VoorthuisNetherlands
3. Bernii MillerAustralia
4. Denise Van DeventerSouth Africa
5. Evgenia PetzerSouth Africa
6. Gabrielle PollaccoCanada
7. Ilene TellDelaware, USA
8. Irene Tan - Malaysia
9. Juliana Michaels - Ohio, USA
10. Kaori FujimottoJapan
11. Keri BabbittUtah, USA
12. Lisa Nazario-GregoryFlorida, USA
13. Lisa Novogrodski Rhode Island, USA
14. Lynn ShokoplesCanada
15. Maryia PotapovichRepublic of Belarus
16. Megan GourlayNew Zealand
17. Rhonda A. Van Ginkel - Minnesota, USA
18. Romy Veul -Netherlands
19. Solange Marques - Brazil
20. Tracee ProvisUnited Kingdom
21. Ulrika WandlerSweden

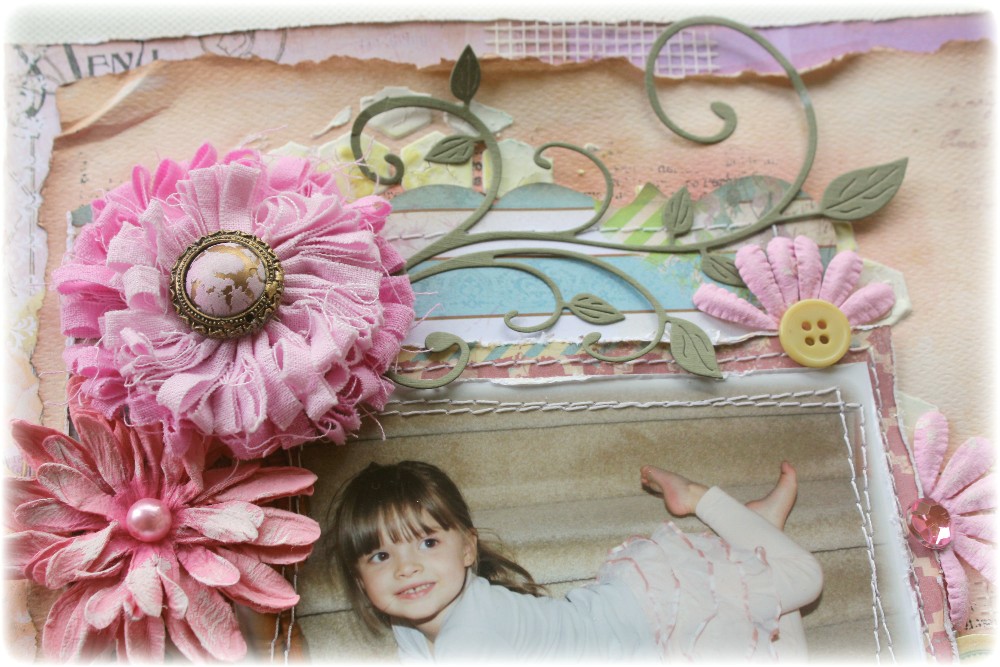
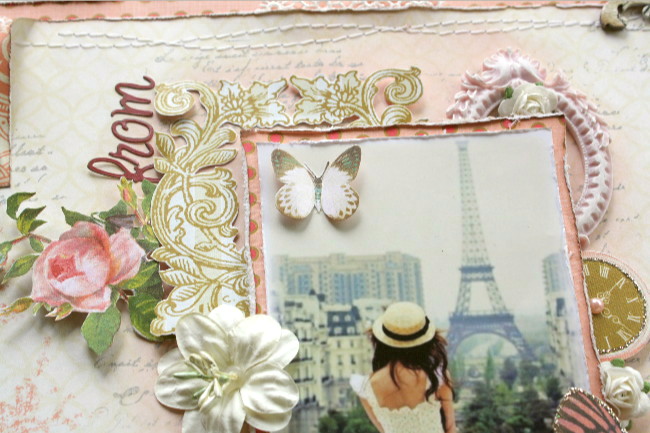
I thought it would be a fun idea to share with those of you who are hopping to each of the blogs to share with you a few of my most recent pages made with Bo Bunny goodies.....


At this point I just want to say a fond farewell to all my dear friends from the out-going Bo Bunny team, we've been through so much together and I've so appreciated your kind support and encouragement over the years, I will certainly miss our daily interaction but I will for sure keep in touch as well and look forward to seeing your work in the galleries.  I wish you all the best in your future endeavors. xo xo


Wednesday, July 31, 2013

Capturing Those Everyday Moments {Maja Design & MLYB}

My camera is rarely far from my reach, I love to snap those everyday photos like the one I took of my oldest daughter Chloe when we were out at a little patio in Paris, Ontario having a cold drink and some munchies.  To make up this page I went with the soft green paper from the new Maja Design 'Sofiero' collection and mixed it with some of the greens from the 'Life in the Country' collection and a little touch of 'Crea Diem' for elegance.
I got this beautiful pack of elegant lace's from Lucy at Tresors De Luxe, so I used a section of one of them under my photo (I lightly misted them with some green and tea color tints).  I also like to use earthy colors with green when it comes to my embellishments, so I used a variety of embellishments from the 'Naturals' collection from My Little Yellow Bicycle. I love their canvas, wood and cork embellishments.  Here are a few of the embellishments I used on this layout....
I tinted the measuring tape embellishment from the Canvas Strips with some tea (yep! a real tea bag steeped in boiling water).  I added some Platinum Stickles to the Cork Heart Pin.  I used the canvas flower shape to make a layered bloom and the other canvas pieces were simply used 'as is'. 
I absolutely LOVE LOVE LOVE the new 'word' stamp sets from My Little Yellow Bicycle, I love the script/font they use for the title stamps and they come in so many great and versatile subject/titles.  The one I used here was from the 'Everyday collection'.  I wanted to get an even more intense effect so after I stamped the title in black ink, I used some gloss medium (I used the Gloss Varnish from Dusty Attic, but Glossy Accents will work just as well)....I just followed the lines of the stamped image to give the title a nice shine and some thicker texture. 
In this close-up you can see the canvas bloom from MLYB layered with the Recollections blooms.  In the corners I used another stencil I bought a couple weeks ago from the Art House Studio (Brick Stencil by Crafters Workshop).  Some of you have asked me about these stencils, it's an artshop/studio here in Cambridge Ontario but she also sells online with a very reasonable shipping rate, you can find her shop HERE
 
Many of you have also been asking me about where to get Maja Design papers....more and more shops and online stores are beginning to carry these beautiful paper collections.  You can find a full retailers list HERE.  And if you'd like to check out Tressors De Luxe lace and other lovely embellishments, you can find them HERE.

Thursday, July 25, 2013

July Dusty Attic ATC Challenge ~ {Trinkets & Treasures}

 I'm always excited to see what the new challenge theme for the Dusty Attic ATC challenge will be for each coming month.  This month (July) has such a fun theme ~ "Trinkets & Treasures".   I wanted to go with losts of gems and glitter for this one.
 I began with the ATC Frame Set #4.  I used a whole bunch of heat embossing metalic powders to create a kind of aged metal patina.  I then used the Morrocan Design chippie as a backing for my cameo piece (Cameo is from Websters Pages).  This piece I coated with some 3D metalic paints (Scribbles) and different colors of Stickles glitter glue.  And finally to give the ATC more opulance, I added a variety of adhesive gems.
Here are the Dusty Attic pieces I used for this project....
There's still some time this month to play along in the challenge and have a chance at a nice Dusty Attic prize!  Here is info you'll need for the challenge (this link is for the swap and for the challenge....it is not necessary to enter the swap, you can enter your ATC in the monthly challenge and still have a chance to win :)

Tuesday, July 23, 2013

Enjoy the Adventure {Bo Bunny Trail Mix}

I just love the Bo Buny Trail Mix collection for those outdoor/travel type layouts!  Some of the design team girls were challenged today at Bo Bunny to create a 'travel' page using 3 photos.  I was all set to do my layout until I actually registered that I had to use THREE! photos!  I'm used to using 1 or maybe 2 photos on my pages, I get a little nervous when I need to use more!  But you know what? it's really not that tough as long as you remember to size some of your photos a little smaller when you get them printed.

I like to mix my trinkets with chipboard, for the embellishment above I used a Dusty Attic Compass chipboard (I gave it a bunch of different coats of embossing powder in a gold, metalic blue, glitter black and a glitter rust and then hardened with a heat gun) and mounted the Bo Bunny Trinket in the center.

TIP: A new favourite stamp for me lately is the "It is Written"background stamp from Bo Bunny!  I particularly love the text stamp!  I just love using this one over color inked areas and then using a texture paste design over that!  Here is a full list of supplies I used to make this page....

Supplies:
Patterned Paper: Trail Mix (Bird Watching, Field Journal)
Carstock: Double Dot (Ocean)
12x12 Chipboard - Trail Mix
Layered Chipboard - Trail Mix
Trinkets - Trail Mix
Stickers - Trail Mix
Stamps - It Is Written Background stamp
FLower: Little Miss
Other: Twine, Drywall screening, Ink (Tim Holtz Broken China, Colorbox Mixed Media Inks - Honey, Patina), Compass chipboard - Dusty Attic, Brick Wall Stencil - Crafters Workshop, Texture Paste (home-made, recipe is in the right side column of my blog under my tutorials).
 
I'm excited to get my hands on some of the new papers from Bo Bunny coming out at CHA, but in the meantime, I'm still havin' a blast playing with the mid-season releases!  Thanks for stopping by today! xo xo

Wednesday, July 17, 2013

She Blooms {NEW Maja Design ~ Sofiero Collection} PLUS a Bloom Tutorial!!

 
I'm so excited today to share with you my first project that I made with the NEW 'Sofiero' collection by Maja Design!  I'm just a total sucker for pink when scrapping and the gorgeous blooms in the Sofiero papers totally made me reach for this photo of my oldest daughter Chloe.  We like to pick bouquets of blooms from our garden on Fridays so that the house looks and smells pretty for the weekend.  I love Spring and early Summer because we have lot's of 'picking' flowers in our garden at this time of year.  The peonies she picked that day were not only beautiful but the scent! Lovely!
 
 
The papers that I used from the Sofiero collection are....Strolling Down the Rose Path, Enjoy the Fragrance-bs (Don't you just LOVE the pretty names of these papers!!).  I also combined these with some accents from two other collections - (1922-bs from the Vintage Summer Basics, as matting for my photos, and Den oersättliga tiden from Crea Diem....love the clock images!)
 
I cut out some of the clock images, edged them with some Platinum Stickles and tucked them around my photos.  For the larger clock image I created a delicate frame design using a cute little corner flourish die (Lace Corner Deco B -B162) I got from Cheery Lynn Designs.  I just layered them around the clock edge creating a doily effect.  I also used some of the lacy corners in the outermost corners of the layout.
 
You'll also notice the fun textured writing design I put behind my photos and embellishments.  I just love the scripted writing bits that Marie  (the talented owner/designer of Maja Design) incorporates into her paper designs so I wanted to mirror this with some masking and texture paste.  I used my home-made texture paste recipe ( this can be found on the right column of my blog under my tutorials) and a new Crafter's Workshop mask I picked up over the weekend.  Did I mention that I found this AMAZING Art/Mixed Media/Scrapstore not 5 minutes from my place!!  Finnabiar (Anna Dabrowska) was having a class there over the weekend and one of my online scrapfriends was attending and mentioned it to me!  I wasn't able to attend the class because of family coming to visit but I was able to duck out and meet my friend Avril for a coffee after the class.  I stopped by the shop and was so tickled to find this amazing shop so close by!  Loads of wonderful scrap goodies and mixed media supplies to be had there.  The store/workshop is called The Art House Studio, for those of you who live close to Cambridge it's well worth a visit... and for those of you who don't, she also has an online store, and I hear the shipping rates are great!  I was able to pick up all sorts of masks I've been wanting and I'll for sure be back for some of those mixed media goodies I've got my eye on! :)   ....Did I mention that I got to meet Anna as well?  She is such a cutie-pie, so very sweet to everyone!  And seeing her work, in real life? Gorgeous!
 
 
Okay....so getting back on topic again, lol!  I wanted to have some soft fabric blooms for this one so I ended up making these blooms myself.  I saw a tutorial a while back on making these fabric blooms but it was in another language and I slightly altered the bloom with different centers.  So rather than linking to the site, I thought I'll just take pic's of my flower as I make it and share the design here with you all.
Gathered Fabric Bloom Tutorial


Cute aren't they?  And as you can see, quit easy to make!  I just used some scrap fabric I had from an old pink blouse I had been cutting up to make blooms.
 
To finish up my page I added a few of my Dusty Attic chippies (Corner flourish #3, Rose Vine, Bird Houses), again simply treated with some Gesso, random stamping and some Dusty Attic Crackle Varnish.
 
I hope you enjoyed today's project and I hope you give this bloom tutorial a try!  I'd love to hear how your's came out.  And for those of you who have been writing to me asking 'Where can I find Maja Design papers??"  ....Good news!  More and more retailers on our side of the world are now carrying these beautiful collections.  Here are just a couple of the retailers that let me know that they now have them in stock....
 
To find a retailer near you, you can check out the 'Store Finder' at the Maja Design Website.

Monday, July 15, 2013

Fun with Banners {Bo Bunny Design Team}

Banners have been a fun new design element in the past couple of years....and Bo Bunny challenged some of us design team members to create a layout with banners! 

 I chose to use some of the ready made layered chipboard banners from the C'est La Vie collection as well as some banner pieces from the patterned paper.

I also used some of those cute coordinating blossoms that Bo Bunny put out last year.  I used the Blush Daisy collection and a couple of the blooms from the Blush Bouquet collection as well.

Do you like the pretty flourishes I used on the two photos above?  Well, here's a little secret, just between you and me.....Cheery Lynn Designs Die Cuts asked me to be their guest designer in September and I got a bunch of their gorgeous dies in the mail a few days ago!   I just couldn't resist giving them a little try before then so I cut out a couple of the flourishes 'Fanciful Flourish'.  I just LOVE them!  They're so fine and delicate!  I thought I might have a hard time getting them out of the die's because they are so delicate, but they popped out easy-peasy!  Must be some sort of special design :)  I can't wait to share more with you in September!
 
If you'd like to see more pages and projects using banners you've got to take a peek at the Bo Bunny Blog today, there are some really beautiful projects shared there!
 
Supplies:
Patterned Paper - C'est La Vie (Ephemera, Deja Vu, La Vie en Rose, Belle)
Cardstock - Double Dot (Chiffon)
Misc Me - C'est La Vie Contents (blue stripe page)
Chipboard - C'est La Vie (layered chipboard)
Trinkets - C'est La Vie
Buttons - C'est La Vie
Blossoms - Blush Daisy, Blush Bouquet
Lace Paper Doily - Small 4"
Other: Burlap, Cheery Lynn Die cut flourish, twine, texture paste
 
Thanks so much for stopping by today! xo

Thursday, July 11, 2013

From Paris with Love! {NEW Dusty Attic & Websters Pages}!!

 Today I get to share with you all a peek at the NEW goodies from two of my design teams! I just love it when two of my teams have products that just work so well with each other!  A short while ago I had asked Jennifer Hedger (the owner/designer of Dusty Attic Designs) if she would make up a bicycle chippie for us....below is the cute design she came up with!  I could think of so many ways this cute chippie could work on a l/o, from romantic to an awesome 'boy' style page!  And I just love the fine detailing she puts into her chipboard pieces!  Not just the finely cut spokes on the wheels but even the fine weaving in the basket!
 
At the same time, Brandin (owner/designer) of Websters Pages came out with her NEW Postcards from Paris II collection!  I was just so in love with this collection first time around and she sure did not disappoint with her round two of this old favourite!  I love this paper with the trees in bloom, and I thought the bicycle would be the perfect romantic embellishment for this one!

For my bicycle I gave my whole piece a coating of white Gesso and then some Dusty In Color Paint (Navajo White).  I then I used the Dusty In Color (Dusty Pink) to paint the body of the bicycle.  I wanted a super glossy paint job look for my bicycle so I added an nice coat of the Dusty Attic Gloss Medium.  I just love the way it came out!  I topped the bicycle basket with a bunch of Dusty mini-roses. 
I also used one of the cute Dusty Attic Blossoms (Bridal Veil) for this page as well.  The other blooms were just fussy cut blooms from the WP papers.  In the corner of the page I used a Baroque Corner Scroll and topped it with a WP Cameo.  I painted the scroll with Gesso and then some Navajo white, stamped on it and then added Dusty Attic Crackle Medium.
 
Here are all the Dusty Attic Products I used for this project....
Dusty Attic Product:
Bicycle, Baroque Corners, Dusty In Bloom (Bridal Veil), Dusty Roses (Latte, Pink, White), Dusty In Color (Navajo White paint, Dusty Rose paint), DA Gloss Varnish.
 
I hope you all enjoyed my project today!  If you haven't seen the newest releases for July yet you can fin them HERE.  There are so many beautiful new designs from intricate new garden gates, film strips and branch to new background texture/designs.
 
NOTE:  Brandin is having a big PRE-CHA give-away of the Postcards From Paris II collection today (July 15th) so check out this link for your chance to win!!  Postcards From Paris II Giveaway!! xo
 

Thursday, July 4, 2013

Bo Bunny's CHA Sneak Peeks!!!


I just love this time of year, seeing all the newest goodies to be released at the Summer CHA!  Bo Bunny is now showing all of their new collections at their blog HERE.  One of my favourites coming out is the collection called 'The Avenues'!  I just LOVE the beautiful papers and designs!  Doors, shutters, birdies, flourishes!  Just gorgeous!  I can see this one becoming a big favourite for me!  Here are just a few of the papers that caught my eye in this one!
How cute will this one be for snipping out door sections to decorate a layout with!  I just can't wait!!
 
 
These are just a few of the beautiful papers!  There are so many gorgeous pieces to this collection.  And as always they have the beautiful coordinating trinkets, buttons, brads, die cuts and chipboard!  But I just wanted to show you the beautiful chipboard album that comes with this one!
How cute is this?!!  I can think of so many ways to use this cute chipboard album (and not just as an album!). 
 
Be sure to check out the Bo Bunny Blog each day as they show a new collection daily!  (There is an amazing Fall collection coming out as well, you are going to love this one!)  Another great reason to go by the blog to check it out is that you can win!!  Just leave a comment at their blog telling them what you love about the collection and you will be entered for a chance to win!

LinkWithin

Related Posts with Thumbnails