Showing posts with label Bo Bunny. Show all posts

Monday, July 27, 2015

Nautical/Beach themed Wall Art {BoBunny - Boardwalk}


So today is a bitter-sweet post for me....as many of you know, I've been on the BoBunny Design team for over 5 years now and it's been such a joy working with all their beautiful products!  This today is my last post for the BoBunny design team as I've decided to take a little break and step down from the team.  Sometimes it's nice to just take a little breather, so I've been making a few changes this summer. It's nice to have a little more family time over the summer months and maybe a little 'me' time to do a little designing and playing with my art supplies.  .....No worries for those of you who follow my blog, I will still be doing plenty of projects and sharing them here, but it will be at a more relaxed pace, creating on my own time.


I found this shabby-chic looking printer's tray at Michaels by 7 Gypsies (half price!!), I thought the white background would work nicely with the fresh designs and colors in the Bo Bunny Boardwalk collection.  The starfish is again cut from an image in the BoBunny papers, I gave it a little 3D look by lightly misting the design with water and then pushing the hand of my mini scissors into the design (in the palm of my hand).....same with the shell.  The title is a new chippie by Dusty Attic as are the two lil corner scrolls, the chain, screw and seagull chippies. (the title shows up better against the soft aqua paint in my laundry room).


I totally love this lighthouse image, prominent in the designs of the Boardwalk collection.  Here I just cut it out and again gave the paper a little curve to give it a 3D look. I added some pieces of the coordinating chipboard to this collection (I've always loved their layered chipboard designs, like that glittery ships wheel that I linked with the chain link design.  (I gave the chain link chippie a bit of realistic metal look by using some of BoBunny's Chocolate Pearlescents on it).  And finished the design with a little nest in the corner....hey, there's a seagull so I figured a nest would be fitting (even though the eggs are more like Robins eggs, LOL).


Here's a pic of the piece sitting on the shelf in my laundry room.....I take a deep breath and feel peaceful just looking at it....even though I might be toiling away doing laundry :)

Bo Bunny Products used in this project:
Patterned Paper: Boardwalk/Bliss, Boardwalk, Sandcastle, Seaside
6x6 Paper Pad: Boardwalk
Layered Chipboard: Boardwalk
Pearlescents: Chocolate

Dusty Attic Products:
~ Seagulls
~ Mini Corner #2
~ Mini Chains
~ Nuts and Bolts
~ Word Pack #10

I'm sure you will be seeing me use Bo Bunny products in many many more projects in the future as I always adore everything their talented designers create!  This is not good-bye, just 'so long'.  I hope you enjoyed todays post, thanks so much to all of you who take the time to leave your kind comments and feedback, it means so much to me!! (Seriously....thanks everyone for the kind feedback especially on the new designs I came out with for TCW....this is a new venture for me and your positive response makes me so happy! xo xo)


Sunday, July 19, 2015

Romantic Penny Emporium

Scrapbook Page by Gabrielle Pollacco using Bo Bunny Penny Emporium

I've always loved the combination of grays with plum/purples, and Bo Bunny's Penny Emporium satisfies all my love for this color combo!   I started with a polka dot paper as a frame for the grey background paper (BoBunny Double Dot 'Sugar Dot').  I chose the gray side of the 'Alphabet' paper from Penny Emporium as the background.


I was going for a nice romantic lacy effect so I used some black cardstock with Bo Bunny's Elegant Die throughout the page design.


There are so many wonderful images that can be fussy cut from this collection. I fussy cut the pocket watch design from the 'Captured' paper, adhered with some foam dots and added some glitter paste to give the cutout some dimension.  ...In  the background area I did a little painting using the heart design from BoBunny's stickable stencils (Cascade Stencil).


I embellished the photo area with some flowers from Bo Bunny's Plum Purple Blossoms (Bouquet and Zinnia), I painted up a laser cut butterfly (also new to BoBunny) and added a piece of pearl flourish to the side.

The photo is another lovely shot of my nephew and his wife when they got their engagement photos taken.  ....I hope you enjoyed today's post as much as I enjoyed making it!  Thanks so much for popping in today, your kind comments and feedback always make my day! xo


Wednesday, May 27, 2015

Nautical Cards with NEW BoBunny 'Boardwalk' Collection!!

Nautical Cards made by Gabrielle Pollacco using the BoBunny Boardwalk collection papers and embellishments

Hello my friends!  Just a few days ago I got my new Bo Bunny collections in the mail and was so excited about them, that I immediately stopped all other projects just to give this adorable 'Boardwalk' collection a play!  I just LOVE the nautical/beach elements in this collection, lighthouses, ships, starfish, weathered wood.....I just had to take a moment and do up a couple of cards!

Nautical Cards made by Gabrielle Pollacco using the BoBunny Boardwalk collection papers and embellishments

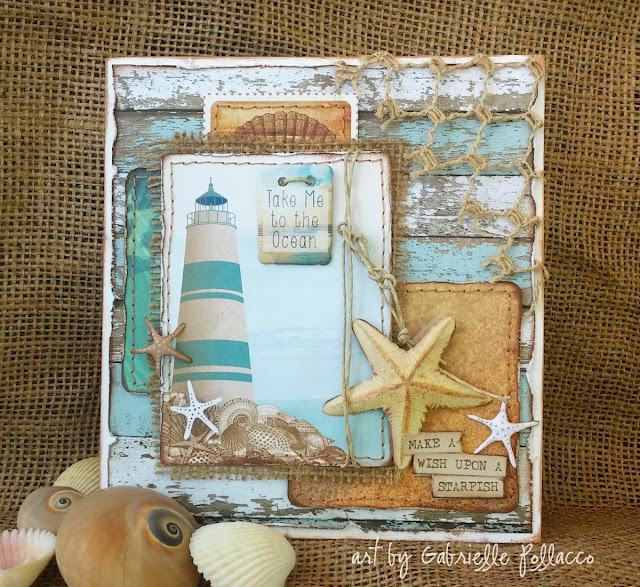
For my first card I used the Boardwalk 6x6 paper pad for my background (I chose the weather wood paper for this), and then cut out the lighthouse image from the 'Sandcastle' paper as my focal point image.  


I then took 2 of the Misc Me Boardwalk pocket square designs (the starfish) and mounted one on the card and then cut out the starfish/title from the other.  I gave the starfish a little dimension by using an embossing tool on the back and rubbing along the lines of the legs.  I also cut out some smaller starfish images from the back of the 'Beach Bliss' paper and did the same with an embossing tool.  It takes a minute to do but makes a big difference in the finished look of the card.  I finished the design with a bit of burlap, some hemp twine and a piece of trim (netting) I got from my sweet friend Janene, at The Scrapbook Diaries.

Nautical Cards made by Gabrielle Pollacco using the BoBunny Boardwalk collection papers and embellishments

For my second card I used the ship postcard design from the Boardwalk 'Beach Bliss' paper as my focal point, and matted it on the dark blue 'Sail Away' paper.  I sandwiched a piece of burlap between the two layers. 


I made the fun anchor design by using a piece of die cut paper (anchor) from the matching 'Noteworthy' pack (this is a pack full of really fun nautical and beach die cuts).  I used Bo Bunny's Chocolate Pearlescents to add a metalic 3D effect.  I added a layered chipboard medalion and added some hemp twine and some bits of denim of some old jeans.

Products used in these cards:
Patterned Paper: Bo Bunny Boardwalk/Beach Bliss, Sail Away, Sandcastle
6x6 Paper Pad: Bo Bunny Boardwalk
Noteworthy: Boardwalk
Layered Chipboard: Boardwalk
Pearlescents: Chocolate
Hemp Twine
Burlap

The new Bo Bunny products should be in your local stores now (or on their way)!  Thanks for stopping by my blog today and for the lovely comments and feedback, they always make my day! xo

Thursday, May 21, 2015

Video Tutorial: Steampunk Style Glasses Case {Bo Bunny}


Mixed Media Tutorial by Gabrielle Pollacco using Bo Bunny Pearlescents, Ironworks wood accents, Stickable Stencils and Glitter paste

Hi everyone!  A little while back someone suggested on one of my posts that I should do a steampunk style phone cover.  I thought it would be a fun idea but then wasn't sure how well that would hold up with the beating it would take in my purse and pockets! lol!   So I thought I would instead, do a Steampunk style eye-glass case using a variety of Bo Bunny's gorgeous mixed media products and one of my favorite wood embellishment collections called Ironworks.  I have an eye-glasses case that I keep on my night table so I thought I could give that a nice make over :)

Mixed Media Glasses Case tutorial by Gabrielle Pollacco using Bo Bunny Ironworks wood accents, Pearlescents, Glitter Paste, Lasercut chipboard and Stickable stencils.

Have you tried these beautiful new lasercut chippies by Bo Bunny?  I was lucky enough to get my hands on this stunning butterfly chippie, they have such intricate cut-work, love them! So I decided to make this, and a lovely scroll from the Ironworks wood accents collection the centerpiece of my OTP (of the page) project.  I thought it would be nice to make a video tutorial up to show how this thing went together.... so grab a cup of coffee (or tea) click on the arrow below and enjoy!


I just love the way the Pearlescents adhere so well to almost any surface, I didn't even have to pre-coat my piece with Gesso!  Here are a couple of views of this project from other angles...

Mixed Media Glasses Case tutorial by Gabrielle Pollacco using Bo Bunny Ironworks wood accents, Pearlescents, Glitter Paste, Lasercut chipboard and Stickable stencils.

This is the backside of the glasses case, you can see the nice texture I got using the Cascade Stickable Stencil with a combination of  Licorice, Graphite and Chocolate Perlescents streaked across it.

Mixed Media Glasses Case tutorial by Gabrielle Pollacco using Bo Bunny Ironworks wood accents, Pearlescents, Glitter Paste, Lasercut chipboard and Stickable stencils.

I finished my design with some Bo Bunny Trinkets and Mocha Jewels. 

Mixed Media Glasses Case tutorial by Gabrielle Pollacco using Bo Bunny Ironworks wood accents, Pearlescents, Glitter Paste, Lasercut chipboard and Stickable stencils.

A view of the left side.  I also added some little hits of the Bronze Glitter Paste to the wings o the butterfly and on the metal flowers.  This project came together quick and easy and now I have a pretty eye-glass case to keep on my night table.

Product used in this project:
Bo Bunny Stickable Stencil/Cascade
Bo Bunny Pearlescents/Licorice, Graphite, Chocolate
Bo Bunny Glitter Paste/Bronze
Bo Bunny Laser cut chipboard/Butterfly
Bo Bunny Wood Accents/Iron Works
Bo Bunny Double Dot Jewels/Mocha
Bo Bunny Trinkets/Apple Cider collection

Hope you enjoyed my tutorial and hope this has inspired you to use Bo Bunny's fabulous wood accents and mixed media products! Thanks to all my lovely blog readers for the sweet comments and feedback, they make my day! xo


Monday, April 27, 2015

Sweet Life Cards {Bo Bunny Design Team}


I know, we are all in the mood for Spring! That's why this week I chose Bo Bunny's cheerful and beautiful 'Sweet Life' collection papers and embellishments to make a couple of cards.  Spring is synonymous with weddings, so I thought it would be fun to create a bridal shower invite using 2 sizes of the Bo Bunny paper doilies.


It's super easy to create this cute little invite card using the Bo Bunny Doilies, some Sweet Life paper and some double dot cardstock.  Here is a quick little step by step on how to fold the dress design....


The key to getting a nice frothy look to the skirt is folding slightly off center so that you can see the layers.  Here is a close-up pic of the finished dress....


I simply added a strip of the green (Clover) double dot paper and made a little 'ribbon' for the dress and added a tiny white rose to finish the look.


A dear family friend just passed away and I wanted to make a sympathy card that could bring a little cheer to the family. So I used one of the pretty floral papers from Sweet Life, fussy cut some of floral images from another of the papers and added another folded doily and some coordinating buttons from this collection to add a finishing touch.


I also added a pretty pink blossom from the Blush package of Bo Bunny Blossoms. I attached my fussy cut little flowers with some foam adhesive dots to help them stand out from the page a little.

Thanks so much for stopping by my blog today! I really appreciate all the kind comments and feedback :)


Sunday, April 12, 2015

Everday Pages with Bo Bunny's Safari Collection


Hello my friends! I'm sharing with you today my latest layout using Bo Bunny's Safari collection and featuring their brilliant Aqua Jewels!  ...So, you bought the Safari collection to scrap all those photos you took with the kids at the Zoo or on a special vacation.  But now you've got some leftover paper. What I love about Bo Bunny's themed collections is that they can be used for everyday photos as well!  I was just crazy about these grungy wall papers, so I started with these as my base for this page of my dear husband and me.

Scrapbook page by Gabrielle Pollacco using Bo Bunny's Safari collection papers and embellishments

I took the grunge look a little further by tearing out sections of the turquoise wall paper and exposing the aged brick paper behind it. Before I glued it together I sandwiched some tattered cheesecloth between the layers.  I used the Chocolate to add 'rivets' to the edges of the paper.

Scrapbook page by Gabrielle Pollacco using Bo Bunny's Safari collection papers and embellishments

I began creating a background for my photo area by first dry brushing some Gesso on the area, then I used the NEW Cascade stickable stencil with some texture paste on the same area.  Then I added some richness to the design by adding a bunch of the small gems from the Aqua Jewels pack at the cross sections of the Moroccan.design.

Scrapbook page by Gabrielle Pollacco using Bo Bunny's Safari collection papers and embellishments

I tucked a wood piece from the Ironworks Wood designs package behind the photo, removing the center disc (to be used in my floral cluster - below), and then filled the cavity with a variety of gems from the Aqua Jewels packet. 

Scrapbook page by Gabrielle Pollacco using Bo Bunny's Safari collection papers and embellishments

Finally, I wanted some rustic looking blooms for this page so I used a daisy floral punch on some neutral color papers from a 6x6 paper pad from the Heritage collection.  I layered a few of the punched blooms and added a circle of burlap to the center.

Bo Bunny products used in this project:
Patterned Paper: Safari/Corrugated, Jungle, Outback
6x6 Paper Pad: Heritage
Combo Stickers:  Safari, Star-Crossed (title alphas)
Stickable Stencils: Butterflies, Cascade
Wood Accents: Ironworks, Kraft wood Keys & Butterflies
Jewels: Aqua
Stamps: Floral Stamps

Thanks for stopping by my blog today, hope you enjoyed this project and feel inspired to give these yummy product a try! I appreciate all your kind comments and feedback! xo

Friday, March 27, 2015

Garden Journal Cards {Bo Bunny & Tresors de Luxe}


I'm just crazy in love with this beautiful new collection by Bo Bunny called Garden Journal!  It's so easy to create pretty cards using the patterned papers like 'Notebook', "Journal' and 'Postcard' to create whimsical cards.  I purposely left the type of card as blank so that I can use them for whatever purpose arises.


For this card I used some leftover 'Wonder' paper as my card background, then I layered a couple of the postcard designs from the 'Journal' paper.  I then added a bloom cluster from Tresors de Luxe, really sweet handmade blooms from my friend Lucy's etsy shop! (thanks Lucy!!).  And I finished with some natural hemp twine and some coordinating buttons from the Garden Journal collection. 


For my second card I used some paper from the Garden Journal 6x6 paper pad (green) as my background.  I had some leftover paper from a project I recently did using the weathered wood design from Bo Bunny's Heritage Collection called 'Register', I cut out a few of the wood planks and put them on the card with foam adhesive dots, laying them on in an uneven pattern.  I then layered on some images from the 'Notebook' paper from Garden Journal.  Again I used a little natural floral cluster from Tresors de Luxe, some natural twine and another coordinating button from the Garden Journal collection.


Products used in these 2 Cards:
Patterned Paper:  Garden Journal/Wonder, Notebook, Journal, Pastel, Heritage/Register (Bo Bunny)
6x6 Paper Pad: Garden Journal (Bo Bunny)
Garden Journal Buttons (Bo Bunny)
Blooms: Tresors de Luxe
Other: cheesecloth, hemp twine

Thanks so much for stopping by my blog today! These gorgeous Bo Bunny collections are in stores now!  And if you are looking for beautiful lace, trims and blooms, have a peek at the lovely offerings at the Tresors de Luxe Etsy Shop HERE.   We have the Maple Syrup Festival this weekend, hope the weather won't be too cold to have some fun!  Have a great weekend everyone!


Saturday, March 21, 2015

Combining Collections {NEW Bo Bunny}

Scrapbook page by Gabrielle Pollacco using Bo Bunny's Garden Journal collection mixed with Heritage, Star-crossed and Sweet Life

Sometimes I like to just stick to one collection and use all the embellishments made to coordinate with the collection. It makes a page design come together easily.  But other times I like to play around and pick a bit of this collection and a little of that!  That's what I did with this page.  I used a wood panel paper from the Bo Bunny Heritage collection for my background paper.  Then layered a paper called 'Gratitude' from the Garden Journal collection. I then used other papers from the Garden Journal collecton for my matting and coordinated with embellishments from the same collection. Then I wandered over to the Sweet Life collection by Bo Bunny and picked out a butterfly from the Noteworthy die cut pack to add as an extra embellishment to this page.


I used film strip sticker from the 12x12 sticker page from Garden Journal to create a horizontal page design.  This shot shows products from 4 collections (Butterfly from Sweet Life, woodgrain paper from Heritage, Stickers, chipboard stickers and papers from Garden Journal and alphabet stickers from Star-crossed (LOVE those alpha stickers!). 


I went with the greens and neutrals from the Bo Bunny Blossom collections to embellish around my photo.  I also added a hemp twine bow and some bits of cheesecloth to add to the tattered look.

Bo Bunny Products used on this Project:
Patterned Paper: Heritage/Register, Garden Journal/Wonder, Gratitude,Pastel 
6x6 paper pad: Garden Journal
12x12 Sticker Sheet: Garden Journal
Combo Sticker: Star-Crossed (alphabet Stickers)
Layer Chipboard: Garden Journal
Noteworthey: Sweet Life, Garden Journal
Jewels: Double Dot Emerald Jewels, Primrose
Blossoms: Clover Bouquet, Clover Dahlia, Natural Earth Zinnia
Stamps: Distressed Textures, It is Written

Other products: 
Wyncinanka Wood embellishments
Tim Holtz Distress Paint: Victorian Velvet, Bundled Sage
Hemp Twine
Cheesecloth

Hope you enjoyed my project today! And hope you all have a lovely scrappy weekend!  Thanks so much for all the sweet comments and feedback! xo

Sunday, March 8, 2015

Whimsical Party Favors {Bo Bunny Garden Journal & Flutter Stamps}


Hello everyone! I'm excited to share with you today a fun party favor project I made using the NEW Bo Bunny Garden Journal collection and their NEW Flutter Stamps!  We have a big wedding anniversary party coming up for my parents next weekend (their 57th anniversary!) and I thought it would be fun to prep some whimsical party favors (Chocolate flavoring spoons for stirring into coffee or hot chocolate) using the new Flutter Stamps and the Garden Journal collection.  

Party Favors by Gabrielle Pollacco using BoBunny's Garden Journal collection and new Flutter stamps.

I started out with this empty Panko tin I had saved (I don't throw out these nice smooth sided tins, I find they are great for off the page projects).  I began by painting the rim of the tin with some Gold Pearlescents to give a nice shimmery edge to the tin.  Then I glued a section of the Garden Journal 'Wonder' paper directly to the tin using a combination of white craft glue and water. I then cut out a piece of the Garden Journal 'Notebook' paper to perfectly fit around the tin.  I really wanted the curled out part of the paper to be green (the revers of that paper is blue) so I first glued on a little section of the green floral paper from the Garden Journal 6x6 paper pad....then I curled back the two top corners.  I added 6 metal eyelets and then adhered this paper panel to the tin, tying up the corset design with some crinkle ribbon.  

Party Favors by Gabrielle Pollacco using BoBunny's Garden Journal collection and new Flutter stamps.

I added some lace (and a chipboard zipper) as well as some pearls and topped the design with a butterfly embellishment I made using the new Flutter stamps.

embossed butterflies using Bo Bunny Flutter Stamps

I made my butterfly embellishments by stamping one of the butterfly images onto one of the green floral papers from the Garden Journal 6x6 paper pad, and the pink one's were made by stamping onto the Garden Journal 'Wonder' paper.  I added a shimmery black, gold and amethyst embossing powders.  I added a little jewel from the BoBunny jewel packets for the heads and cut out each embellishment.


Next I prepared my favors by laying out some plastic spoons, melting some semi-sweet chocolate and a couple drops of oil and pouring it into the spoons.  I decorated with some colorful sprinkles....


I then wrapped each spoon with some plastic wrap and decorated with one of the embossed butterfly embellishments

Party Favors by Gabrielle Pollacco using BoBunny's Garden Journal collection and new Flutter stamps.

I set them all in my embellished tin and my little project is finished!

Bo Bunny Products used in this project:
Patterned Paper: Garden Journal/Wonder, Notebook
6x6 Paper Pad: Garden Journal
Pearlescents: Gold
Stamps: Flutter Stamps
Jewels: Think Pink, Emerald, Mocha

I hope you enjoyed my 'off the page' project today and hope I've inspired you to play with Bo Bunny's new Flutter stamps Garden Journal collection!

Thanks to all who come by my blog and leave your kind 'rays of sunshine' behind, I appreciate all the lovely feedback on my projects! xo

LinkWithin

Related Posts with Thumbnails