Thursday, July 1, 2010

Dusty Attic Lamp!


Most of you who are familiar with my work know that I am mainly a layout girl and I rarely stray into the world of cardmaking and altered art. Well, here my friends is my first try at making an altered piece! I had this beautiful piece from Dusty Attic Designs, a intricately cut stained glass window design. As soon as I saw it I knew this would be something I would like to use on an altered artwork project rather than a layout.
When my girls were babies I had bought this inexpensive lamp at a garage sale. I simply covered it in some cardstock and added a flower fairy picture to it for their bedroom. Well, now that they are a little older I thought it was high time to do a make-over on this lamp (aside from the fact that it was starting to look pretty shabby, and not in a good way! LOL!) Last year I painted their room in green/purple so I went with these colors for their lamp. Here is a full shot of the finished lamp.....
I began the job by giving the whole lamp a coat of DecorArt Americana Stucco in the colour 'Pale Willow'.....Then I lightly brushed the dry stucco with a little bit of Chestnut Brown chalk ink by Colorbox. I then glued on the Dusty Attic Stained Glass window piece and the brick pieces (which I painted with some brown, orange and white paint. .....the brick design can also be found at the Dusty Attic site)
To get a stained glass look I used some Lavender Stickles to fill in the grapes and some Eucalyptus Stickles for the leaves. I used some soft watercolor paints in the diamond panes and then coated the design with some gloss medium to get a glass effect. I then used some bronze 3D metalic paint on the design itself to get the leaded look that stained glass panels have. Here are some close-up peeks at the finished piece so you can better see the details....

Thanks for having a peek!!
~Gabrielle xxx

Wednesday, June 16, 2010

And the Winner is.....


Please take a moment to check out the bit of exciting MCS news at the bottom of this post!

So a little over a week ago I posted a chance to win some fun blog candy by running over to the MCS blog and checking out the 20 questions I had to answer there. Then you need to leave a comment here with the answer to the question 'What is my guilty pleasure' ....the answer was a Tim Hortin's Ice Capp (an iced cappucino/coffee). I went to random.org to choose the happy winner and the answer I got was....

True Random Number Generator

Min: Max: Result: 65

Powered by RANDOM.ORG

Denise said...
Love the new picture of you Gabrielle! I so addicted to flowers too :) Your guilty pleasure is Tim Horton's Ice Capp. Don't know what that is but it sounds dangerous to your waistline, lol.
June 7, 2010 9:36 AM

Congrats Denise!!! (LOL! Looks like the key to being a winner for my blog candy is having the name Denise!...I believe the last time I gave away some blog candy it was a Denise too!...but a different Denise!) Please send me your mailing address to gpollacco@aol.com and I'll get your package right out to you! Thanks everyone for playing along!!

Some quick NEWS!!! Pam the owner of My Creative Scrapbook has let me know that she will be adding 100 new subscriptions to the fast growing membership for the Limited Edition Kit. She will be opening the shopping cart to the first 100 subscribers on June 25th. This kit is in huge demand but she's had to limit the size of the membership so that she can be sure to keep to the amazing value and quality of the kit. It's often hard for her to get the premium and unique embellishments and extra's in the larger amounts from the manufacturers, thus she's had to limit the number of kits available. When you sign up for this kit you will be getting the subscription starting Sept-Nov 2010. All I can say is this is my favourite kit! and I've never been disappointed with the gorgeous goodies in this one, you are not taking leap of faith when you order this one. To view previous LE kits you can check out this link Past LE Kits (The LE kits are labeled, just scroll down to view all the past months kits) for more information on this opportunity you can check out Pam's post HERE ..........I just wanted to give a quick little 'heads up' to my girls here so you can get a jump on this opportunity!

Thanks!!

~Gabrielle xxx


Friday, June 11, 2010

Some Whimsical Fun with Dusty Attic


I love it that my youngest daughter Meagan is still at that age where she live's in an enchanted world of dress-up, fairy hairbands and make-believe. That was the idea behind this l/o I made with the fun laser-cut dress-form from Dusty Attic and the corner flourish. For the dress form I painted it with a bronze metalic paint, I did a little corset lacing with some soft pink DMC thread and I just glued on a little trim and pearls to finish it off. For the corner flourish I simply painted it with some purple/orchid pearl paint and added a couple of lavender gems. The papers are by Scrap Beyond Reach (Afternoon Tea) and BasicGrey (Kioshi). The blooms are Prima and the crystals are Zva Creative. Here are a few close-up pic's.....


I noticed some comments in the last blog piece about availability of the Dusty Attic products to oversea's customers. There is a pdf file you can now view at the Dusty Attic site that gives locations of stores that carry the DA products and I believe many of them ship worldwide you can find the Retailers list HERE (just click on the 'Retailers PDF' at the end of the comment to pull up the list). The list will be added to as the retailer numbers grow, and don't forget to mention these products to your local scrapbook stores if you'd like to find them locally!

Thanks for having a peek!!

~Gabrielle xxx

Thursday, June 10, 2010

Gotta Love the Dusty Attic!!


I always have more time in the beginning of the month to get some layouts done for Dusty Attic (the Lantern and iron fence designs on the l/o) while I'm stalking the mailman for my MCS kits :) ....I made this l/o for the Dusty Attic Design team and at the same time thought I would try out Gerry's challenge at My Creative Scrapbook to make your own patterned paper. So this time around I didn't use any patterned paper in my l/o I simply used cardstock that I stamped with some script stamps and inked with a little bit of 'Moss Green' Colorbox inks.

TIP: When you stamp with a script stamp that is shaped in a square you get a more 'natural' effect if you lightly wipe off the ink on the outer edges of the stamp before you apply it to the paper. This way the script writing fades out on the page.

For the lantern all I did was paint the laser-cut shape in black and cut out a piece of yellow carstock to put behind the lantern part to give it a 'glow'. I used some 'chestnut brown' Colorbox chalk in on the edges of the yellow paper to have the glass part appear more rounded. Here are some close-ups pic's (the pretty green ribbon along the bottom was from the June Main kit from My Creative Scrapbook, it was a pretty piece of ribbon I hadn't had a chance to use on my DT layouts, the pearl flourishes are from my dear friend Carolyn at Zva Creative, she was so sweet sending me some of her newest designs to play with).....


And a quick note, so many of you asked what is a Tim Hortin's Ice Capp? (in my last blog post) It's and iced cappuccino, sort of like a super thick frosty ice coffee....Yum! Don't forget I'm posting a winner for the Blog Candy on the 16th so come back and check if you won, and if you haven't posted a comment yet you still have a few days! ;)
Thanks!!
~Gabrielle xxx

Friday, June 4, 2010

June's Kits From MCS!! and a Yummy Blog Candy Giveaway!!


First off I just want to say although I know my 'reveal' day posts are long ones, hang on to the end of the post because I've got some fun blog candy to give away!! Also I wanted to let you all know that I've posted a lot of the tutorials I've shared at a side post to the right of my blog to make it easy to find them again as you need them. ...I was so delighted when I saw the new papers and embellishments in the June Limited Edition kit from My Creative Scrapbook!! Such beautiful soft and feminine papers, sweet florals and with a shabby-chic element to them....and loads of coordinating blooms, trims and embellishments! The papers featured in this kit are from Girls Paperie, I cut out some of the floral designs on one of the patterned paper for this l/o and dressed up a cut little die cut dress form with some of the velvet and pearl trim in the kit. Here are some close up details ....


A second l/o I made with this kit I used the cooler pinks (there are some seriously cute die cut papers in this collection!).....I took this picture of my oldest daughter Chloe picking some of the tulips in our garden a couple of weeks ago. When we first moved into our house I planted a whole lotta tulip bulbs so that every Spring we have a nice little cutting gardent to pick from....


I've got to say the hot glue gun is my newest best friend! It worked quick and fast to apply the pearl strand to my layout and the hold is extra strong. Here are some close-up details....


Included in the kit there were some really beautiful Prima blooms and a couple of them had some smokey plum colours in them. So I changed up the look of the kit a bit by using the blooms and some plum colour cardstock along with some of the more 'neutral' papers in the kit to make this l/o....

I find myself doing a lot of machine stitching lately on my photo's and papers, I think it's because I really like a fabric look to my pages, so the more stitching, ribbons and trims, the happier I am! Here are a few close-ups...


And finally I made a 4th l/o with this kit using the lovely feminine floral and polka-dot papers in this kit, I thought they would go nicely with this pic I recently took of my oldest daughter....

TIP: How do you get a nice even and smooth curvy line when cutting out patterned paper? I like to use the Bo Bunny Flex Ruler, it's a long 20" strip that is bendable, you can smooth it out the the exact shape you want (see the floral paper cut above) use it to draw a pencil line on the patterned paper and cut it out....and it even comes in a pretty pink! Here are some close-up shots of this l/o.....


After making 4 l/o's with this kit I still have loads of papers and embellishments left, I know I'm going to be using more of these goodies in future l/o's, love this collection! Now moving on to the Main kit for June from My Creative Scrapbook. This kit had beautiful grass greens and summery reds in it. The collection featured in this kit is the Sophie (Savvy) collection from My Minds Eye.

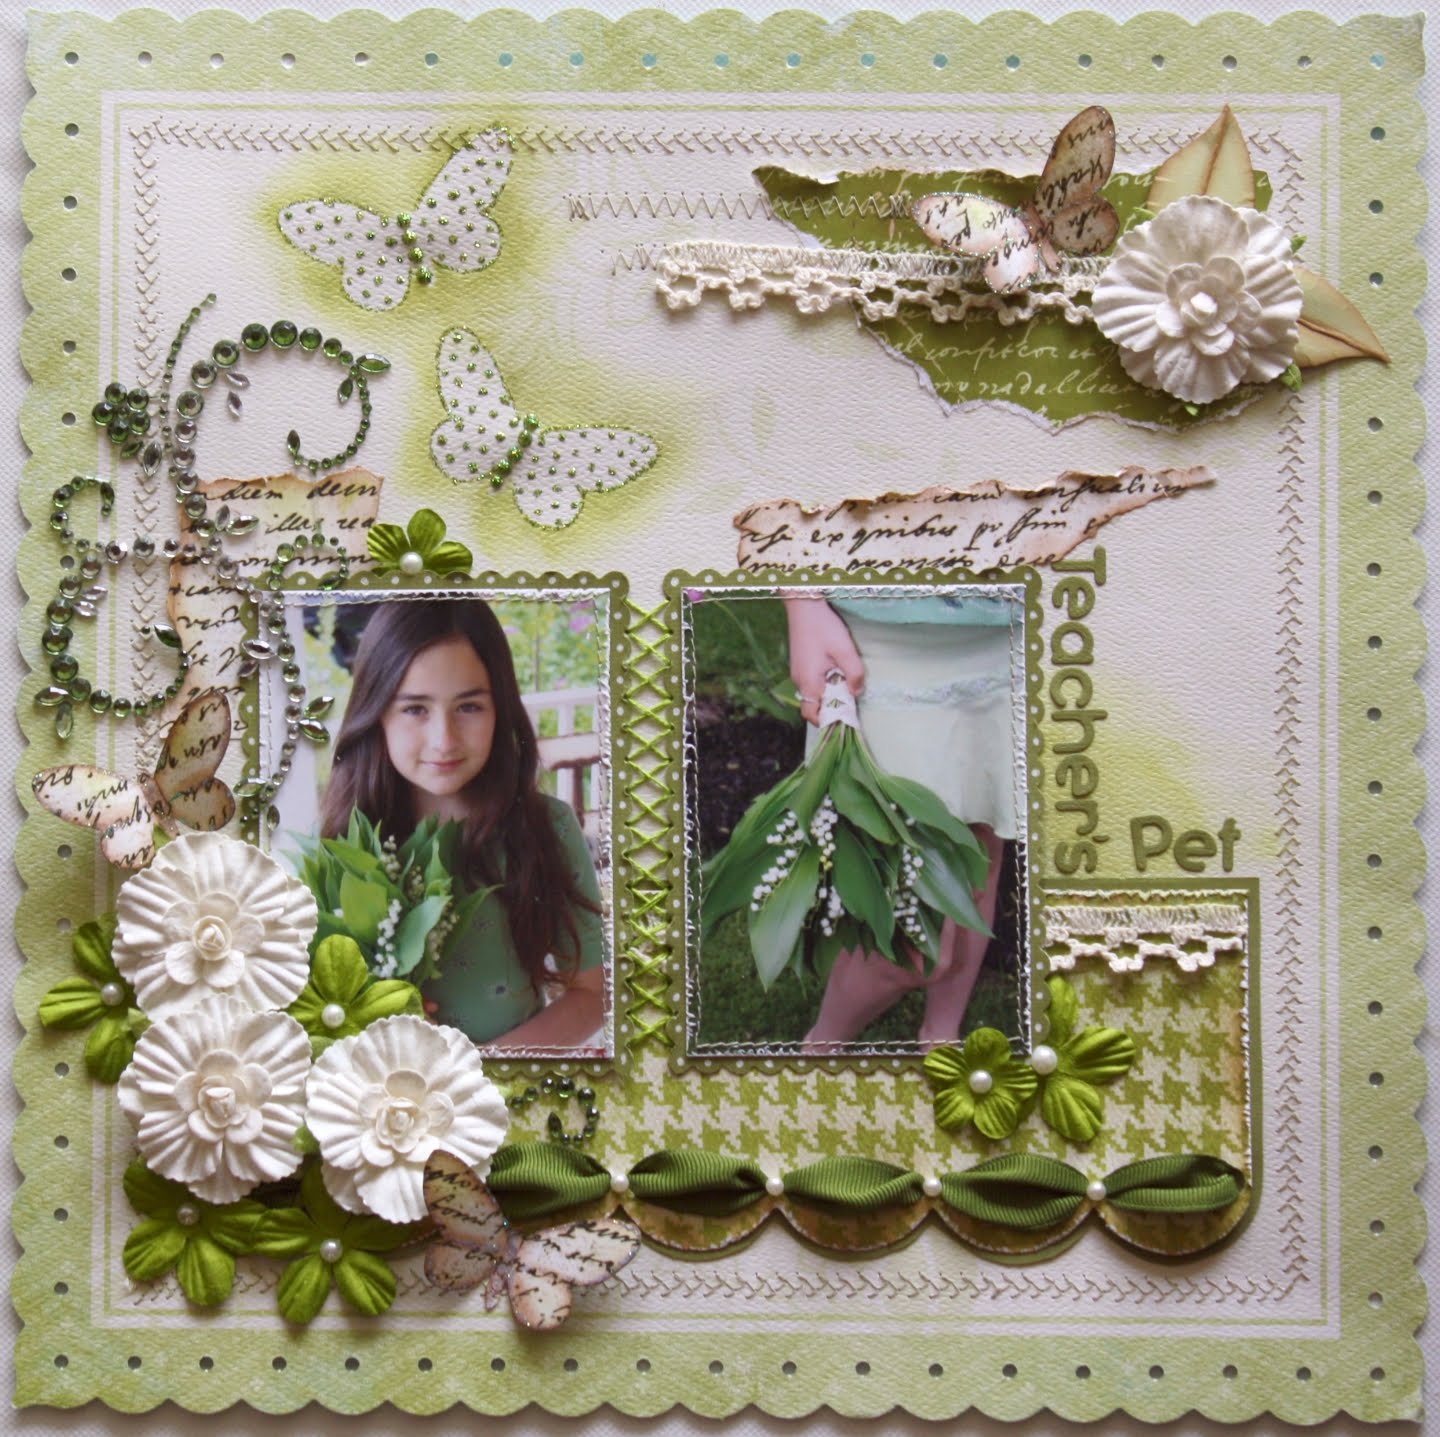
For this l/o I wanted to use the grass greens and creamy whites to compliment the photo's I took of my youngest daughter holding a bouquet of Lily of the Valley she picked for her teacher. I did some machine stitching with a fancy stitch on my machine around the outside edges and some masking with a cut-out of a butterfly (I just inked around the edges with some green chalk ink and then added some dots with green Stickles). I hand-cut some butterfly shapes out of the 7 Gypsies script paper (included in the kit). And finally I had some fun with the Prima clear crystal flourishes included in the kit.
TIP: To change up some clear crystal flourishes to better match your page you can use Tim Holtz Alcohol Inks and a Q-tip. Here I used Meadow Green ink and lightly dabbed the tips of the flourishes working inward. I added extra ink to the outside edges to deepen the colour there so that the flourish has multiple layers of color tint. If you are not happy with the results you can use the alcohol blending solution to remove what you've done and retry again (I believe you can remove the ink with nail polish remover too). Here are some close-up pic's....


For a second l/o I made with this kit I went with the reds. There are some really beautiful die-cut papers in this kit, the one I used here is 2 sided, I chose the red polka-dot side for this page....

I had some fun with my circle punch by cutting out a bunch of circles from the red polka dot paper (from behind the photo area) and sprayed a larger circle of cream/white colour paper with some Candy Apple Glimmer mist (also included in the kit) I layed out the circle cuts on the cream colour paper to create a large polka dot design. For the blooms I used a paint brush with some deep rose red Pearlex powder and tinted the centers of the white Prima blooms. The butterflies are a little stamp set included in the kit! Here are some close-up pic's....


And finally a 3rd page I made using the main kit, I used the blues and greens in the kit. I wanted to play up the the pretty floral design in the patterned paper, so I used a small flower punch on some of the green and aqua paper and layered them over the flower image on the page to give a 3D look to the blooms, and finished them off with some pearl 3D paint on the centers of the bloom images.

I was trying to get a 'gathered fabric' look in the ruffle I added at the top of the page. The MME paper is very thick and pulpy and works well for this. I just soaked a piece of the paper in some water and gathered one edge in kind of a fan shape. I then used the blow dryer to quickly dry the piece. It holds it's shape nicely once it's dry. Here are some close-up pic's....


There are 2 more kits available for the month of June, the Creative and Album kits and you can see the beautiful work done by the Design Team this month by checking out the Design team gallery at this link June Design Team Gallery ... We also had the priviledge of having the amazing Lucy Edson as Guest Designer for the Main kit!! Many of you know her from the Webster's Pages Design Team. She really wowed us with her beautiful creations with this kit! And we had the wonderful Jackie Anderson doing some Guest DT work for us using the LE kit for this month, Jackie always does such a beautiful job with the shabby-chic kits!

And now for some Blog Candy fun!! It was my turn to answer the 20 Questions posed to the MCS Design Team this month. Julie Howard (our blog girl at MCS) told me if I didn't send her a fun and different photo for the blog she would 'play' with my avatar photo....words like 'clown hair' and 'arrows' were mentioned! LOL! So I had an idea. Julie always says she hates working with a lot of blooms on her pages and I always joke that when I get all those pretty Prima blooms in the kits I scatter them on my bed and roll in them naked! Well, I spared you the naked part **shudder!** but I came up with a fun photo!! Come check out the link HERE and then post a comment in this blog thread with the answer I gave to the question 'What is my guilty pleasure?' .....If you do you can win a selection of some of my favourite embellishments pictured here....


~ 1 pkg. of Prima Blooms (Pink/red/white)

~ 1 pkg. of Flower Market Velvet Blooms by The Girls Paperie

~ 1 pkg. of Paper Girl Market Trims by The Girls Paperie

~ 1 pkg. of Making Memories Stitched Felt Dimensional stickers 'Flutter'

~ 1 pkg. of Imaginisce Glitter Flowers from the Lucy Bird collection

~ 1 pkg. of Zva Creative Pearl heart flourish

~ 1 pkg. of Petaloo Mulberry Street blooms

~ 1 pkg. of Queen & Co. adhesive pink pearls


You will have until the 15th of this month to post your answer, then I will use Random.org to choose a winner from the people who commented at this thread and post the winner on the 16th.
You can find the blog post for the answer HERE. Thanks for taking the time to read to the end of this very long thread :)


~Gabrielle xxx

Monday, May 17, 2010

Dusty Attic at the Beach...


I had the weekend to play with my Dusty Attic laser cuts and decided to do a beach layout....can you tell I'd like Summer to be here already? I used the DA laser-cut shell designs along with the French scrolls and a large corner scroll design to make up the above page.

For the shell's I simply painted them white first and then inked the edges with some brown chalk inks, I used a pink chalk ink here and there for a little bit of highlights. On some of the shells I added a row of 3D pearl paint to add a touch of dimension to the shells....here's a close-up pic....


For the large corner scroll and the hinge designs on the right side of the page (I cut a French Scroll in half to make the hinges) I went for a rusted iron look. I got this by inking the pieces with a red/brown colorbox ink first. Then I dabbed on some Pearlex (this is a shimmer dust you can find at Michaels) in a variety of colors. I then used some Folk Art Papier Glass Finish (also from Michaels) to seal the Pearlex in. I dabbed on the Glass Finish with my finger so that it doesn't look perfectly smooth but rather has a rougher finish like rusted iron would have. Here are a couple of close-up shots....


I got a lot of the papers I used courtesy of Scrapbook Dreamer for whom I was doing some Guest Design Team work this month. The Cream color background Paper is Bo Bunny "Paradise Collection" the patterned paper behind the Photo is from Scribble Scrabble.....these can be found at the online store at Scrapbook Dreamer.

Thanks for having a Peek!!

~Gabrielle xxx

Tuesday, May 11, 2010

Dusty Attic DT and Color Room Palette #5....


I always enjoy the beginning of the month when I have a little time to play with my Dusty Attic laser cuts. This time I decided to give colour #5 a go from the Color Room as I was making up this layout. The color palate for this week at The Color Room is a Dusty Pink, Light Moss Green, Creamy Chamois and Dusky Mauve. I had recently bought these pretty Prima Calcutta blooms in a Dusty Pink and a Dusky Mauve and I had been itching to scrap with them. I picked up the creamy Chamois and moss green in the papers. I used a Dusty Attic flourish border on the right side of the photo as a page accent. This I painted with a soft green, inked it with some brown chalk in and added some Stickles (Waterfall color) on top. Then I stuck on a few Prima e-line pearls in a mossy green to accent the lasercut piece. I want to thank a sweet friend (a member at My Creative Scrapbook) Virginia Abshire for the pretty super wide sheer/gold ribbon I used behind the photo and the pretty vines! She sent me a package of such pretty embellishments and I'm so happy to have some time to put them to use!
Here are a few close-ups of the above l/o....


You can find The Color Room challenge by clicking on the highlighted link above if you'd like to join in the challenge, there is a whole lotta inspiration to be found at this fun site! Dusty Attic is composing a Retailer's List that should be up to date soon so that you can order some of their beautiful products for your scrap pages, in the meantime I had started up a thread on 'Where can you find these products online and a number of online stores have listed their links Here

Thanks for having a peek!!

~Gabrielle xxx

Tuesday, May 4, 2010

May Reveal for My Creative Scrapbook!!


Well you should have heard the excitement when I was opening the May kits from My Creative Scrapbook a few weeks ago! ...most of it coming from me! The girls were ohhhing and ahhhhing over all the pretty things and there I am clapping my hands and doing the happy dance as I'm pulling up each of the papers and embellishments. My dear husband calls out from his office, "I don't think you'd be this excited if you won the Lottery!!" ROFL! ..... I'll Start with the Limited Edition kit this month. I was just crazy for the beautiful 'shabby-chic' look of this kit! The blooms were among my most favourite of the New Prima releases!! and the papers! Fancy Pants Designs! Love them! ..... The above l/o was made using this beautiful kit!...love the cute distressed frame paper, ...it's actually a chalkboard design but I added the cool pink toned paper for the background of my l/o. There is a wonderful sheet of grey flocked transparency in this kit, I cut a bracket design with it and outlined it with some pink Stickles. One of my favourite embellishments in the kit is the cute little Mellissa Francis resin frame, well, that and the adorable Prima blooms!...and the awesome rub-on's! Here are some close-up pic's.....


A second l/o I made using this kit, I went with the soft aqua colours with a touch of pink. I recently saw a beautiful l/o by Lynn Biermann in which she did some fancy machine stitching around her l/o 'A Young Woman' ...It made me take a closer look at my sewing machine to see if it had any fancy stitch settings, AND IT DID!! so I gave it a go! I was really happy with the results!

Here are some close-up pic's of the design elements on this page (you'll find the pink/white bloom on this page is a bit on the tall side for a scrapbook page, I snipped the center down and folded the petals back more to flatten it down more....

For a third page I made up using this kit I did quite a bit of layering. I layered a frame transparency page over the clock design paper, layered the flocked transparency paper over some soft pink paper and for the scallop edge piece I used the background from the Prima packaging (white words on transparency) on some black paper.....The photo is one of my favourites of my husband and youngest daughter.....

Here are a few closeup pic's to show some of the kit details (I cut a few of the clock designs out from the background paper directly behind the photo to use as embellishments on the page, add a little chalk ink and gold/bronze paint to the edges for a nice masculine embellishment)...


And finally I made a 4th page using this kit (there were so many beautiful papers and embellishments I just had to keep going!) I used a favourite photo that my nephew took of my dear husband and myself on a walk last summer (I'd scrapped a similar photo before but it didn't come out quite like I wanted so I've re-scrapped it).....

Again, so many pretty blooms and embellishments to play with (loved all the fun rub-on's!!) For the ruffled edge I did a little tutorial on how to make this, you can find the video/tutorial here Ruffle Edge Here is a close-up pic of this l/o.....


Now for the MCS Main kit for the month of May! This one had so many wonderful paper combinations in it!! I did 3 l/o's with this kit and managed to get 3 different looks! The first l/o I made with this kit I went with the soft blues and whites. There was a package of these wonderful Prima fabric blooms in the kit, so I thought I would create a big branch design with them for my l/o. The branches were cut from brown cardstock using my Quickutz Revolution machine. These could easily be cut by hand too. Here is my first l/o with the Main kit....

This page was put together quite fast (at least for me who can spend hours on one page!) I tried to keep the lines simple to make the design have a fresh clean look. Here is a closeup detail of the page....

A second l/o I made using this kit I went with the pinks in it. I used a few different design elements on this page. I used the Torn Paper Flower technique I shared with you a couple months back (you can find the tutorial HERE), and I also did a bit of masking too. I hand cut out a simple butterfly shape and then chalked around the edges. Then to make the butterflies stand out more I used a white gel pen to draw in a little detailing. I want to say I first saw this done a few months back by a Canadian friend of mine Tara Orr, I loved the effect and gave it a try here. And finally I made the 'belt' embellishment by cutting a long strip of brown cardstock, trimmed one end to a point and then machine stitched the edges in white. I added a few eyelets and a chipboard circle design (included in the kit) and used it for the 'buckle'.

Here are some close-up pic's of the page details (remember you can find a lot of the design techniques used on the DT pages at the month thread at MCS called 'How did they do that').....


And a third page I made for from this kit I went with the pretty butter yellow/grey papers in the kit and combined it with the cornflower blue papers. Both my girls talked me into getting them these funky looking sunglasses with a design printed on them, ....and YES! they can actually see through them! :) .........

I made the paper roses by hand using the 6 Petal Punch method I shared with you all last year (although in this case I wanted larger blooms so I hand-cut larger base blooms rather than using a punch.......you can find the tutorial I posted HERE) Here are some close-up detail photo's of the page...


And finally I also got to work with the awesome Album kit this month. So many rich beautiful colours in this one! I went with the purples & greens for this l/o. I loved the floral vine design on one of the patterned papers so after I matted the paper with green cardstock I cut out some green flourishes (Quickutz) and added it to the outer edges to mimick the paper design.


A second l/o I made using this kit I did a whole lotta machine stitching. I have to admit the l/o doesn't translate well on the screen and looks a lot nicer in real life where you can see the detailing better. The photo is of my youngest daughter and one of my girlfriend's little girls having a little 'girl talk'.....

Here are a bunch of close-up details on this page.
TIP: I added some Stickles glitter glue (Platinum colour) over the stitches to give them a metalic look....


And finally a 3rd page I made using this fun colourful kit! I used a few different design elements on this page. A little bit of corset lacing on the left side of the page and I also created 4 pockets along the bottom of the page with journaling tags stuck into each of them.

My husband Steve is such an awesome Dad, even though he is very busy with work every day he alway makes time for his girls. So I wanted to make up a page to remind the girls of all the wonderful things he does for them, from taking them skating, swimming, feeding ducks, to the park....even clothes shopping!! They just have to say they need something and he pops them into the car to pick up something new!...yes, a wee but spoiled aren't they! :) Here are some close-up pic's of the page details....


So that's 3 of the 4 new kits available this month from My Creative Scrapbook. (there is also a wonderful Creative kit too! Be sure to check out the beautiful pages the DT girls made up with this one!) And be sure to see the work of all the rest of the DT members with these amazing kits I'm sure you'll have enough inspiration at a glance to keep you going all month! I've noticed some questions about the products used in the kits in the blog comments. You can find all products used (other than cardstock) in the kits each month and you'll find an itemized list of the product names/manufacturers at the My Creative Scrapbook site, listed with a photo of all the kits.

Thanks so much for taking the time to read through my lengthy reveal blog post!! I know this is a long one each month! LOL!

~Gabrielle xxx

LinkWithin

Related Posts with Thumbnails