Showing posts with label Template. Show all posts

Wednesday, February 11, 2015

I Couldn't Resist Another {Maja Design and Dusty Attic}


Hello dear friends! Yep, I'm back again today to share another canvas I made using some older bits of my scrapping stash mixed with some beautiful Maja Design papers. As I explained yesterday, I had recently been browsing on Pinterest and found this artist out of Singapore, named Grace Ciao, who makes fashion designs out of real fresh flowers....I  thought the artwork was beautiful but at the same time thought it sad that they could not last being that they were made from fresh flowers.  It got me to thinking about some very large Prima blooms that I had bought many, many years ago when I first started out scrapping....


Remember these?  I realized that they would be perfect to make up some lovely couture canvas designs.  Yesterday I shared one canvas that I made out of one of the other flower petals (also shared a video tutorial on how I made it as well).  Today I'm sharing another canvas using some pink/cream petals from my stash.

  Vintage-Summer-Basics-P1

Vintage-Springr-Basics-P1

I used a variety of papers from the Maja, Vintage Summer Basics and Vintage Spring Basics collections. I used the center of the 'March 1st' paper (from Vintage Spring Basics) for the body of my couture figure as well as the pretty Daffodil images in the corners of the paper for my canvas background.  In the center of the canvas I used '1910' from Vintage Summer Basics, and then cut out a heart shape from '1909-bs' also from the Vintage Summer collection.

  Uniquely You_Gabrielle_Pollacco_Maja_Design_01

I always feel that the Maja papers are beautifully complimented by Dusty Attic chipboard, in this case I used a new chipboard design called 'Elegant Swirls #3' to top my canvas. I used a stencil called 'Butterfly Collage' that was designed by a lovely and super talented friend of mine, Janene Meyerowitz (yep, that's right, owner of The Scrapbook Diaries) to make the wings behind the figure and to add the lattice design in the corners.  I used the 12x12 stencil for this, but she also has this gorgeous stencil available in a 6x6 size as well :)


Uniquely You_Gabrielle_Pollacco_Maja_Design_02

Running down the side of the canvas I used a Dusty Attic chipboard piece called 'Branch #3" that I just gave a coat of Gesso and inked with some Ingvild Bolme 'Moss Garden' chalk ink, and some Branch Bark ink by her, as well.  In the bottom right corner I added a corner chippie from the DeVine Frame Set (Dusty Attic).  The dress design was made entirely of a couple of the petals I had from an old, old Prima box.  (I'm sure you can use petals from just about any silk/fabric flower you have in your stash).

  Template_Gabrielle_Pollacco_Figure_FLower_Dress

I sketched out a couture figure to create my canvas design and saved the page as a template.  Just right click on the photo and 'save image as' to your computer if you would like to try using my sketch for one of your projects.

If you are looking for Maja Design papers as well as Dusty Attic chipboard, Janene at The Scrapbook Diaries has loads uploaded to her online store (how's that for one stop shopping! :)

Thanks so much for stopping by my blog today, I really do appreciate all the lovely comments and feedback! Happy Scrapping! xo

Monday, December 15, 2014

Unique Card Design & Tag! {Bo Bunny}

Star Fold card by Gabrielle Pollacco using Bo Bunny Madeleine paper collection.

Okay, so if you've been following my blog, you'll know that I've been into unique folded card designs lately.  I thought this was a really fun card design, and actually pretty simple to make! I gathered together some  of my favorite Bo Bunny patterned papers (for this one I used papers from the Madeleine collection)

Folded star card by Gabrielle Pollacco using Bo Bunny's Madeleine collection papers and embellishments

The card opens out and you can put your sentiment in the center.  For mine I just used a rub-on for the sentiment and added a cute lil birdie design from the matching Noteworthy die-cuts from the Madeleine collection.  Below I've posted a template for this unique card (instructions below the template).

Star Card Template by Gabrielle Pollacco For Bo Bunny

Step 1:  Take a solid color piece of 12"x12" cardstock.  Mark the center point (6") at the top (make a pencil line, a few inches down...this is the dotted line you see on my template).

Step 2:  Now put the zero mark of your ruler in the bottom left corner of your paper and pivot the ruler until the 12 " mark meets the dotted line.  Mark this line. Do the same for the right bottom corner. (this is how you get 3 equal sides).

Step 3: Mark the center point of each of the 3 sides (6 inches) These will be the score lines (valley fold).

Step 4: Now put another mark 2" from the center point along the edge of the paper (both ways from each center point).  This will be the other score lines....I flipped the card to make these scores as you want them to fold the opposite way of the other score lines).  Done! Now decorate! 

I made my decorative paper designs an 1/8" smaller around the edges  so that some of the darker cardstock border showed around the edges.

Bo Bunny Products used on this card:
Patterned Paper:  Madeleine (Symmetry, Tiles, Frames)
Double Dot Cardstock: Licorice
Noteworthy: Madeleine 
Double Dot Jewels: Think Pink

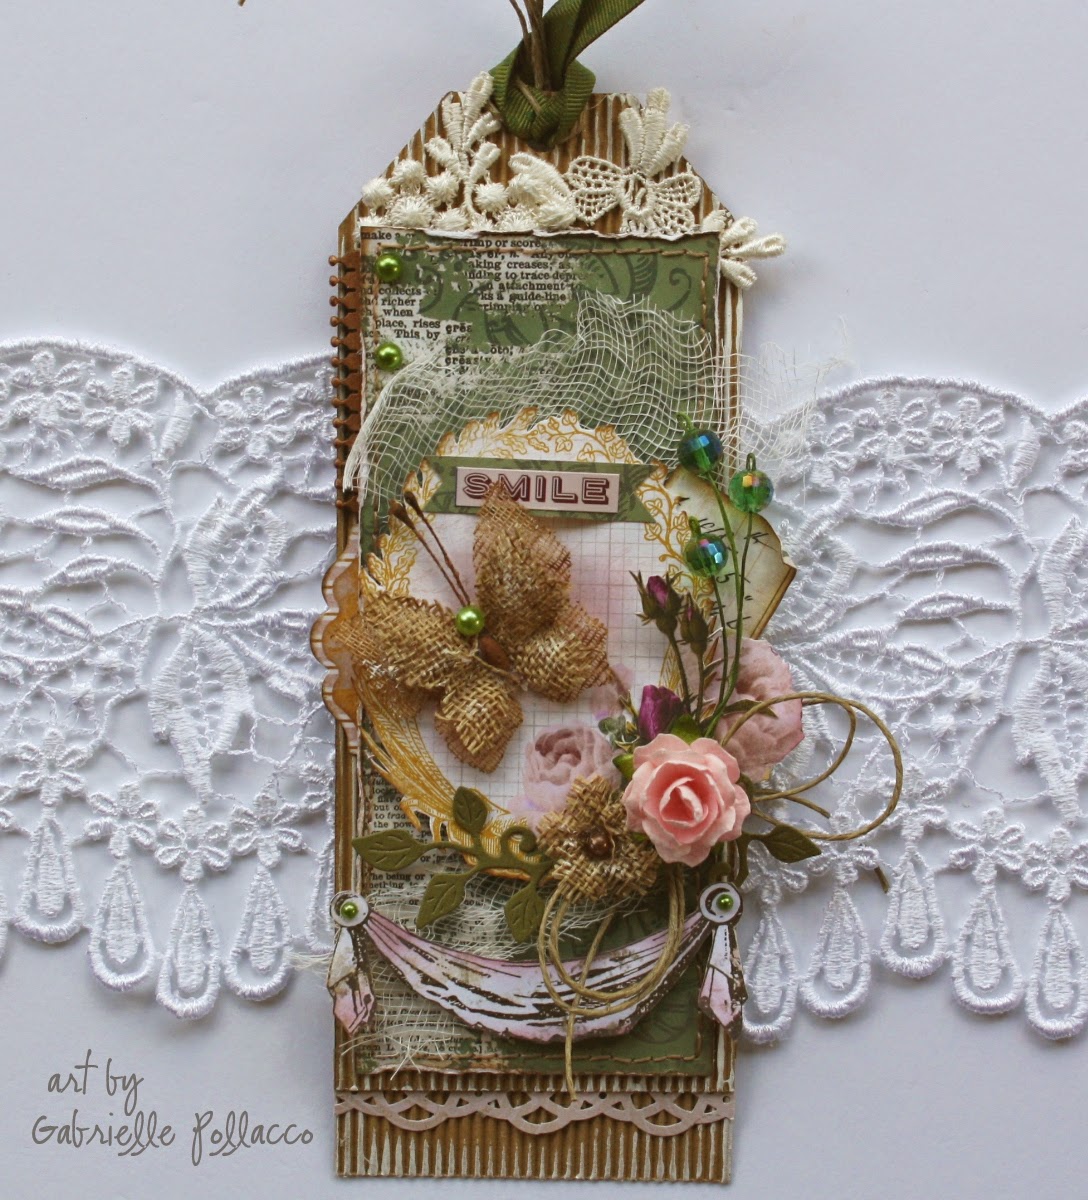
Tag by Gabrielle Pollacco using Bo Bunny 'Rose Cafe' collection

A second Tag/Card I made was using the Bo Bunny 'Rose Cafe' collection. I went with the soft sage greens and pinks for this tag.  I like to add neutral elements for this color grouping so I began by cutting a tag shape out of some craft paper corrugated card.

Tag by Gabrielle Pollacco using Bo Bunny 'Rose Cafe' collection

I layered on some scraps of the Rose Cafe 'Garden' paper I had left over from another project. I then cut out a frame design from the 'Frames' paper and added it with some foam dots.  I fussy cut out a few of the pink rose designs from the "Espresso" paper and from a scrap I had left from the name paper from the Rose Cafe collection (swag is from this paper as well).

Tag by Gabrielle Pollacco using Bo Bunny 'Rose Cafe' collection

I added a few blooms and some burlap blooms & butterfly (by Petaloo).  Put in a twine bow....easy peasy, the tag is done!  I like to put a little sentiment on the back of the tag to use on a gift. (Some of you have asked what you do with tags :)

Bo Bunny Product used on this Tag:
Patterned Paper:  Rose Cafe (Garden, Frames, Espresso, Rose Cafe)
Double Dot Jewels: Emerald

Thanks so much for stopping by my blog today, I hope you enjoyed my cards and hope you will give the folded card design a try!  If you have any questions (if my template and instructions are not clear enough) please don't hesitate to ask! :)


Wednesday, November 26, 2014

Flip Card ~ VIDEO TUTORIAL {Bo Bunny 'Star-Crossed'}

Flip card video tutorial by Gabrielle Pollacco using Bo Bunny 'Star-Crossed' collection papers and embellishments

Hi all!  So lately I've been finding myself obsessed with unique folded cards, and this one really caught my attention.  I love a card that can play tricks, and this one is so much fun!  You just have to make a couple of easy cuts into a piece of  5 1/2" x 6 1/4" paper....add a few score marks, and you get this fun card that flips and shows 2 sides as you open it!  Check out my video below to watch me put this one together!  (there is also a template with the measurements I used below) :) ....


Fun, isn't it!!  Here are a few close-ups and views of the card....

Flip card video tutorial by Gabrielle Pollacco using Bo Bunny 'Star-Crossed' collection papers and embellishments

This is the card cover when it is closed. I used the adorable Bo Bunny 'Star-Crossed' collection to make up this card.  All I needed was the 6x6 paper pad and a packet of their Double Dot Jewels for the bloom centers (inside the card).

Flip card video tutorial by Gabrielle Pollacco using Bo Bunny 'Star-Crossed' collection papers and embellishments

This is the inside view of the card when it is opened and the center piece has done it's flip (you have to see the video to see how the flip works...it's so cool! :)

Flip card video tutorial by Gabrielle Pollacco using Bo Bunny 'Star-Crossed' collection papers and embellishments

Here is a close-up of the centerpiece of the card (the front view).  I cut out some chipboard hearts and traced them on a piece of the patterned paper from the 6x6 paper pad.  I added a coat of Diamond Stickles to give the hearts some sheer shimmer.  I also cut out a couple of the feather designs from one of the patterned papers in the Star-Crossed pad to make my corner design.

Flip card video tutorial by Gabrielle Pollacco using Bo Bunny 'Star-Crossed' collection papers and embellishments

This is a close-up of the card center piece when the card is open. Oddly enough, every time I pulled out an element to add to my card, it fit perfectly.  The frame is from the Noteworthy pack that coordinates with the Star-Crossed collection, it's dimensions were perfect for the center panel!

Flip card video tutorial by Gabrielle Pollacco using Bo Bunny 'Star-Crossed' collection papers and embellishments

And here (above) is a template I drew out that has all the dimensions you'll need to make your own flip card!  (in the video I accidentally put a score line down the middle, but I didn't fold it and once I had on my center panels it kept the design true).

Hope you enjoyed my tutorial and hope you'll give this card a try! I made this one for my youngest daughter, she's been making such great progress in school and other areas in her life, I wanted to make a special card just for her....and she loved it! :)

Thanks so much for stopping by my blog today and for all the lovely comments and feedback, they make my day! xo xo

Wednesday, May 22, 2013

Scrapping a Favorite Photo with Maja! {PLUS Corset Template!}

Hello, it's Gabrielle here with you today! I recently took this photo of my girls (Chloe, Meagan and Chloe's best friend Peyton) at a festival we took the girls to.  It's not always easy to get at photo where everyone is co-operating, so I was thrilled to get this one of the 3 of them.  I had actually started out this project as a card!  I wanted to do a corset design, but once I had the corset done, it occurred to me that I would like to use it as an accent on a page instead.  I made the corset by first drawing out a design on a piece of white paper.  I know not everyone is comfortable with sketching a design so I have posted my sketch/template below, I made it to fit easily on one of the 6x6 inch patterned papers that are one of the sizes offered by Maja Design.  Just set your printer for 6x6 and print directly onto you patterned paper, or you can just print it on white paper and cut out and trace onto patterned paper (this is a good method for when you have scrap bits of paper you want to use up!) 
Here are some quick and easy steps in creating this corset design.  First print off  the corset design above.

Trace out template onto your choice of patterned paper (I used the '7th of May-bs' of Vintage Spring Basics for my design).  I cut a small groove into the top and bottom of the corset so that when I lace it up it looks like two seperate pieces lining up (you don't want to seperate the two pieces entirely as this makes it harder to to the lacing up).  Then Ink all the edges with a complimentary ink color (I used Tim Holtz Victorian Velvet).

Do some machine stitching on the piece, zig-zag along top and bottom edges and straight stitch on marked lines to resemble boning on the corset. (see above)

I use a thick gage needle with a large eyehole to pre-punch the holes for the corset lacing.  Just cross-stitch an 'X' pattern and tie off at the top.  Adhere blooms, lace along edges and add pearl accents as desired to finish up your corset design.  Here are some close-up peeks at the rest of the page....

I really like combining intricately cut chipboard pieces with my Maja Design papers, I think the detailed looking chipboard works so well with the vintage style of Maja designs.  For my piece above I added extra detailing by using some 3D pearl paint (Scribbles) in white, to add even more texture to the design.

Above is another close-up view of the handmade corset embellishment.  I added a little tuft of netting/cheescloth to create a skirt design under the corset.  Add some lace and buttons to complete the vintage look!

Supplies:
  Patterned Paper - Vintage Spring Basics (1st of May, 7th of May-bs, 4th of May, 4th of May-bs, 10th of March, 6th of May). 
Chipboard - Dusty Attic Designs (Baroque Corners, Corrugated card).
Lace paper doily. 
Circle Frame and Dress form stand - Pink Paislee Artisans Collection.
Flowers and Flourishes -  Prima, Dusty Attic.
Alphabet Stickers - Websters Pages Designs (Beautiful collection).
Other: Loose Buttons, Lace.
 
I hope you enjoyed my project for today and hope you will give my template a try!  It can be used on tags and cards as well!

Tuesday, May 29, 2012

A Fun Little Bo Bunny Card (Plus a Template)!

Today's assignment at the Bo Bunny blog was to create a project using an embossing technique.  Well, let's just say this past week has been crazy hectic and a comedy of errors!  We had a beautiful family wedding over the weekend that caused me to put off this assignment till Sunday.  Sunday comes and I find we've got huge plumbing problems.  Long story short, my heat embossing tool gets ruined with water and now my plans for my embossed project is out the window!  Okay, 'Plan B' .....I think to myself, I saw this link on Pinterest for this cute folded paper dress design.  I'll do up the dress design on a card and use my Score Pal to do some 'dry embossing' on the edges of my card. Easy peasy right? ....Off I go to Pinterest, only to find that the template connected to the pin I had saved had been removed!  **Sigh** .....Well, I'm not ready to give up, finally I decided I would draw up my own template for the dress (it took a little fussing and measuring but I got it done!  I've posted my hand drawn template here for those of you who want to give this folde dress design a try.  (Below) Just right click on the picture of the template and 'Save Picture As' to your computer.  Then print out on the back of a 6x6 piece of patterned paper (I used the 6x6 paper pad from the Bo Bunny "Little Miss" collection for my dress, the back of it is plain white paper so you can print out on the back and cut it out) 
Above is a close-up view of the embossed edges I put on my card using the Score Pal. 
This is a picture of the template I made up for the Folded Paper Dress.  (Right click on the photo and 'Save Picture As' to your computer....set your printer to print on a 6x6 paper....it's better to use one sided patterned paper like you find in the Bo Bunny 6x6 paper pads so that you can better see the design when you print it out on the back of the paper.  Cut out and fold on the markings.).  I gave two different dress-top designs.  The one with the straight bottom edge is the one I used on my card....this one is good if you are using a ribbon in the center of the dress....the other is good if you are doing a corset style top...how cute would this be with a little lace up? huh?)

TIP:  I have one more little tip for you! Okay, I'm all thumbs when it comes to tying bows, especially small ones!  But I found a fun and easy way to tie a perfect bow on Pinterest.....USING A FORK!!  Here is the link TYING A BOW WITH A FORK  .....I used a velvet type ribbon so mine is a little bulky but I think you'd get even better results using a ribbon that is a little finer and has the design on both sides as opposed to the one-sided velvet ribbon I used. 

Thanks again for stopping by and for all the lovely feedback, I just love hearing from you all! xx 

LinkWithin

Related Posts with Thumbnails