Monday, March 9, 2015

Together - NEW Video Tutorial {Dusty Attic Chipboard and Shimmerz Paints}


Hello friends! I'm so happy to be sharing with you today a page which was my 'attempt' at doing a 'white space' page.  I often admire the look of the layouts that utilize only a small portion of a page but do it in such a way that the eye is drawn right in to the photo.  I, being  an over embellisher find that my attempts at this style does not always come out as I had envisioned!  In this case I think I came closer to what I was envsioning so I guess I should be happy with that. (maybe next time I'll start with a smaller photo?)


Here are the lovely Dusty Attic chipboard designs I incorporated into my page.  Some you may not recognize because I chopped it up a bit and used small pieces of it (Vine Corner). 


I designed this page using the Dusty Attic's March Inspiration Board as a jumping off point.  Every month Dusty Attic has a great challenge (with prize!) going on centered around their Inspiration board.  Just create a page using Dusty Attic chipboard utilizing the colors and moods set on the inspiration board for the month. 


These are the Shimmerz products I used to create this page, using the Dusty Attic Moodboard as my color inspiration. **Pleas NOTE: I said in the video that I used "Bamboo Leaf" Spritz, when it should have said Olive Branch...sorry about that!**   Here is a full step by step video tutorial I created on how I made up this page. Enjoy!


I hope you enjoyed watching my video tutorial!  I've got some close-ups of the page for you to view at your leisure below....


I used some of the Punked Up Purple Spritz to add a soft hint of color to my Rodanthe Blossoms from Prima.  I always love a nice white blossom that you can change up to match your page with just a few dollops of color!  I've got to say, that Dusty Attic frame (Decorative Scroll #1) has to still be one of my all time favorite Dusty Attic pieces!


Another design technique I really like to use in my work is laying down a couple of layers of color with my Shimmers mists and then stamping on top of it. In this case I used a well used stamp I have from Bo Bunny called 'It Is Written'.   The pretty Moroccan looking chipboard is a piece from Dusty Attic called Marrakesh Trellis panel.....and the circle frame is an old favorite of mine called Decorative Scroll #1.


I did a little bit of fussy cutting from a labels paper I had from the House of Roses paper from LemonCraft. The title sticker is a Heidi Swapp epoxy sticker.


To achieve a shabby chic look, I like to first paint my chipboard pieces white, then do some random stamping in black using an archival ink (so it doesn't run when you hit it with other mediums).  I used my Paris/Beauty stamp for this. Then I rub a little brown chalk ink along the edges of the chipboard to give it a well worn look. Finally I add a coat of Crackle Varnish.


And I don't want to forget to talk about the yummy tinted texture paste used here, it's the gorgeous green color of Texturez called 'Artichoked'.  I used this with a Tim Holtz Harlequin stencil, I think it adds a nice festive touch, don't you?

I hope you enjoyed today's project, I had a LOT of fun making it!  Remember, if you are looking to purchase Shimmerz Paints products, DONT FORGET TO MENTION MY NAME 'GABRIELLE' in your 'Instructions to Merchant/Seller' part of your order to receive a FREE/Bonus Shimmerz product in the color of your choice!  You can find the Shimmerz Paints online store HERE.

If you would like to play along with the Dusty Attic Inspiration board challenge, be sure to post a pic of your layout at the side panel of their blog using their link button.  A good reason to play along?  How about a $100.00 Gift Certificate to spend in their online store?!  Hope to see you play! xo

Thanks for stopping by my blog today, your kind words and feedback always make my day! xo xo


Sunday, March 8, 2015

Whimsical Party Favors {Bo Bunny Garden Journal & Flutter Stamps}


Hello everyone! I'm excited to share with you today a fun party favor project I made using the NEW Bo Bunny Garden Journal collection and their NEW Flutter Stamps!  We have a big wedding anniversary party coming up for my parents next weekend (their 57th anniversary!) and I thought it would be fun to prep some whimsical party favors (Chocolate flavoring spoons for stirring into coffee or hot chocolate) using the new Flutter Stamps and the Garden Journal collection.  

Party Favors by Gabrielle Pollacco using BoBunny's Garden Journal collection and new Flutter stamps.

I started out with this empty Panko tin I had saved (I don't throw out these nice smooth sided tins, I find they are great for off the page projects).  I began by painting the rim of the tin with some Gold Pearlescents to give a nice shimmery edge to the tin.  Then I glued a section of the Garden Journal 'Wonder' paper directly to the tin using a combination of white craft glue and water. I then cut out a piece of the Garden Journal 'Notebook' paper to perfectly fit around the tin.  I really wanted the curled out part of the paper to be green (the revers of that paper is blue) so I first glued on a little section of the green floral paper from the Garden Journal 6x6 paper pad....then I curled back the two top corners.  I added 6 metal eyelets and then adhered this paper panel to the tin, tying up the corset design with some crinkle ribbon.  

Party Favors by Gabrielle Pollacco using BoBunny's Garden Journal collection and new Flutter stamps.

I added some lace (and a chipboard zipper) as well as some pearls and topped the design with a butterfly embellishment I made using the new Flutter stamps.

embossed butterflies using Bo Bunny Flutter Stamps

I made my butterfly embellishments by stamping one of the butterfly images onto one of the green floral papers from the Garden Journal 6x6 paper pad, and the pink one's were made by stamping onto the Garden Journal 'Wonder' paper.  I added a shimmery black, gold and amethyst embossing powders.  I added a little jewel from the BoBunny jewel packets for the heads and cut out each embellishment.


Next I prepared my favors by laying out some plastic spoons, melting some semi-sweet chocolate and a couple drops of oil and pouring it into the spoons.  I decorated with some colorful sprinkles....


I then wrapped each spoon with some plastic wrap and decorated with one of the embossed butterfly embellishments

Party Favors by Gabrielle Pollacco using BoBunny's Garden Journal collection and new Flutter stamps.

I set them all in my embellished tin and my little project is finished!

Bo Bunny Products used in this project:
Patterned Paper: Garden Journal/Wonder, Notebook
6x6 Paper Pad: Garden Journal
Pearlescents: Gold
Stamps: Flutter Stamps
Jewels: Think Pink, Emerald, Mocha

I hope you enjoyed my 'off the page' project today and hope I've inspired you to play with Bo Bunny's new Flutter stamps Garden Journal collection!

Thanks to all who come by my blog and leave your kind 'rays of sunshine' behind, I appreciate all the lovely feedback on my projects! xo

Saturday, March 7, 2015

Take the March Maja Mood Board Challenge!


Have you ever played in the Maja Moodboard challenge?  Each month Maja Design puts out a beautiful Mood board, a design idea that is meant to spark your creativity in your own crafting projects.  You are given an inspiring photo, a color inspiration, a quote and prompt words that will help you to create a beautiful project.


Here is this months (March) mood board. Loving the pretty, feminine color combination of brown and pink! I really love the quote too, there is something cozy and yet happy about it at the same time!


For my card I layered a bunch of the patterned and plain papers from the Summer Vintage Basics collection and made a homemade bloom from some of the papers as well. I used another piece of Tattered Angels Glimmer Glass (the owl) from some old stash I had sitting around and added a Webster's Pages cameo to the center of the owl.  The frame/Moroccan background die is a new die from Bo Bunny.  The clocks were cut from a paper called XVI from Maja's Vintage Autumn Basics collection.

If you would like to have some fun and play along you can find the full instructions to enter the challenge at the Maja Design Blog today.  Come join the fun, there is a full Maja collection pack (in the collection of your choice) up for grabs each month!

Thanks so much for stopping by my blog today, hope you all have a fun scrappy weekend! xo

Friday, February 27, 2015

NEW! Double Page Kit & Tutorial!! {The Scrapbook Diaries!}


So, I was sorting through all the pretty products deciding what I wanted to be in the next kit page and video tutorial that I make up for The Scrapbook Diaries.  Some of the papers Janene sent for me to work with are these gorgeous and unique papers from Poland called LemonCraft.  My Dilemma?  I didn't know which of the to settle on for this kit page, they are all so pretty!!  So, I finally decided on making this a Double!  2 Kit pages and 2 Video Tutorials to go with them!


One thing I really love about working for The Scrapbook Diaries is that Janene is always on the look out for the most unique and beautiful papers and embellishments in the market....I'm mean how cool is that chipboard frame/title? right? (the photo is of my nephew and his beautiful bride).


This kit also includes my Brick/waterdrop stamp set as well as one of my all time favorite Crafter's Workshop Stencils "Art Is"...I'm sure you've seen me use this one a LOT on my projects (you will sure find yourself reaching for this stencil over and over in future projects!)


Another fave for me, LOVE the Prima shabby-chic metal accents! 2 Tim Holtz distress inks and lots of fun fussy cutting elements from a Label sheet designed to coordinate with the gorgeous papers!


And as always, this kit includes a link so you will have unlimited access to a step by step video tutorial I made up on how to recreate this page for your own precious photo.


....And here is the second page kit and Video Tutorial I made up for this kit.  I used lots more yummy chipboard designs, blooms, metal accents and more! ....yes, that's me...one of those few times when we were on summer vacation and I had time to play with my hair.  I decided to use a curling iron on it that day, and my daughter insisted on taking a pic.


For this page I used the water droplet stamp from the stamp set I designed for The Scrapbook Diaries. Lots of fun chipboard and fussy cutting elements on this one.


I share a really fun finish that I used on this very cool cogs and chains chipboard (also included in the kit).....this page was a lot of fun to create! Here are a couple more close-ups of the page...


As you can see, lots of pretty accents included in this kit! Seen enough? You can order your's at The Scrapbook Diaries today! As always Janene offers the kit's in a couple of options (we know that some of you may have already got some of the kit items, like my stamp set in your stash, so she offer the Complete Kit or The Basic Kit)  All kit purchases include a link to the online Video Tutorial I created for each of these pages. You can pick up your double page kit HERE....the kit's sell out quickly, so grab your's while the gettin's good! (And as always, there are 2 fabulous BONUS sample page idea's made up by Janene included in the kit!)

Thanks so much for stopping by my blog today, and for the sweet comments and feedback.  Your kind words mean a lot to me! xo xo


Wednesday, February 25, 2015

Creating a Fresh Pretty Gift {With Maja Design}


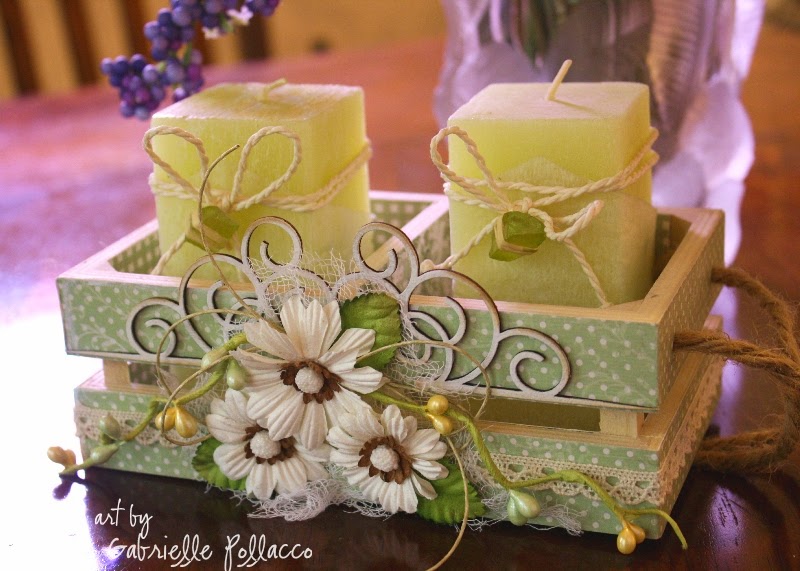
Hello friends! I thought I would share with you all a fun little 'Thinking of You' gift idea.  I found this cute little unfinished wooden crate at my local Dollar store and thought I would use some of the fresh pretty patterns in the Maja Design papers to dress it up to create a candle holder gift set.
  Lantliv-P (1)

Antligen

I used the 'Naturen doftar' paper from the 'Antligen' paper collection to cover the outside strips of the wooden crate.  I used a mixture of equal parts white glue and water to adhere my paper strips to the wooden crate.  I just love the sweet white dotted green paper for this, I think it gives the project an nice Spring feel to it.

  Crate_Gabrielle_Pollacco_Maja_Design_view2

For the inside of the box I used the pretty gingham design in the 'Kitchen Garden' paper from the 'Life in the Country' collection.  And for the middle/side walls I used the lovely script/floral paper that is on the reverse side of the Kitchen Garden paper.

  Crate_Gabrielle_Pollacco_Maja_Design_closeup

For the front of the box I wanted to keep the clean lines of the box design so I didn't over embellish the box, I just added a few paintable Prima Blooms, a twine bow and a Dusty Attic swirl chippie (Elegant Swirls#13), which I painted white and edged with some brown chalk ink (Ingvild Bolme's Branch Bark).

I hope I've inspired you to pull out some of your favorite Maja Design papers and Dusty Attic chipboard to create a little gift to cheer a friend of yours!  You can find a wide variety of Maja Design Papers and Dusty Attic Chipboard at The Scrapbook Diaries.

Thanks so much for stopping by my blog today, I always appreciate and read all your lovely comments! xo

Tuesday, February 24, 2015

Heritage Tags {New Bo Bunny!}


So the ports in the USA are clearing products and I understand that the NEW Bo Bunny collections are making their way to all the scrapbook stores! Yay!  I had some time over the weekend to play with the New Heritage Collection, and made up a couple of tags.  This first one is a gift tag I made using some of the patterned papers from the Heritage 6x6 paper pad along with some of my favorite Vintage Double Dot cardstock.


I used a flower die (Spellbinders, Rose) with some of the lighter papers in the 6x6 paper pad to make up my floral accent for the card. I added a frame from the Noteworthy (die cuts) pack, a little hemp twine, and I quickly had a fun little tag put together.

Bo Bunny Products used on this project:
Patterned Paper: Heritage 
Cardstock: Vintage Double Dot/Gingerbread
6x6 Paper Pad: Hertiage
Noteworthy: Heritage


For my second tag I went with the sweet wood grain patterned paper and combined it with Sweet Pear Double Dot cardstock.


I used one of my favorite Bo Bunny blossoms as a centerpiece for this tag, a bloom from the Clover Zinnia's package. The bit of brick mortar chipboard behind the bloom is a leftover bit from Dusty Attic.  I also accented with a butterfly cut with Bo Bunny's NEW Flutter dies. I used a little bit of 'Island Mist' Pearlescents on the butterfly as well as some of the new Glitter Pastes in 'Caribbean' and 'Wasabi'.

Bo Bunny product used on this Tag:
Patterned Paper, 6x6 Paper Pad: Heritage
Cardstock: Sweet Pear Double Dot
Noteworthy: Heritage
Flutter Dies
Blossoms: Zinnia/Clover
Glitter Paste: Caribbean, Wasabi
Pearlescents: Island Mist
Frosting Jewels (pearl flourish)

Hope you enjoyed my Bo Bunny projects for today, and hope that you will have these gorgeous products available to you soon at your local scrap store!  Thanks so much for stopping by my blog today! xo

Sunday, February 22, 2015

New Mixed Media Page AND Video Tutorial {Bo Bunny - Garden Journal}


Last week I got my big beautiful design team pack from Bo Bunny! I was so excited to see all the new gorgeous paper collections, one of my favorites being the new Garden Journal collection. So of course I had to dig in and play with this collection first thing!  Did you know that Bo Bunny now has metal dies that can help you create intricate and beautiful accents for your scrapbook pages and craft projects?  Today I made up this scrapbook page using a variety of the new dies, including my favorite new butterfly design to create accents and embellishments that help give a light, airy feel to the page. Here is a video tutorial I made up to show step by step how this page was made, including a really fun technique when cutting your dies that help release the paper from the die quickly and easily. Enjoy!


I hope you enjoyed this video tutorial and will feel inspired to try out some of Bo Bunny's new dies and mixed media products.  Here are a few close-ups you can view at your leisure...


One of the tips I shared in this video is how you get the cardstock to release from the die in a quick and easy way.  I don't know the science behind it but it works beautifully.  I found this tip on Pinterest a tip shared by Stampin' Up's Patty Bennett, and the basic idea is to sandwich your cardstock between a layer of wax paper and a layer of dryer sheet (yep, those pretty smelling little sheets you throw in your dryer, a fabric softener sheet).  So basically you have your die, the next layer is a piece of wax paper, then your cardstock piece, then a dryer sheet.  Then the piece of plastic that you use with your die cutting machine (I used the Quickutz Revolution for mine).  Just roll it through like you usually do, when you pull it out, the cardstock piece releases very easily from the die, and the tiny bits and pieces with pretty much fall out of the intricate little cuts.  I didn't have to use any tools to poke out my bits, they just fell out as I ran my fingers over the piece! It only takes a second to add the extra two layers to your cut out but it saves you tons of time trying to pop out those stubborn little bits on those intricate dies!


I also used one of the awesome NEW stickable stencils called Love on this page.  I took the clock design and using a palette knife laid down a thick layer of NEW Blush Glitter Paste to add this shimmery design to the background of my photo cluster.  I also used the Blush and Sugar Glitter Pastes on my Flutter die cut pieces to create these little butterfly accents for my page.


For my floral accent on this page, I combined the coordinating chipboard pieces for the Garden Journal collection with a Bo Bunny Daisy Blossom from the Blush packet.  I made a quick fun little nest using some Spanish Moss and a chipboard egg design from the coordinating chipboard for Garden Journal collection.

Bo Bunny Product used in this project:
Patterned Paper: Garden Journal/Sketch, Wonder
6x6 paper pad: Garden Journal 
Sticker Sheet/Garden Journal
Chipboard/Garden Journal
Glitter Paste: Sugar, Blush
Stickable Stencil: Love
Dies: Flutter Dies, Ornate Frame, Lattice Frame
Glimmer Spray: Bronze 
Blossoms: Blush Daisy
Wood accents: Iron Works

Thanks so much for stopping by my blog today, I hope you enjoyed my project and video tutorial.  Your kind comments and feedback always make my day! xo


Thursday, February 12, 2015

Favor Boxes with Template {Bo Bunny Double Dot}

Favor boxes by Bo Bunny design team member Gabrielle Pollacco, template below)

If you are like me, you love a quick and easy project.  This favor box is so easy to make from an 8 1/2" x 11" paper....not cutting, just a few easy folds.  I have lots of that pretty Double Dot paper from Bo Bunny, (I have a love of dots!!) so I grabbed a piece of Mint Double dot 8 1/2" x 11" piece and scored it as follows.....

Favor Box Template 01

Score at the 3/4", 4 1/2" mark, 6 1/2" mark and 10 1/4" mark.  If you are like me and only have the Score Buddy (meant for cards)....I just measured in 3/4" and 4 1/2" from each side edge. Now turn on the  8.5" side and score as follows

Favor Box template 02

Score at 2 inches in from each side.  Then you will want to mark 4 angles....measure 2" ALONG the edge from the two center marks.  Now draw a line from your mark to the inner corner as shown....score this line.

Favor box template 03

I personally found it a little hard to score the angle line so what I did was brought the point of the middle fold up to meet the edge of my side fold and then used my finger to make the angle fold.

Favor box template 04

I opted for the dotted design to be on the outside of my box, so I added 4 strips of 2 sided sticky tape to the four corners of the plain side as shown above.

Favor box template 05

Once you've applied your sticky tape, bring the two sides in, it will look like the picture above. Now bring the two side flaps up and you have formed your box....


It will look like the pic above!  Now the fun part....decorate!

Close up of Favor Box by Gabrielle Pollacco for Bo Bunny

For one of my boxes I used an edge punch and cut a scallop edge across the top.  I added a band of green cardstock (BoBunny Clover Dot) to hold the top together, and added some hemp twine, burlap, strip of lace and a die cut Shasta Daisy (Cheery Lynn Designs) and some leave cut from the Clover paper.

Close up of favor box by Gabrielle Pollacco for Bo Bunny

For my second box I used some left over paper I had from the Primrose collection (that collection had such pretty dot papers and butterflies!!).  I fussy cut a few butterflies from the patterned paper and cut a Fanciful Flourish from Bo Bunny's Clover Dot paper.

Hope you enjoyed today's project and that you give this easy-peasy favor bag a try the next time you want to give a good friend a little gift!  Thanks for stopping by my blog today! xo 


LinkWithin

Related Posts with Thumbnails