Hello friends! I have a new page kit to share with you that is filled with lotsa fun chipboard and some unique and beautiful embellishments. And as always you get a unlimited access to a private video tutorial on how to make this page when you order from The Scrapbook Diaries!
There is an amazing set of chipboard designs included in this kit, I think all these circles and cogs allow for a variety of designs, here I used it like a spray across the page....I love these combo packs because they allow for a maximum variety of chipboard designs for a minimum price! Also included are those lovely title chippies, I really love the font used on these.
I began the design by relaxing and (watching TV) while cutting out a bunch of these cute little butterflies from a lovely contact sheet by LemonCraft.
And I combined the butterflies with these cute adhesive buttons by LemonCraft. The chickenwire is this cool set of stickers by 7 Gypsies. I just randomly cut the sticker to suit my design.
I had been saving this stunning packet of verdigris metal leaves by Prima for just the right kit and here I finally found it! Aren't these embellishments beautiful? ...of course Janene had stock-piled enough of them so that I could create a kit with them.
And as always I love to add in some cool mixed media products, here I used a Tim Holtz paint called Sea Glass and some of my favorite Prills pebbles as well....all of course are included in the kit.
The beauty of this kit is it works equally well for a girlish page or a masculine page....and the title allows for so many photos. Janene includes enough product to make bonus pages and you can see a sample she made at The Scrapbook Diaries website.
Some of these kits are limited because of some of the unique products I use on the page such as the metal verdigris leaves, so if this one appeals to you, head on over to the Scrapbook Diaries before she runs out! You can order you kit HERE.
Thanks so much for stopping by my blog today, I always appreciate your kind words and feedback! xo
Hi Everyone! I know it's been ages since I last posted! My dear friend Janene at The Scrapbook Diaries has been gently reminding me there are many out there that are wanting some fun new kit pages....so here I am with a kit page using some amazing products from great companies like 49 & Market, LemonCraft and Prima. I've been busy making up a photobook from all the beautiful photo's we got from my daughter Chloe's wedding. This is one of my favorite photo's taken by a dear friend of ours (Gord Wenzel, an amazing photographer) ....he captured this sweet unposed photo of her that I think expresses her beautiful soul.
I really love the papers I was able to use for this kit....so feminine and beautiful....I used this for a wedding photo but it can be used equally well for friendship pages or any other themed page you're looking to make up. I always love to add in those little extra's like Prills (the small colorful pearls) that add a lovely texture to the page.
And the flowers and chipboard accents! Beautiful shimmery goodness by 49 and Market. Janene Meyerowitz cleverly designed these groupings of chipboard that allow you to have a nice variety of chipboard for your page without breaking the bank!
As always the kit comes with a free unlimited access to a private Video Tutorial, which will show you step by step how to make this page as well as all the materials and mixed media products to create this page and bonus pages.
If you want in on this one, and I know you will!...hop on over to The Scrapbook Diaries and order yours today! (as always the kits are limited in number so grab your's while the gettin's good!)
Thanks so much for stopping by my blog today....I know it's been a long time, it feels good to be back! xo
Hi All! I have a new fun and easy Video Tutorial up today again this time using the NEW Winged Mosaic TCW656 stencil that I designed for The Crafter's Workshop! I gave you all a peek at this one a few weeks back and here today I have a full video tutorial on how it was made :) ....so grab a cuppa, kick up the feet, relax and enjoy!
Hope you all enjoyed my little tutorial! Just imagine all the fun ways you can use a mosaic tile stencil! On a keepsake box, on the cover of an art journal....the projects are endless! And all the work of piecing together a mosaic is already done for you!
And the look of it of course will change with the mixed media products you choose to use on the stencil! I used TCW Black Gesso and Black Modeling paste with Pearlex Mica Powders, then sealed it with some hair spray.
I can't wait to see how you all use this stencil in your projects! The good news is that TCW is carried by a lot of craft stores so it shouldn't be hard to find one near you. If you are looking to order online I know that Janene at The Scrapbook Diaries has my stencils in, in both sizes (for Canada and USA, she ships international as well), The Mad Scrapper in the UK, andScrapbook.com has it as well!
I narrated this one again as I got an overwhelming response of 'do it again!' :)
Thanks so much for stopping by my blog today, I really appreciate all the kind words and comments! xo
Hi All! So I'm back with another video tutorial....and I went wayyy out of my comfort zone with this one. I always try to get in and read all the feedback on my tutorials and one of the things I've been asked a few times is if I'd consider narrating on my tutorials. Well, I'm one of those people who can't stand the sound of their own voice. When I get nervous my voice is low, my throat gets dry...well, you get the idea. But never-the-less I went and tried it out anyways. So this is a layout I gave you all a peek at a little while back on which I used a NEW stencil I designed for TCW (The Crafter's Workshop), it's called 'Tile Mania'. For this one I used the 12" x 12" stencil (but it also comes in the 6"x6" size. TCW662. So without any further ado, hear is my tutorial!....
The photo is of my oldest daughter and her fiancee, they are getting married in May and this photo was one of my many favorites from their engagement photo shoot.
Most of the products I used on this page can be found in one place....The Scrapbook Diaries! I didn't do this one as a kit as this was a sample page I made for the TCW trade show booth. But the most of the products I used were from The Scrapbook Diaries. You can find the papers, the stamps (Gabi's Patterned Textures and Gabi's Postcards From Paris), the stencil, the flowers, burlap, twine, texture paste, Gesso and even some of the chipboard and embellishments at The Scrapbook Diaries, I believe she even has Perfect Pearls there too? (at least I got them from her in the first place, LOL)
The gems where from my local dollar store. In Canada we have Dollarama, I often find odds and ends there that I can add to my pages.. Here you can see how I added the gems to the cross sections of my stencil design. You can also see some of the script stamping I did with my Postcards from Paris stamp set (also at The Scrapbook Diaries)
Another little closeup of the accent area on my layout....I like to throw a little accent area in to balance the page design. The little blue buds were part of a kit I made up for The Scrapbook Diaries a little while back. If Janene doesn't have these in her store, I know that many craft stores carry these or something similar in a variety of colors.
I hope you guys enjoyed watching this video tutorial and weren't too put off by my voice! lol......now I've got to get back to wedding plans, like a true mom I've decided to take on a lot of the work myself....wedding cake, flower arranging, decorating....yipes!
Thanks for stopping by my blog today and thanks for the kind comments you all are always leaving me, I really appreciate it!
So guess what?! The stencils are finally hitting the stores! Just got word from Janene over at The Scrapbook Diaries that the NEW stencils I designed for TCW (The Crafter's Workshop) are finally in the house! (I was a little premature showing my last tutorial for the Bride book....got a lot of emails asking where to get,...and they weren't in yet! lol!) This time I have somewhere to send you! :)
For this project I used the stencil I designed for The Crafters Workshop called 'Stained Glass Daisies' TCW657. The photo you see above is an extra canvas I made using acrylic paints. But in the following video tutorial I used a variety of Shimmerz Paints Products to create my Mosaic canvas. Time to grab yourself a cup of coffee (or tea), kick back, relax and enjoy!
Hope you enjoyed my little tutorial....and easy, right? Almost like painting in a coloring book! And you get a mosaic effect without having to cut and match pieces, it's all done for you, just a few swipes with some texture paste and your can get your creative on with coloring!
This is a still shot of the stencil I created in the video tutorial using the Shimmerz paints, here I used a wash in the 'grout' lines, giving more of a vintage look. For the canvas at the top of this blog I simply used TCW's Black Gesso for the background and TCW's Ultra Thick Molding Paste for the stencil and then painted with some favorite acrylic paint colors.
But Getting back to the canvas in the video....I used a variety of Shimmerz Paints products for this one and finished the design by adding some Dusty Attic Grasses at the bottom of the canvas.
Shimmerz Paint Products used in this Tutorial:
Creameez: Get Glowing, Peachie Keen, Sage It Isn't So, Boogie Boardin' Blue, Purple Rain, Black Cherry Cola, Strawberry Fields
Inklingz: Greener Pastures
Coloringz: Chocolate Brownie
You can pick up your Shimmerz Paints HERE. NOTE: Be sure to mention my name 'Gabrielle' in your next order to receive a FREE/Bonus Shimmerz Paints product in the color of your choice!
Just imagine all the places you can use this mosaic stencil design....on the cover of an art journal, ...on a tissue box cover,...on a keepsake box....I can't wait to see what you all come up with using this fun new stencil! Be sure to tag me in if you post something using the stencil, I just love to see what you all create using them! As I mentioned you can now find them at The Scrapbook Diaries(USA & Canada, she also ships International)....I also heard that The Mad Scrapper in the UK has them in as well! (Just click on the links to take you there). If you don't like to shop online you can always check your local scrap store or art shop (many now carry TCW products!)
Thanks so much for stopping by my blog today! I always appreciate and read all the lovely comments and feedback! They make my day! xo
Hi All! I have finally gotten around to putting together my video tutorial for a canvas I made for the winter Creativation Show in Phoenix for TCW (The Crafter's Workshiop). This art canvas features two stencils I design for TCW one is a stencil I designed last year called Organic Matter, the other is a NEW one I designed called Jungle Vines...
I also used a few of my favorite Dusty Attic chipboard pieces, a fairly new frame called Ornate Frame #5 and another called Feathered Charm #3...and a very cool title chippie called Blueprint Dream.
This video tutorial is a 2 parter which includes a small tutorial on how I made the polymer clay Bonsai Tree center piece so it's a few minutes longer than my usual tutorials. Hope you all enjoy!
This was a really fun canvas to do and I hope you all give it (or something like it) a try!The tree center piece was easy to make and the result is something that to me resembles something that looks like cast bronze!
And how fun is that flourishy art deco looking frame? for this I used a variety of metalic paints and glitter glue. (All the products are listed in the description area under the Youtube video).
I used Sculpey polymer clay to make the tree and with a few easy steps, you can make it too. I like to take the time to use the tip of a knife to put in a few etching lines in the 'bark', this shows up well when you add the Pearlex mica powder before you bake off the piece.
Here's a close up of the title chippie by Dusty Attic...I love the blue print series of title's that they recently produced....you can see how I did the finish in the video above.
Another fun little addition I've been adding to a lot of my tutorials lately is the use of Prills, these colorful cute lil pebbles. For this project I used a color appropriately named 'Ribbit' :) I believe Janene has these (Prills) available at her store at The Scrapbook Diaries as well....you can find them HERE.
And how cute are these 'Feather Charm' chippies? The Dusty Attic designed a variety of styles in this chippie, this one I used is Feather Charm #3. I sued a bit of 3D metalic paint on it to give it even more texture.
Thanks so much for stopping by my blog today, your kind comments and feedback are always appreciated. I know I've been slow in getting up my tutorials lately with working on all the wedding plans for my oldest daughter (just a few more months!) But I'll try and get busy with lots more tutorials to come, I have another one coming up this Saturday (March 4rth). In the meantime enjoy this one, and give it a go! xo
Hi All! I'm so happy to be sharing with you today my first layout using Janene Meyerowitz's beautiful Flower Fairies of Spring collection! I was delighted to be asked to be a guest designer today using this amazing, whimsical collection! And I was so thrilled when I first got my hands on this lovely collection....loving the heavy weight of the paper, so nice for fussy cutting and mixed media products!
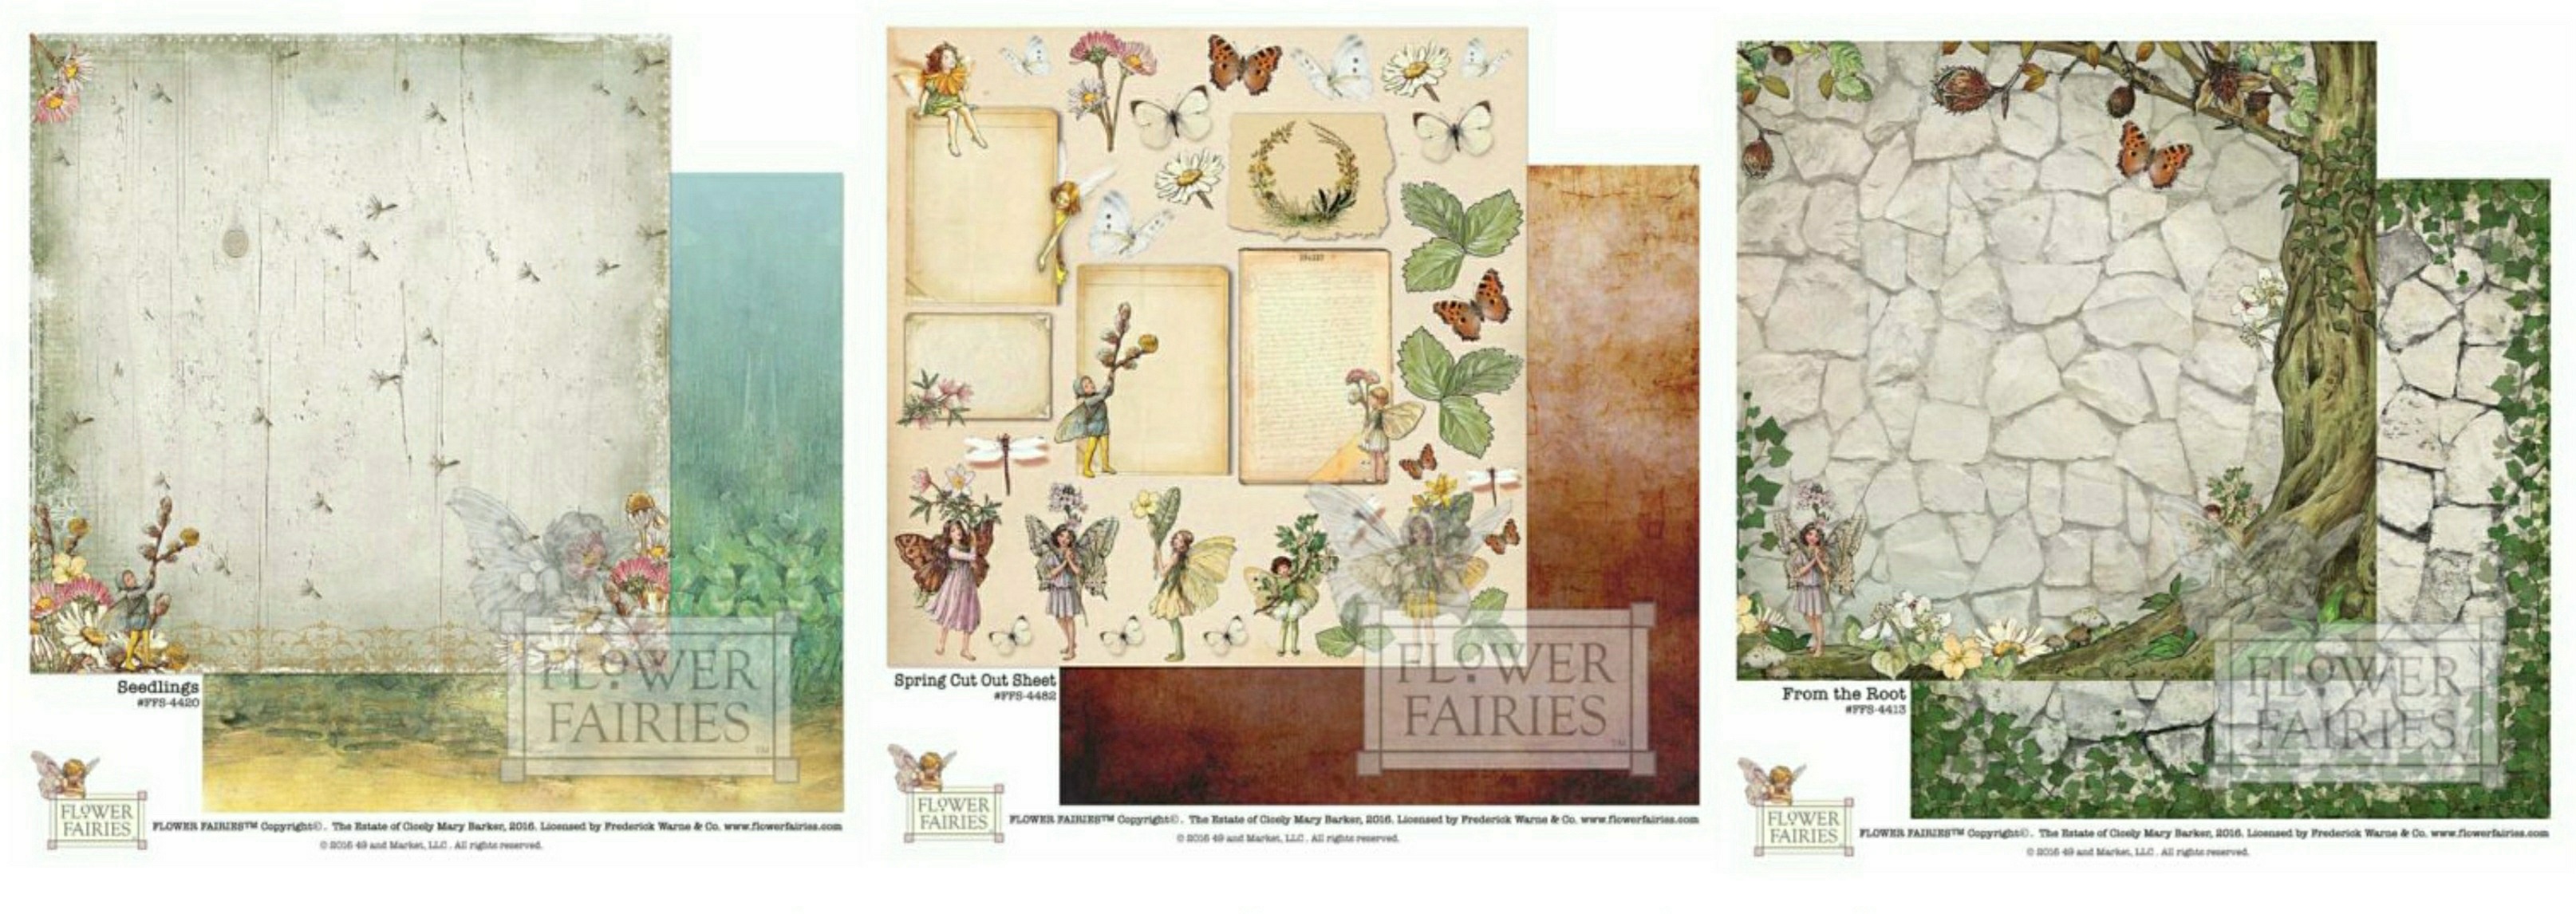
I was Immediately drawn to the backside of the paper called 'Seedlings'....such a pretty background design! It made me think of this photo I took of my oldest daughter Chloe, when she was a baby. So I chose this paper as my main background. Then I noticed the pretty Ivy design on the paper called 'From the Root' and thought it would make a lovely matting frame for my background paper. The third paper I went with was the 'Spring Cut Out Sheet'....I cut out a bunch of the pretty images to use with foam pop adhesive dots to add these elements to my page design.
Dusty Attic Product used in this project:
~ Decorative Scroll #1
~ Flower Buds
~ Lavender
~ Mini Captions #9
~ Dusty Attic Gloss Varnish
Above are the Shimmerz mixed media products I used in making up this page. You can order Shimmerz Paints HERE. NOTE: You can get your FREE/Bonus Shimmerz Paints product in the color of your choice if you mention my name in your next order! :)
So before I show you close-ups and a few tips on my page, I thought I would share a video tutorial I made up on how this page came together, so grab yourself a cup of your favorite beverage, take a little break and enjoy!
I hope you all enjoyed my little tutorial and feel inspired to create your own whimsical mixed media layout using Flower Fairies of Spring papers and embellishments! I'm posting a few close-ups of the layout that you can peruse at your leisure....
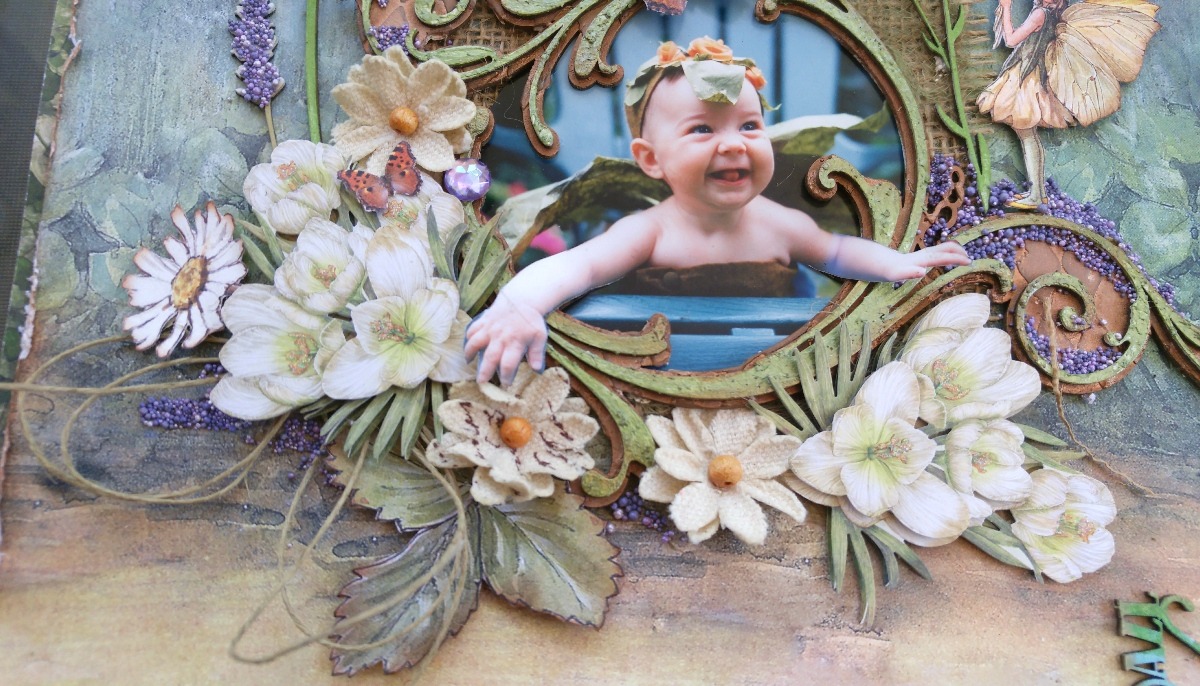
I used a Dusty Attic 'Elegant Scrolls' Frame to encircle the photo of my daughter and used a variety of products to add texture to the frame. I began with using a Tim Holtz Harlequin Stencil with homemade texture paste on the bottom layer of the stencil. I then painted it with a wonderful metalic paint by Shimmerz called 'Penny 4 Your Thoughts Inklingz'...the top layer of the stencil got a coat of Shimmerz 'Artie-choked' Texturez.
The smaller matching scroll got the same treatment in mixed media product as the larger frame. I also spritzed some Cheesecloth with Shimmerz 'See Ya Latte' and 'Olive Branch' Spritzes and adhered it to the background paper. I tucked a leaf cut out from the Spring Fairies cut-out sheet and a butterfly in the center of the design (from the cut out sheet as well).
Janene has these fabulous new products in her store 'The Scrapbook Diaries' called 'Prills'....I'm totally obsessed with them! Here I used the Lavender Ice Prills on the tips of my Dusty Attic 'Flower Buds' and 'Lavender' Chippies. I just put nice big globs of Aleene's glue on them and poured the little colorful balls all over them. I just love the effect they give!
....And, once I started playing with these Prills, I couldn't stop! Used them on the chipboard and around my photo area as well. I really liked how the purple/lavender color went with the blue/green/sepia colors on the background paper. (sorry about the stray piece of burlap on there....was to lazy to retake the pic when I was posting...but still wanted to share the close-up so you could see the effect on the chipboard :P
And seriously, how cute are those little flower fairy images!! Not only are these sweet l'il images scattered tastefully over all the papers but you get a bunch of the adorable images on the Cut Out sheet! Love that! ...I also added some burlap trim under my photo frame for added rustic texture, this wonderful stuff is available by the roll (in a nice workable small roll) at The Scrapbook Diaries....
There are 3 different styles available, the one above, a coarser burlap and a cream color burlap. I also used these adorable Burlap/Canvas blossoms by 49 and Market....such a sweet design, don't you think!
I hope you all enjoyed checking out my first (of many I'm sure!) pages I made using the gorgeous 'Flower Fairies of Spring' collection and hope I've inspired you play and get your 'whimsy' on! You can find most of the products I've used above at Janene's online store The Scrapbook Diaries! xo