Showing posts with label Video. Show all posts

Tuesday, February 28, 2017

NEW Video Tutorial - Bonsai Tree Canvas {TCW Stencils & Dusty Attic)


Hi All! I have finally gotten around to putting together my video tutorial for a canvas I made for the winter Creativation Show in Phoenix for TCW (The Crafter's Workshiop).  This art canvas features two stencils I design for TCW one is a stencil I designed last year called Organic Matter, the other is a NEW one I designed called Jungle Vines...


I also used a few of my favorite Dusty Attic chipboard pieces, a fairly new frame called Ornate Frame #5 and another called Feathered Charm #3...and a very cool title chippie called Blueprint Dream.


This video tutorial is a 2 parter which includes a small tutorial on how I made the polymer clay Bonsai Tree center piece so it's a few minutes longer than my usual tutorials.  Hope you all enjoy!


This was a really fun canvas to do and I hope you all give it (or something like it) a try!The tree center piece was easy to make and the result is something that to me resembles something that looks like cast bronze!


And how fun is that flourishy art deco looking frame?  for this I used a variety of metalic paints and glitter glue. (All the products are listed in the description area under the Youtube video).


I used Sculpey polymer clay to make the tree and with a few easy steps, you can make it too.  I like to take the time to use the tip of a knife to put in a few etching lines in the 'bark', this shows up well when you add the Pearlex mica powder before you bake off the piece.


Here's a close up of the title chippie by Dusty Attic...I love the blue print series of title's that they recently produced....you can see how I did the finish in the video above.


Another fun little addition I've been adding to a lot of my tutorials lately is the use of Prills, these colorful cute lil pebbles.  For this project I used a color appropriately named 'Ribbit' :)  I believe Janene has these (Prills) available at her store at The Scrapbook Diaries as well....you can find them HERE.


And how cute are these 'Feather Charm' chippies?  The Dusty Attic designed a variety of styles in this chippie, this one I used is Feather Charm #3.  I sued a bit of 3D metalic paint on it to give it even more texture. 


You can find TCW Stencils and Dusty Attic Chipboard at The Scrapbook Diaries (for those of you in USA and Canada), in Australia (or Internationally) you can order direct from The Dusty Attic website (for chipboard) and you can order both the TCW Stencils and Dusty Attic chipboard from The Mad Scrapper in the UK.The Stencils can also be found at Scrapbook.com and any craft stores that carry TCW products.

Thanks so much for stopping by my blog today, your kind comments and feedback are always appreciated.  I know I've been slow in getting up my tutorials lately with working on all the wedding plans for my oldest daughter (just a few more months!)  But I'll try and get busy with lots more tutorials to come, I have another one coming up this Saturday (March 4rth).  In the meantime enjoy this one, and give it a go! xo


Thursday, May 26, 2016

A bit of Whimsy & Video Tutorial {49 & Market, Dusty Attic, Shimmerz Paints}


Hi All!  I'm so happy to be sharing with you today my first layout using Janene Meyerowitz's beautiful Flower Fairies of Spring collection! I was delighted to be asked to be a guest designer today using this amazing, whimsical collection! And I was so thrilled when I first got my hands on this lovely collection....loving the heavy weight of the paper, so nice for fussy cutting and mixed media products!

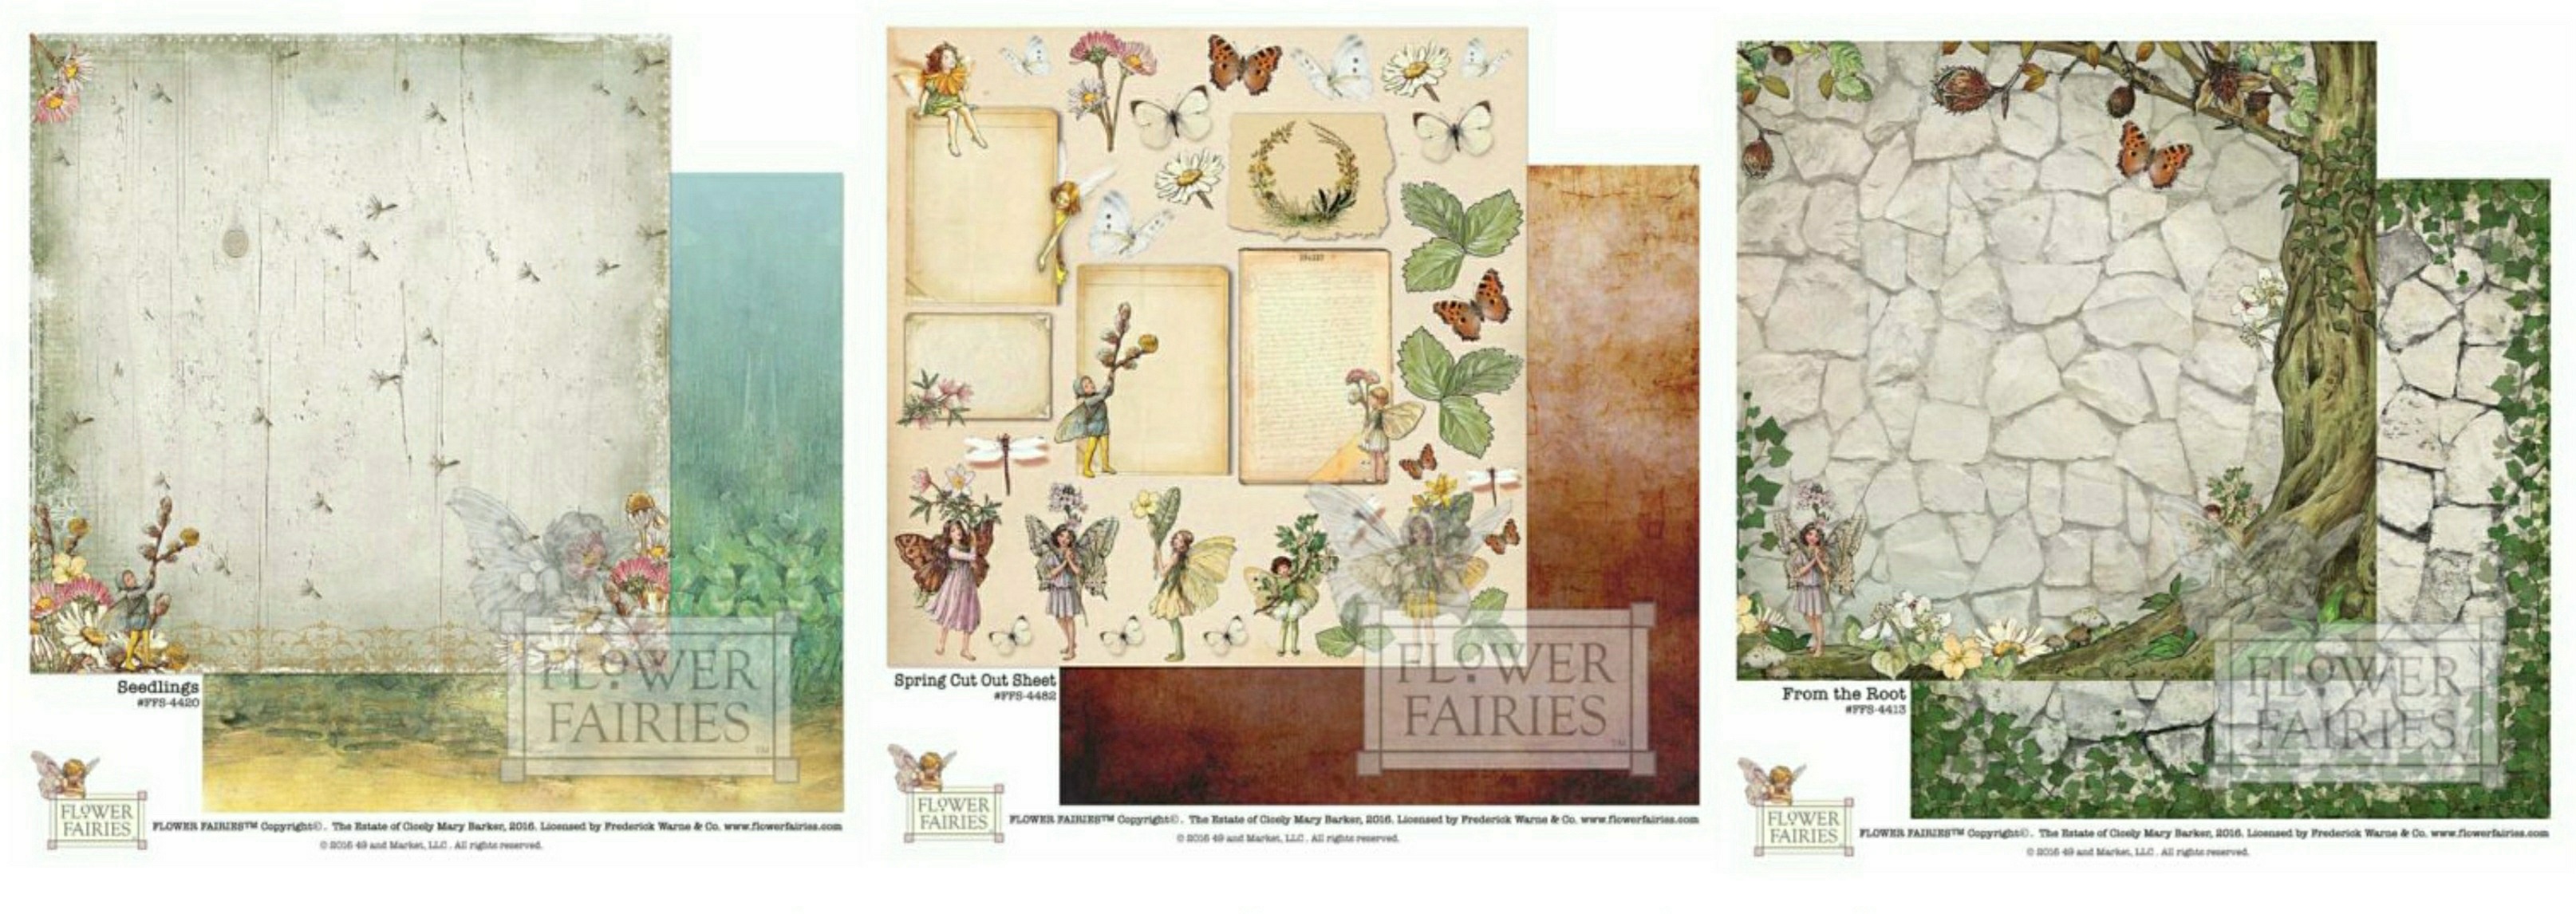
  product photo2
I was Immediately drawn to the backside of the paper called 'Seedlings'....such a pretty background design! It made me think of this photo I took of my oldest daughter Chloe, when she was a baby.  So I chose this paper as my main background.  Then I noticed the pretty Ivy design on the paper called 'From the Root' and thought it would make a lovely matting frame for my background paper.  The third paper I went with was the 'Spring Cut Out Sheet'....I cut out a bunch of the pretty images to use with foam pop adhesive dots to add these elements to my page design. 


Dusty Attic Product used in this project:
~ Decorative Scroll #1
~ Flower Buds
~ Lavender
~ Mini Captions #9
~ Dusty Attic Gloss Varnish


Above are the Shimmerz mixed media products I used in making up this page.  You can order Shimmerz Paints HERE.  NOTE: You can get your FREE/Bonus Shimmerz Paints product in the color of your choice if you mention my name in your next order! :)

So before I show you close-ups and a few tips on my page, I thought I would share a video tutorial I made up on how this page came together, so grab yourself a cup of your favorite beverage, take a little break and enjoy!


I hope you all enjoyed my little tutorial and feel inspired to create your own whimsical mixed media layout using Flower Fairies of Spring papers and embellishments!  I'm posting a few close-ups of the layout that you can peruse at your leisure....

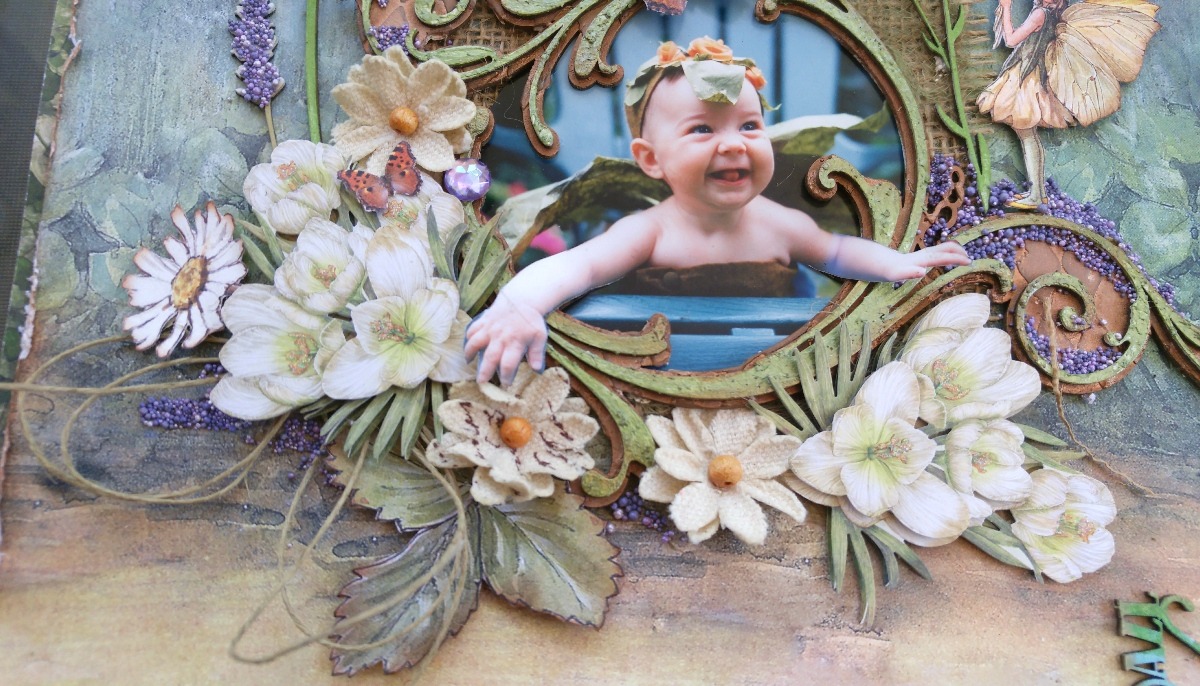
  All Smiles closeup1

I used a Dusty Attic 'Elegant Scrolls' Frame to encircle the photo of my daughter and used a variety of products to add texture to the frame.  I began with using a Tim Holtz Harlequin Stencil with homemade texture paste on the bottom layer of the stencil.  I then painted it with a wonderful metalic paint by Shimmerz called 'Penny 4 Your Thoughts Inklingz'...the top layer of the stencil got a coat of Shimmerz 'Artie-choked' Texturez.

  All Smiles closeup2

The smaller matching scroll got the same treatment in mixed media product as the larger frame.  I also spritzed some Cheesecloth with Shimmerz 'See Ya Latte' and 'Olive Branch' Spritzes and adhered it to the background paper.  I tucked a leaf cut out from the Spring Fairies cut-out sheet and a butterfly in the center of the design (from the cut out sheet as well).

  All Smiles closeup4

Janene has these fabulous new products in her store 'The Scrapbook Diaries' called 'Prills'....I'm totally obsessed with them!  Here I used the Lavender Ice Prills on the tips of my Dusty Attic 'Flower Buds' and 'Lavender' Chippies.  I just put nice big globs of Aleene's glue on them and poured the little colorful balls all over them.  I just love the effect they give!

  All Smiles closeup5

....And, once I started playing with these Prills, I couldn't stop!  Used them on the chipboard and around my photo area as well.  I really liked how the purple/lavender color went with the blue/green/sepia colors on the background paper. (sorry about the stray piece of burlap on there....was to lazy to retake the pic when I was posting...but still wanted to share the close-up so you could see the effect on the chipboard :P

  All Smiles closeup6

And seriously, how cute are those little flower fairy images!!  Not only are these sweet l'il images scattered tastefully over all the papers but you get a bunch of the adorable images on the Cut Out sheet! Love that!  ...I also added some burlap trim under my photo frame for added rustic texture, this wonderful stuff is available by the roll (in a nice workable small roll) at The Scrapbook Diaries....

  burlap-ribbon-natural-4-1m-rb-84383rustic-canvas-and-burlap-small-blooms-rb-84352
There are 3 different styles available, the one above, a coarser burlap and a cream color burlap.  I also used these adorable Burlap/Canvas blossoms by 49 and Market....such a sweet design, don't you think!


I hope you all enjoyed checking out my first (of many I'm sure!) pages I made using the gorgeous 'Flower Fairies of Spring' collection and hope I've inspired you play and get your 'whimsy' on! You can find most of the products I've used above at Janene's online store The Scrapbook Diaries! xo

Monday, May 16, 2016

Maja Design Vintage Romance Layout & Video Tutorial! {Dusty Attic Chipboard}


Hello everyone, Gabrielle here with you today!  Yup, I'm back for a little guest spot!  When I received the gorgeous Vintage Romance collection in the mail a couple weeks ago, I felt compelled to make up a layout & video tutorial with these stunning papers!

  Vintage-Romance-P
I used 'Happily Ever After', 'Together Forever' and 'Words of Love' for my page design.  I was going for a fabricky (is that a word? LOL) look on this layout, so I added a little machine stitching on the background design, this is optional, I think it can look equally as nice if you leave that off (if you are not a sewer).


As always, no project is complete for me without a nice smattering of Dusty Attic products.  For this page I used the following:
~ Wildflower #3
~ Chicken Wire Panel (small)
~ Word Pack #10
~ Vintage Frame #4
~ Dusty Attic 'Flower Power' Stencil
~ Dusty Attic Glaze Varnish

So grab your favorite beverage, take a little break and enjoy!....


I hope you enjoyed my little video tutorial, here are a few closeups for you to check out at your leisure....

Closeup1

I have this close-up turned on it's side just so you can get a more close-up and personal look at it.  I simply followed the pattern in the paper to create my button hole design...makes it easy to space out the design.

  Closeup6

The next step was to add a little color just directly behind the photo area using some Shimmerz spray called 'See Ya Latte' Spritz....then I applied some home-made texture paste through a Dusty Attic stencil called Flower Power.  I was going for a kind of Bohemian-chic look and I thought this daisy design would work well with it.  I also matted my photo with the backside of the 'Words of Love' paper, I do love browns with blues!


To continue the fabric idea of my page I also included a pretty strip of lace that I got from Tresor's de Luxe (my favorite source for beautiful lace!), which I adhered with Tombow liquid adhesive.  I prefer this glue as it allows you to readjust your placement if need be without making a big mess on the paper (let the glue sit for a few minutes to set up before you apply your embellishment to the page.

  Closeup3

I had a little fun with my embellishments on this one....I tried a new product (at least to me) called Prills, they are these little balls that come in different colors. Here I using the color called A-maized. I just applied a little glue to the tops of the blossoms of the Wild-Flowers #4 chippie by Dusty Attic and poured the little pebbles onto it.....I really love the effect!

  Closeup2

I finished my design by adding some layered floral and butterfly stickers by K&Company in a few strategic areas of my photo area.  Added a small shabby-chic bench embellishment by Prima and a few adhesive pearls on the lace panel.  Done! I hope you enjoyed my tutorial today and hope you feel inspired to try your hand with the gorgeous new Vintage Romance collection and Dusty Attic chippies and stencils. If you are looking for a great online source for Dusty Attic and Maja Design products, you can find both at The Scrapbook Diaries.

I'm always delighted to read your comments and feedback, they simply make my day, thank-you! xo

Thursday, December 10, 2015

VIDEO TUTORIAL: Creating Drama (the good kind) with Shimmerz Paints and Dusty Attic Chipboard


So I printed off this dramatic gorgeous gown photo over a year ago (an image I got off of Pinterest) and had meant to do a page with rich colors and textures for quite some time now.  Finally got around to doing it (as I still had so much family pics to scrap!).  Sometimes it's fun to do a page 'just because', know what I mean?


These are the Shimmerz Paints products I used for this project....as you will see in the video tutorial, each of these products has it's own unique quality whether it be the smooth thick texture of the Dazzlerz, the deep rich tones in the Coloringz and Vibez or the incredible shimmer of the Inklingz.
NOTE:  You can purchase your Shimmerz Paints HERE.  Be sure to mention my name "Gabrielle" in the Instructions to Merchant part of your order to get your FREE/Bonus Shimmerz paint product in the color of your choice with your next Shimmerz Paints order!


As always, a project is not complete for me unless I have a nice selection of Dusty Attic Chipboard in them.  Above are the Dusty Attic Chipboard pieces I used for my project:  Ornamental Trim Set (brand new product), Word Pack #14, Lacey Heart Frame Set.....and I used a NEW Dusty Attic Stencil design called Fans....if you haven't seen all the gorgeous new stencils from Dusty Attic, be sure to check them out, they are amazing, you can view them HERE!! You can find Dusty Attic Chipboard at The Scrapbook Diaries.


I also used 3 stamp sets I designed for The Scrapbook Diaries, the two stamp sets on the left and right (above) are a couple of the newest stamps I've designed for them.  You can purchase my stamps at this link at The Scrapbook Diaries.  And good news for those 'down under'....Joanne Flannery at Embellish It! in New Zealand is now carrying my stamps (and stencils!) you can find her store HERE.

So it's time to give yourself a little break, grab your favourite beverage and hope you enjoy watching my little video tutorial on how to make this page....Enjoy!


Hope you had fun watching my tutorial. Here are a few close-ups you can view at your leisure....


I should note that after I filmed my tutorial, I felt my design needed a little more color in the bottom right section so I added a couple more spritzes of paint and some swirls of fibre threads (from a package I got from my local dollar store).


I've had these Prima jewelled leaves sitting in my stash forever! When I was choosing my embellishing products I totally had to use these as I thought they were a good match for the colors I was using in the layout!


I'm just loving those new Ornamental trims from Dusty Attic, ....kinda sad I've used the whole pack up....thinking I need to get me some more :)  ....Really loving the new stencil designs as well, in the top right corner you can see some of the texture and design I got onto the page using the Fan stencil from Dusty Attic with my Homemade Texture Paste and some Shimmerz Paints.


The pink and black butterflies were cut from one of my favorite Bo Bunny collections called Primrose (I used the paper called Bliss).  I also used a fun BoBunny Stamp on this page called 'Butterflies'.   TIP:  Many of you ask what to do when your paper buckles from wetting or spritzing your paper with paints and water.  One of my favorite things to do is use my hair flattening iron on the paper, its a quick and easy fix!

So I hope you enjoyed todays post and hope I've given you some inspiration to get out your scrapping/mixed media products and play!  Thanks so much for stopping by my blog today and leaving such sweet comments and feedback, they really make my day! xo xo


Monday, October 19, 2015

Mixed Media Reverse Nature Canvas & Video Tutorial


Hi all! I know it's been a while since I posted a project, so I'm happy to share with you today a reverse style canvas I made on a 4"x 6" canvas using a TCW (The Crafter's Workshop) Mini-Brick Stencil, Shimmerz Paints and some NEW Dusty Attic chipboard!


Shimmerz Products used on this project:

~ Glorious Day Vibez
~ Truffle Spritz
~ Palm Reader Vibez
~ Don't Be Suede Coloringz
~ Green Olive Shimmerz
~ Greener Pastures Creameez
~ Boogie Boardin' Blue Creameez
~ Penny 4 Your Thoughts Inklingz
~ I Onxly Love You Inklingz (Jewel)
~ Olive U Truly Inklingz
~ Berry Hot Creameez


Dusty Attic Products used on this project:

~ Indian Arrow
~ Rushes #2
~ NEW Dusty Attic Texture Paste


TCW Stencil used in this project:

~ Mini Bricks (6x6 inch stencil)

So to make things easier I did up a video tutorial on how this project was made.  So grab yourself a lil break and enjoy! xo


Hope you enjoyed watching.....here are a few close-ups you can view at your leisure....


I just love all the new chipboard pieces Jennifer Hedger has added to the Dusty Attic Store!  This piece is called Indian Arrow....so many fun things you can do with this one!  I did a little quick painting with Shimmerz Creameez & Inklings, then added some twine and Bo Bunny adhesive pearls for a unique look.


For the butterfly, I printed off a butterfly image on an acetate sheet and cut out two sizes, gluing them together.  (I had the image on my old computer, so I no longer have the image to share....but you can find many printable butterfly images on Pinterest).  The metal embellishments are the key and keyhole embellishments from Graphic 45.  I used the TCW mini-brick 6x6 stencil with the NEW Dusty Attic Texture paste to get my background design.


I used a combination of Shimmerz Glorious Day Vibez, Truffle Spritz and Green Olive Shimmerz Paint for the background brick texture colors. NOTE: You can get your FREE/Bonus Shimmerz Paint product in the color of your choice with your next Shimmerz Paints order just by mentioning my name "Gabrielle" in the Instructions to Merchant/seller part of your order.  Shimmerz Store. xo

Hope you enjoyed today's post! thanks so much for stopping by, your comments and feedback are always appreciated and make my day!  (For anyone looking for DA chipboard, Janene at The Scrapbook Diaries has a large selection, including their new texture paste! :)


Monday, August 10, 2015

Clean & Simple Style {Shimmerz Paints and Dusty Attic} Video Tutorial!!


Hi all! For today's project I thought I'd play a bit with negative space designs.  I so admire people who can do this style of scrapping well! For me it's a bit of a challenge as I have a tendency to fill up my spaces too much.


I began this project by first using the Dusty Attic August Inspiration board as a stimulus for this project.  I chose my colors from it but I think I got a little off track with the blue, I meant to choose a steal/blue/gray ....I thought that the light blue and the grey would mix to the right color, but the light blue ended up dominating my layout.....ah well, I'm still happy with the results even if the colors didn't match the mood board as well as I wanted.....and where is the yellow, you may ask? It's in my nephews, wife's shirt! LOL!


These are the Dusty Attic products I used to make up this page:
~ Key to My Heart
~ Marrakesh Panel (small)
~ Sea Gulls
~ String Frames (Small)
~ Foliage #2
~ Work Pack #16


These are the Shimmerz Paints products I used for this project.  I've made up a short video tutorial on how this page came together....so take yourself a lil break and enjoy! (If the video is not showing up here on blogger you can watch at this link https://youtu.be/PGyEa1N19II .....


Hope you enjoyed my video tutorial! I have been trying to make use of some of my old stash, so I took these layered stickers I had from an old K and Company collection called Blossomwood and used them as my floral embellishments for the page (makes for a nice flat page design that will fit easily into an album).


I also fussy cut some Pussy-willow branches from a patterned paper in the Blossomwood paper collection, and scattered them around the photo area.  The little Sea Gulls are a nod to one of my friends on my Dusty Attic design team Joanne Bain, who does clean and simple style to perfection,....she often uses those lil Sea Gulls in her work adding a lovely dramatic effect!


The Dusty Attic Marrakesh Panel (small) is such a fun design element that I think can add lots of texture to a page....here I just added a drop of Perfect Pearls in a lavender color to the joints.  For the pretty Dusty Attic heart lock (Key to my Heart) I painted the base with Shimmerz Grapetastic Dazzlerz and the ornate top piece with Shimmerz Gritty Graphite Texturez.


Recently Dusty Attic put out a whole bunch of AWESOME word packs, I just love these scripty titles....and what a great deal, as you get a number of titles in one pack!


I know it may pain some people to cut up the beautiful Marrakesh Panel, but never throw out the bits and pieces left over.  Even the smallest bitty piece can add a nice accent as shown here where I used a cut off piece for the little corner accent.

I'm so loving the watercolor effect the Shimmerz Paints Creameez add to a background design!  Did you know that Shimmerz just recently came out with a whole bunch of NEW Creameez colors?  I just got my order in and I can't wait to play....there is a new Summery color collection and a Vintage Collection, they are ALL gorgeous colors!
NOTE:  If you are looking to put in a Shimmerz Paints order, be sure to mention my name 'Gabrielle' to get yourself a FREE/Bonus Shimmerz Paints product in the color of your choice! (just pop it into the 'Instructions to Merchant/Seller' part of your order along with the product you chose as your bonus). You can order Shimmerz Paints HERE.

Looking for a great place an order Dusty Attic Products in North America?  The Scrapbook Diaries has a huge variety of the latest Dusty Attic chipboard designs (they also ship International) .....another great source is Moments of Tranquility.

I hope you enjoyed checking out my attempt at a clean and simple page style!  Lots of time left this month to still play along in the Dusty Attic Inspiration Board Challenge....as always there is an AWESOME Dusty Attic prize up for grabs (a $100.00 Gift Certificate for the DA online store)!  Be sure to share your project at the Dusty Attic blog and link it in the right side column.  Can't wait to see what you all come up with this month! xo


LinkWithin

Related Posts with Thumbnails