Wednesday, March 23, 2016

Saying Farewell ~ All Smiles {Maja Design & Dusty Attic}


Hello friends, I'm happy today to share with you all a very special project that is dear to my heart.  As many of you know I have been with the Maja Design team for over 4 years now.  Today will be my last post for this wonderful team.  It was very hard for me to come to this decision as I have very much enjoyed creating with these beautiful papers.  But as I have a lot on my plate as of late, I felt it was time to make a few changes.  I decided to end my journey as I began.....the very first project I did for Maja Design was using their signature blue's and neutrals....so today I finish my journey using these classic colors.

  Life-by-the-Sea-P

As always I used a variety of collections in one layout (5 in all), but I mainly chose papers from the Life by the Sea collection.  I drew my inspiration from the navy and white stripe top my oldest daughter is wearing in the photo above of her and our dog.  These are the papers I used on this project:

Maja Design Papers used in this project:
~ Life by the Sea (Seaside Cottage, Bottle Message),
~ Vintage Summer Basics (1945-bs),
~ Vintage Autumn Basics (XXIII-bs, XVI).


Dusty Attic Chipboard used in this project:
~ Chains
~ French Flourish
~ Lattice (small)
~ Vintage Frames #4
~ Word Strips
~ Mini Captions #9
~ Mini Tabs #2
~ Clear Gloss Varnish
~ Dusty Attic Blossoms (Blue Bonnet)

  All Smiles closeup1

I chose the fresh and pretty 'Seaside Cottage' strip paper as my matting paper....and the softly scripted 'Bottle Message' paper as my background.  I decided on my photo and embellishment placement and then softly tinted the surrounding area with some Colorbox Mixed Media Inx in a Patina color.

  All Smiles closeup2

Before adhering my background paper to the matting paper, I added a little accent by tearing the two papers and curling back the edges to reveal the pretty check paper from the Vintage Autumn Basics collection with a little peek of lace as well. I added a small zipper pull from Prima Marketing to finish the look.  I also sandwiched a strip of burlap between the two papers before I finally adhered the two pieces together.  As an added finishing touch I added two 'hinge' designs by cutting a Dusty Attic 'French Flourish' chipboard design in half and glued them to the top and bottom of the right side.

  All Smiles closeup3

I double matted my photo with papers from Vintage Autumn Basics and Vintage Summer Basics, sandwiching the Dusty Attic 'Vintage Frame #4' between the two layers.  Then I added some butterflies (just some images I printed off from the internet), blossoms and clock images that I fussy cut from the Vintage Autumn Basics XVI paper, and applied with pop dots, adding a border with Platinum Stickles (glitter glue).

  All Smiles closeup4

I also added some randomly cut sections of Dusty Attic chipboard Lattice.....and as a final touch used some Dusty Attic Clear Gloss Varnish to attach some seed beads in around the lattice (Prima - Licorice seed beads).  To add another bit of curvy design to the page, I slightly bent a strip of Dusty Attic Chain under the photo and attached it with a 'screw' brad.

I hope you enjoyed checking out my project as much as I enjoyed creating it!  It has been my absolute pleasure being on this wonderful design team and want to thank Marie Janson for her kind generosity and support all these years, as well as Camilla Lillieskold, our awesome design team coordinator and Jennifer Snyder, our social media coordinator for all their hard work on our behalf. Suffice it to say I will be using all the lovely product I still have in my stash for years to come! xo
  

Wednesday, March 2, 2016

Cherish ~ New Kit & Video Tutorial {The Scrapbook Diaries}


Hello friends! I'm so happy to share with you all today the latest kit page I've made up for The Scrapbook Diaries, so much fun to scrap this pic of my sweet little great nieces! I always feel so fortunate to get to have such lovely products to play with in creating my scrapbook pages....and I feel even happier that all the products I use are available to everyone to create the same or similar pages through The Scrapbook Diaries Kits!


Janene Meyerowitz (Owner of The Scrapbook Diaries) always looks far and wide for the newest most exciting products on the market....yup, doesn't matter if the products need to be ordered from as far away as Poland or Australia, she brings them in so we can play!  Here you can see some of the lovely layered wood embellishments she brought in from a company called Scrapeniec in Poland....love the delicacy of these pieces!  


Included in this kit are these wonderful new Shimmerz Paints products, Strawberry Fields Creameez and Ruby Lost Her Slippers Inklingz!  Love these colors combined!


I'm a sucker for butterflies on scrapbook pages, this kit includes a beautiful two-sided cut-out strip of butterflies....the hard part was picking my favorites for this page!


Another fun cut-out strip in this kit is a lily floral design.  I love these, with just a little bit of fussy cutting and some foam adhesive tape, you get a really unique and pretty page embellishment!


As always, the kit comes with all the products included on my sample page....I'm crazy about those adorable little LemonCraft buttons!


And that vine!  One of my all time favorite Prima Marketing Vines.....Janene was able to get in a limited number of these vines, so if this is a kit you want, be sure to move fast on it as this particular kit is quite limited and will go fast!


Also included in this kit is the Organic Matter stencil I designed for The Crafters Workshop!  As always Janene offers the kit in Basic and Complete kits so that if you happen to already have certain items in your stash you can save a little money by taking the Basic kit.

And of course, this kit also comes with unlimited access to a private online video tutorial to show you how this page was made so that you can follow along and create the same page for yourself or you can tweak it to suit your own style! She also provides you with enough materials to create a bonus page (be sure to check out the bonus page Janene created with this kit! It's so beautiful!).  I know you will have a lot of fun with this one! You can order your kit at The Scrapbook Diaries today!  Fair warning, this one is quite limited so act quickly if you want it! :)

Thanks so much for stopping by my blog today, I always appreciate the kind comments and feedback I get from my friends! Happy Scrapping!

Wednesday, February 24, 2016

Window Easel Framed Card {Maja Design - Vintage Baby}


Hi all!  I'm excited to share with you today this uniquely shaped baby card I recently made.  I tend to be a bit frugal with scrap supplies, I save everything!  Those plastic/transparent pieces that many of your embellishments come on (blooms etc.), I don't throw them out, just in case I can use them later.  I recently found a fun use for them....making easel cards with a peek-a-boo window.  The Maja Design 'Vintage Baby Collection' had all the perfect elements to create the card I envisioned.

  Vintage-Baby-P

I used a variety of papers from the Vintage Baby collection (Die Cuts, Die Cuts-bs, Ephemera, Expecting, Our Little Miracle and Flowers for Mom), I also did a little fussy cutting from Vintage Spring Basics (5th of May) and Coffee In the Arbour (Butterflies are Free).


The bottom part of the card has an area for you to write in your own personal thoughts.  I added some fussy cut blossoms attached with foam adhesive dots so that the window part of the card has something to prop against.

  Baby card photo1

Here is a picture of the card with it's folded shut.  To make the card I cut out the framed baby design from the Vintage Baby Ephemera paper, also cutting out the area behind the baby inside the frame with an exacto-knife. I then laid the card cut out on the brown gingham paper (backside of the Die Cuts paper) and cut a piece slightly larger in wide to the frame piece...and kept the length of the strip the full 12 inches.  I then cut a second piece of the gingham paper to frame the baby frame piece, making sure there is about a 1/4 inch edge.  I then made a fold crease in the long strip at the 6" mark and at the 3" mark.  I cut out the center of the upper part of the 6" rectangle and also out of the matting piece I cut for behind the baby frame.

  Baby card photo5

I then put the card together by attaching the gingham matting paper to the upper 3" of the long card strip and then sandwiching the transparent plastic piece between the matting and the actual baby frame piece.  Now you have a cute peek-a-boo window on your easel card.  The last steps are just adding a few decorations.  I cut out a second baby image from another piece of the Ephemera paper and added it with foam pop dots, I thought it gave the card that extra pop.  I also fussy cut some flowers from the Vintage Spring Basics paper and butterflies from the Coffee In the Garden collection and added them as decorations to my card front.  A few seed beads for my flower centers and bingo, your unique baby card is done!  The cool thing?  Maja also has a beautiful baby boy framed image in this collection so you can make the card for either sex.

  Baby card photo3

It's hard to show in a photo the effect of the see through window so I thought I'd post an extra pic from the other angle, but believe me, in real life the effect is quite striking.  I had a lot of fun creating this special baby card and think you'd enjoy it too!

Don't know where to find Maja Design papers in North America?  An awesome source is The Scrapbook Diaries.  

I based this card on this months Moodboard challenge at Maja Design, I chose to work with the pinks and browns....here is a pic of the Moodboard for February....


You can win a wonderful Maja Design paper collection if you play along using this months board as your inspiration for your project using Maja Design papers.  The winner is announced on the last Monday of every month.....This month that would be Monday February 29th....so you still have time to play and possibly win a lovely Maja prize! You can find the challenge rule HERE.

Thanks so much for stopping by my blog today and for the kind comments and feedback, your words always make my day! xo


Tuesday, February 16, 2016

Wonder {More Than Words Challenge Blog Guest!}

Let's talk about challenge blogs!  Have you ever needed a little inspiration to get moving on a project?  All of us do need a little inspiration once in a while.  That's where challenge blogs are a perfect solution.  Earlier this year a wonderful new challenge blog started up called 'More Than Words' and I was asked to be their Guest Designer for February.  And let me say, as soon as I saw the inspiration board they sent me, I had loads of ideas floating around in my head....
This is the beautiful inspiration board for February.  The idea is to create a project (card, layout or art journal page) in which you include the word 'Wonderful' and base you project design around the words 'sparkle' and 'shine'.  Well, I haven't used a lot of glitter or sparkle in my projects for a long time so when I saw the words sparkle and shine, I really went with it!!  I chose a fantasy photo of a mermaid tail, and thought that would work well with the 'Wonderful' theme.  I also thought it would work well with all the glitter elements I chose for this page.


First thing I did was chose my decorative elements for this page.....I recently received some of the newest chipboard designs from The Dusty Attic....this double layered Elegant chain is something I've been dying to use on one of my projects, I thought it would work nicely here!  Something else new that Dusty Attic now carries is wonderful mixed media elements called Colour Blast!  On my chipboard piece I used the Color Blast embossing powder in 'Bling'.  I also dabbed on some Ranger Liquid Pearls in a green and blue color (Key Lime and Juniper).


Above are the products I used from Dusty Attic to achieve this page design....the gold embossing power adds such a deep lovely shimmer to the Elegant Chain chipboard design and I just love the double layered look, the second layer with the chain detailing is so fine and beautiful.


These 'Bubble' chipboard pieces are part of the New releases from Dusty Attic as well....for this I just randomly dabbed on some Ranger Liquid Pearls in Key Lime and Juniper.  Then I added a bunch of glitter glass (I got these small bottles of glitter glass in a package at Michaels). As well as Prima seed beads and Micro beads.....I applied these using some clear gel medium to make sure they stay on the page.  I also liberally applied sequins in aqua, sea green, peacock blue all around the photo area....I thought these would be fun as, to me, they resembled the scales on a mermaid tail :)


I thought I'd do something fun with the photo as well....it's hard to see here because of the added embellishments around the photo but I printed off my photo in black and white and in color.  Then I cut out a circle (or bubble) of the main central part of the photo from the color photo. I then glued the circular color piece over the coordination spot on my black and white photo....then added some Liquid Pearls all around the edges of the cut out edge of the color photo and added clear glitter glass to the Liquid pears to create a unique frame.


The corner scroll is an old favorite Dusty Attic piece for me.....I gave it the same treatment I gave to the Elegant Chains piece....and added some tinted cheesecloth and sequins around it as well.


For my title I used a Tim Holtz metal frame (name plate) and added a few dabs of the Ranger Liquid Pearls streaked on it as well.  I just hand wrote my title on the inside.

I had so much fun creating a layout using this awesome inspiration board by More Than Words!  You can join up at their challenge blog and play along this month as well!  You can find them HERE!  It's a great place to find loads of inspiration from their monthly boards as well as from the other guests and amazing people that play along each month!  They have awesome sponsor's each month with amazing prizes up for grabs!  You have until February 29th to get your project linked to their blog side panel if you would like to play along and have a chance at this months amazing prize! 

RULES & PRIZES!
You can find the challenge rules HERE .  (And just so you know....there is more than one prize up for grabs!  The Challenge Winner gets a $50.00 GC (gift certificate) from LemonCraft!! First Runner-up gets a 9 piece chipboard pack from 2 Crafty, 2nd runner-up gets a $25.00 GC to Flying Unicorn, 3rd runner up gets a $25.00 GC for 13 Arts, 4rth runner-up gets a $25.00 GC for Maja Design Paper, .....there is also a Random Winner that is chosen that will get a $25.00 GC for Lindy's Stamp Gang....and if thats not enough, they've added a Mystery Prize (chosen for originality or great use of inspiration board) which is a $25.00 GC for Fabrica Decoru!  So lot's of prizes to be had....just another reason to join this wonderful Challenge blog!

You can follow More Than Words Challenge on Facebook HERE ....this will help you keep up to date on all the challenges, news and prizes!  I thoroughly enjoyed working on my page hope you will too!

....Looking for Dusty Attic Chipboard in North America?  As always a great source is The Scrapbook Diaries!

Thanks so much for stopping by my blog today, I always appreciate the kind comments and feedback! xo

Wednesday, February 10, 2016

Live Love Laugh {Dusty Attic, Maja Design and Shimmerz Paints}


Hi everyone! I'm so happy to share with you all a special page I made for my parents anniversary this month.  They are having their 58th wedding anniversary, such a wonderful milestone.  For this page I combined a number of  Maja Design paper collections, using 5 different papers. (Vintage Summer Basics 1922, Nyhavn-Strolling Along the Canal, Vintage Summer Basics 1923, Ska Vi ta en Fika-Pratstund, Vintage Autumn Basics-XVI) as well as some awesome new Dusty Attic chippies!


I'm always so thrilled when I hear that Jennifer Hedger (owner of Dusty Attic) has been busy creating new chipboard designs!  Above are all the fun new chipboard designs I used to make up this romantic page. (I used the smaller version of the Live Love Laugh title)


I began by using the Vintage Summer Basics 1922 paper as my matting/background paper. I then cut the corner and 1/4 inches off the edges of the Nyhavn paper, which I then painted with some Shimmerz paints (Black Cherry Soda Creameez and Onyx Inklingz) and stamped liberally around the photo area with some stamps that I designed for The Scrapbook Diaries.  I then layered on a crocheted lace Doily from Tresors de Luxe  and a chipboard frame from Dusty Attic (Swirly Frame and Laurel Leaf chippies).

  LIveLaughLove_GabriellePollacco_closeup3

I created coordinating blossoms using the Rose Creations dies from Spellbinders, using the scraps from the Vintage Summer Basics 1922 and 1923 papers.  I cut the smaller inner petals from the darker pink paper and the larger petals from the light pink paper.  I also cut out a few green leaves using the Ska vi ta en Fika paper (leaf dies are from the Rose Creations set).

  LIveLaughLove_GabriellePollacco_closeup2

I added a cluster of embellishments in the bottom right corner using a couple of Dusty Attic chippies (title and scroll).  I also added some texture using a Prima flourish stencil and home-made texture paste. And as always I love to tuck in a little clock here and there from the Vintage Autumn Basics XVI paper.

Are you looking for a good source for Maja Design Paper and Dusty Attic Chipboard?  Be sure to check out The Scrapbook Diaries for one stop shopping on many of the fun items I used on this page! And if you are looking to put in an order of Shimmerz Paints be sure to put my name "Gabrielle' in the Instructions to Merchant part of your order to get a FREE/Bonus Shimmerz Paints product in the color of your choice!  Lots of exciting news over at Shimmerz Paints (they are releasing some NEW Watercolor paint sets called Aqua Heuz) as well as some awesome new reformulated Shimmerz Paints (can't wait to try these!!).  This Thursday they will be opening a new Website which will make ordering your Shimmerz Paints so much easier....keep your eye peeled on the Shimmerz Facebook page for more info on this!

I hope my parents enjoy this layout, I'm forever grateful to have them in my life and hope they will see many many more anniversaries.  Thanks so much for stopping by my blog today, your sweet comments and feedback always make my day! xo


Monday, January 18, 2016

A Beautiful New Kit Page {The Scrapbook Diaries}


Hello friends, I'm so happy today to share with you my first kit page and video tutorial for The Scrapbook Diaries for 2016!  My sweet friend and the owner of the Scrapbook Diaries was kind enough to send me this beautiful photo of her adorable little triplets!  Do you have that special photo that you've been wanting to scrap and just wanted the perfect products to do it?  Well, this is the one! I had so much fun creating this page around that sweet photo!  Not only are these some of my most favorite papers to work with, but the embellishments and mixed media products are so lovely as well!


One of the many things I love about creating these page kits for The Scrapbook Diaries is that I get to use such unique and beautiful products to embellish my pages.  And you, in turn, get to use them to create your pages as well.  I sometimes hear people say, 'Well she gets to use such fun stuff to create her pages' ....well now you too can have all these lovely things at your fingertips to create your version of this page.  You also get full UNLIMITED access to a private video tutorial, a step by step on how I made up this page.  You can follow the tutorial exactly as is, or are welcome to add your own personal touches to the page.


I just love the blooms I got to use for this particular kit....it also included this gorgeous lavender color of adhesive pearl embellishments.


I always love to use a variety of design elements on a page, like the vertical strip (Gazebo design cut from the Autumn Anthology paper) as well as the circular design found in the chipboard frame. All of it of course being part of the kit.


The kit also includes some very intricate and delicate vines by Scrapeniec (a unique chipboard company out of Europe) and I used some lovely mixed media products to color the chipboard and papers (Tim Holtz Peeled Paint Distress Ink and Shimmerz Paints - Purple Rain Creameez)....also part of the kit.


I used foam adhesive strips to give a little more dimension to my page design.  I just know you are going to love this page kit.  And as always, Janene has included plenty of product to make a bonus page that she has designed as another sample.  You can order your kit (while quantities last, they do go fast!) at this link The Scrapbook Diaries Kit.  When you order your kit you will also be sent a special private link to have unlimited access to the private video tutorial on making this kit page.

Just a reminder, you can find all my newest stamps (and the earlier stamp designs) at The Scrapbook Diaries.  AND they are now also available in the UK at The Mad Scrapper (just scroll down the left side of the website to my name to find all the products they carry designed by me) and in New Zealand at Embellish It! for all of you down under! (she also orders in some of the Scrapbook Diaries Kits....be sure to check with Joanne about availability of these kits for your area!)

Thanks so much for stopping by my blog today, as always I so appreciate your kind comments and feedback! 

Wednesday, January 13, 2016

Wishing for Spring {Dusty Attic, Shimmerz Paints and Maja Design}


So I really can't complain too much about the weather, it's been a fairly mild winter here in Canada (Ontario, at least) so far....but the past few days have been so cold and snowy.  It doesn't take long for me to long for Spring!  So today I thought I would scrap something that makes me happy....beautiful flowers.

  Enjoying-Outdoors-KL

I used a number of papers from the beautiful 'Enjoying Outdoors' collection (Beautiful Trees-bs, Woodlands, Flourishing-bs)....also a bit of Vintage Autumn Basics (XVI) - Clocks, and Walking In the Forest (Die Cut Sheet- butterfly).

  Always closeup2I found these cute flowers that I thought were a good match for the blossoms in the photo....they are Prima Marketing flowers, but I couldn't find a name on the packaging (I think they might be from the FairyBelle collection?).


I did a little painting with some Shimmerz Paints on the background. I used 'Naughty or Nice' Inklingz behind the photo area and then used a combination of 'Sage It Isn't So' Creameez and 'Greener Pastures' Inklings, splashing out from the side underneath the floral embellishments.  I gave the Dusty attic chipboard scrolls a coating of  'Artie Choked' Textures.

  Always closeup4

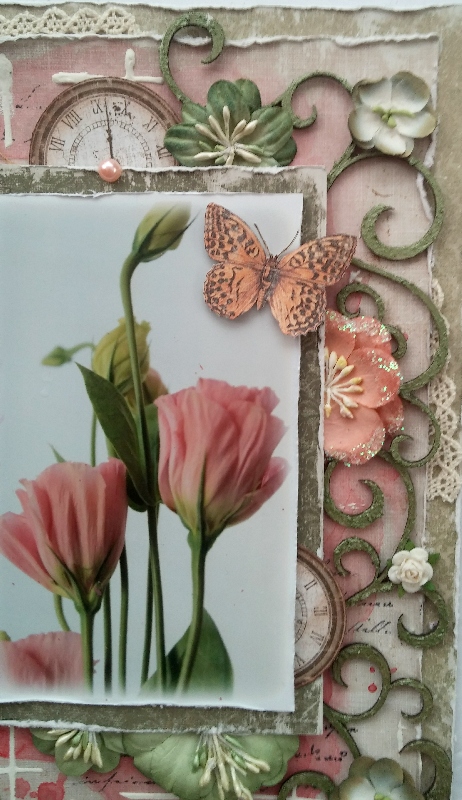
You can see in this photo, the pretty textures the green texture paste gives to the Dusty Attic chipboard Scrolls (also a new set of scrolls recently released by Dusty Attic!).  I also tucked a few clocks that I cut out from the Vintage Autumn Basics XVI paper around the photo area along with some Dusty Attic green blossoms (called Grassy Knoll).  And as a finishing touch I added a butterfly that I cut out of the Die Cut sheet from the Walking In the Forest collection as an embellishment on the photo.


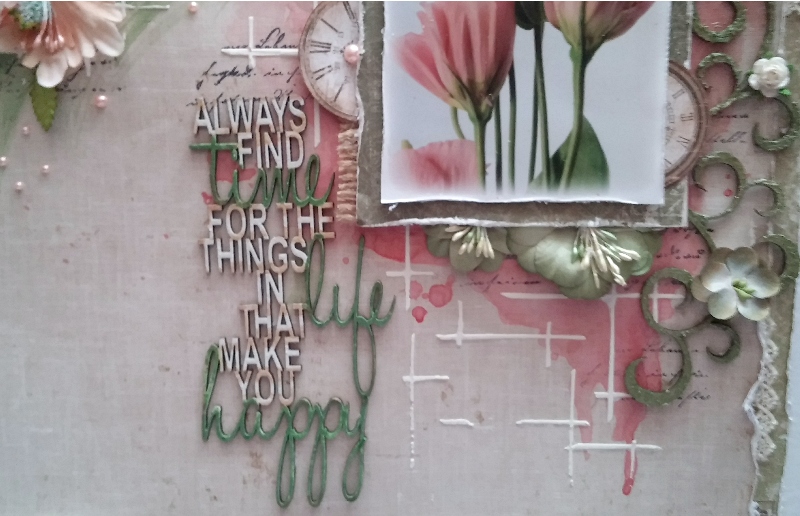
I'm super excited about the new stencils Dusty Attic has been coming out with lately.....just a couple of weeks ago I got a few of them in the mail....I used the Cross Hatch stencil behind the photo area with  some home made texture paste to add a little interest there.

  Always closeup5

I added a bit of texture using a new Dusty Attic stencil called 'Cross Hatch' with some home-made texture paste. I also added a new chipboard title from Dusty Attic, using the Shimmerz 'Greener Pastures' paint to color the scripted words in the title.

I hope you enjoyed today's post and that it brought you a little hint of Spring on this cold winter day! It's fun to be scrapping again after a little break over the holidays....I've got another page coming up in a few days!  Thanks so much for stopping by today! xo


LinkWithin

Related Posts with Thumbnails