Sunday, June 3, 2012

I'm a Guest Designer for Flying Unicorn Kits!!

So I've got to tell you about my experience being the Guest Designer over at The Flying Unicorn Kit Club for this month!  What a lovely group of ladies!!  Sometimes I'm told in advance what to expect in the kit when it arrives, but not this time!  Alda (the super sweet ladie that owns the kit club) let me know that she loves to keep the kit ingredients a secret until it arrives in the mail......and now I know why!  I have to say my jaw just dropped when I got my Flying Unicorn GDT kit in the mail a few weeks back!!  A huge box appeared on my doorstep just PACKED with gorgeous papers and embellishments.  Along with package after package of beautiful papers, blooms, flourishes, trims, coordinating cardstock and even art supplies (liquid pearls, Glimmer Sprays and shimmer paints!) there is also a beautiful OTP (off the page) project, in this case a lovely wooden shadow box!
The above page is the first page I made up using this lovely kit!  Now, I know that this kit club does not have strict rules for their DT and guest designers to use only the kit ingredients on their pages, but the truth is that I really had to use almost nothing from my own stash to make up these pages....there was just so many beautiful things to use!  For these pages, I did scan a couple of the butterflies in the patterned papers and printed/cut them out for embellishing my layouts, so other than this and one Dusty Attic hinge that I used on one of the pages, everything on my work is from the goodies sent to me for this months Guest DT work! 
There is this really cool case of pearl/shimmer paints included in the kit (I can see dipping into this thing over and over in upcoming layouts!) ...I used some of the shimmer paint to tint the layered yellow bloom in the center to draw in some of the pinkish tones on the page.  
There is a wonderful words/quotes rub-on sheet in the kit as well!  I have forgotton how much I really loved to use rub-on's on my work in the past until I got using them with these pages! 
For this page I combined a variety of the florals and branches in the kit, and liberally used some of the beautiful rub-on quotes.  There is also an awesome package of antique crochette lace in the kit that I just loved and used over and over in my pages! 
Check out the cute sheer ribbon and pearl blooms in the kit!  I just thought they made the cutest page accents! 

I really love butter yellow with soft blue as a color combination, so for this page I chose the elements in the kit that favoured these colors.
And finally a 3rd page I made using this kit I went with the fresh and pretty white blooms with the hint of cornflower blue.  And how cute are those vines?!   Here are some close-up pic's of the page and the goodies from the kit...


For the punched circle design, I used the Crafters Workshop Circle template to draw out the circle (I used the 6th ring from the center to make this design.  I used the Martha Stewart Swirling Lace corner punch to make the edge design.

 
Just cut out the circle using the 6th ring from the center of the template.  Then use the corner punch putting the edge of the punch design along the edge of the paper.  

Line up the edge of the punch to slightly overlap the outer edge of the punch design.  There will be a little gap on the edge (see diagram above) 
Happily using this size circle and this punch the design lines up perfectly to make this circle.  (If the design doesn't line up at the end, you can always cover the small gap with some blooms or embellishments when you place it on the page).

All I can say is that I wish I had more days in a month!  I still have so many papers and goodies left over from this gorgeous kit (not to mention the shadow box I'm still wanting to play with!).  If you haven't checked out this amazing kit club yet, go have yourself a peek (and check out the work of the rest of the super-talented design team when you are there, I'm sure you will be so inspired!!) Flying Unicorn Kit Club.  (I've added pic's of the kit and it's add-on's below just so you can have a visual of the yummy goodies!)

OCEAN BREEZE & SUMMER SKIES

JUNE KIT OF THE MONTH

The wait is over, and its time to introduce Ocean Breeze and Summer Skies, our June 2012 Kit of the Month. This month's kit is filled with so many goodies that inspiration and creativity will be falling off your projects! Kits are available now in the store and its first come, first serve. There are no lists or signs ups, We believe that scrapping is a passion and not an obligation . Hurry and get yours today , tomorrow could be too late !


The favorite part of the Kit- the OTP ( Off the Page) and this month we are featuring a shadow box, manufactured by Darice.


BUT WAIT THERE IS MORE !!!
Do not forget about the add ons

Petaloo Vine, Prima Painted ladies, Prima Fairy Belle, Prestige Mini by Wrights, Petaloo Peony
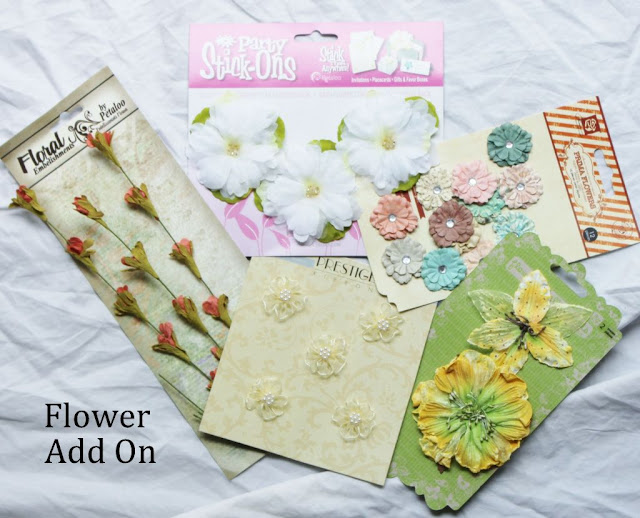
Butterflies by Petaloo, ZVA Creative Crystal, Tattered Angels – Chalkboard Mist, Vine by Petaloo, Rub Ons Kaiser –Rustic Bird House, Hero Art Lace, MM Glitter Brads, Chipboard Alphas Mini Flowers by Wright


Kaiser – Secret Bird – Private, Fairy Belle- Marcelle, Bo Bunny – Garden Almanac garden Vines, garden Weathered Kaiser madame Butterfly – Camisole,Bodice, Blouse, petticoat, Kaiser Up Up and Away – Rollercoaster, Moon Ride , Kaiser Blae and Ivy – Field
Ming, Periphery Gold, Reflections, rosemary, latte, Tangerine, Scotch, Sugar and Spice, Whitewash, Palm Grove
And here are some examples from the Creative Team
Thanks for having a peek! xx

Saturday, June 2, 2012

Websters Pages & Unity Stamps!!

Most of you have by now seen all the lovely goodies in the new Webster's Pages 'Girl Land' collection.  But today I have something really special to share with you!  Brandin O'Neil the owner and designer of all those gorgeous Webster's Pages collections got together with Unity Stamps and created this beautiful collection of rubber stamps to coordinate with the Girl Land collection!  I made the layout above incorporating 3 of the new 'Itty Bitty Stamps' and thought I would share some of the techniques I used to make up  this page. 
First off I started out by using the 'Tea Cup Tag Stamp' with some white Colorbox ink all around the edges of the hot pink paper from the Girl Land collection in order to to create a sort of lacy/vintage edging for my page. 
I then used the cute 'Diamond Tag Stamp' to create a soft background design for behind my photos.  I applied a soft taupe chalk ink (Studio G ink from Michaels) and used a tissue to gently wipe off the edges to create a design that fades into the background paper. 
In the photo above you can see the effect of the faded stamp design. 
And finally I used the 'Doily Tag' on a piece of the soft pink patterned paper in the Girl Land collection and then took a heart punch on the image to create the heart embellishments seen below.   
To make the heart embellishments, you simply use a heart punch on the stamped images (I also like to use a little extra ink around the edges of the hearts to give a more finished look).  Then I cut another slightly larger heart design out using a scallop edge scissor on some contrasting patterned paper.  Stitch to your background design and fold the edges of the top heart up slightly....Viola! a cute little embellishment for your page! 
Above I've pictured the 3 stamps I used for my page...but there are so many other adorable Itty Bitty stamps to be had.  All week long the WP design team girls have been sharing their creations using these stamps at the Websters Pages Blog as well as the designers at Unity Stamps Blog.  If you are looking for more stamping inspiration be sure to check out the posts for this past week.  And while you are at it, lay down some comments for a chance to win some of these super cute stamps! 

Thanks for stopping by!  I have a really exciting post to share with you all tomorrow so pop in if you have a chance!! xx

Thursday, May 31, 2012

ATC Fun with **NEW** Dusty Attic!!!

So yesterday, my youngest daughter goes out the door to get to school but pops back in to give me a package sitting on my doorstep....the NEWEST RELEASES for Dusty Attic have arrived and I'm so tickled to open this package!  Jennifer Hedger, the owner and designer of all the Dusty Attic goodies is so darn talented!  She has asked in the past if there are designs and suggestions that the design team may have, and just a short time ago I sent her a note suggesting nests and eggs.....not but a few hours later she sends me this.....
......asking me if this is what I had in mind?  It's exactly what I had in mind!!....this girl is not only talented but amazingly fast!!!  So you can imagine I was all excited to get these in the mail, rip open the box and start playing!!

Now, I have never made ATC's before but Dusty Attic has started a new monthly challenge for ATC's and it just so happens that the challenge for June is 'Birds/Flight' ....so I just had to jump in immediately and give it a go!  I enjoyed it so much that I just had to go ahead and make two of them!  There are 2 new 'Nest' style chipboards being released this month so I made one of each.  Here you can see them a little more close-up, shown individually... 

Below are the chipboard pieces I used for the ATC pieces.  A little while back Jennifer had sent me the gorgeous ATC frame so that I could put together a collection.  I've decided to start with June and create at least one ATC per month, trying out the challenge for each month in order to create a lovely wall decore piece.  You can get the ATC frame in either Wood or chipboard (some may find the chipboard a better option to keep shipping prices down).  So if you want to play along with Dusty Attic, you can find the newest pieces and the ATC Frames HERE.  (the background papers I used are from Prima "Almanac" and the blue birdie and purple bloom is from K&Company, layered adhesive stickers)


So if you love ATC's or if like me, this is your first go at it.....come join in the fun and start up your own wall decore piece and take a few minutes each month to try the Dusty Attic ATC challenge!  And don't forget to share your creations in the Dusty Attic Gallery!  We love to see what you do with your Dusty! xx 

Tuesday, May 29, 2012

A Fun Little Bo Bunny Card (Plus a Template)!

Today's assignment at the Bo Bunny blog was to create a project using an embossing technique.  Well, let's just say this past week has been crazy hectic and a comedy of errors!  We had a beautiful family wedding over the weekend that caused me to put off this assignment till Sunday.  Sunday comes and I find we've got huge plumbing problems.  Long story short, my heat embossing tool gets ruined with water and now my plans for my embossed project is out the window!  Okay, 'Plan B' .....I think to myself, I saw this link on Pinterest for this cute folded paper dress design.  I'll do up the dress design on a card and use my Score Pal to do some 'dry embossing' on the edges of my card. Easy peasy right? ....Off I go to Pinterest, only to find that the template connected to the pin I had saved had been removed!  **Sigh** .....Well, I'm not ready to give up, finally I decided I would draw up my own template for the dress (it took a little fussing and measuring but I got it done!  I've posted my hand drawn template here for those of you who want to give this folde dress design a try.  (Below) Just right click on the picture of the template and 'Save Picture As' to your computer.  Then print out on the back of a 6x6 piece of patterned paper (I used the 6x6 paper pad from the Bo Bunny "Little Miss" collection for my dress, the back of it is plain white paper so you can print out on the back and cut it out) 
Above is a close-up view of the embossed edges I put on my card using the Score Pal. 
This is a picture of the template I made up for the Folded Paper Dress.  (Right click on the photo and 'Save Picture As' to your computer....set your printer to print on a 6x6 paper....it's better to use one sided patterned paper like you find in the Bo Bunny 6x6 paper pads so that you can better see the design when you print it out on the back of the paper.  Cut out and fold on the markings.).  I gave two different dress-top designs.  The one with the straight bottom edge is the one I used on my card....this one is good if you are using a ribbon in the center of the dress....the other is good if you are doing a corset style top...how cute would this be with a little lace up? huh?)

TIP:  I have one more little tip for you! Okay, I'm all thumbs when it comes to tying bows, especially small ones!  But I found a fun and easy way to tie a perfect bow on Pinterest.....USING A FORK!!  Here is the link TYING A BOW WITH A FORK  .....I used a velvet type ribbon so mine is a little bulky but I think you'd get even better results using a ribbon that is a little finer and has the design on both sides as opposed to the one-sided velvet ribbon I used. 

Thanks again for stopping by and for all the lovely feedback, I just love hearing from you all! xx 

Friday, May 25, 2012

My First Magazine Cover!! Scrap365!!

So I get my copy of the June issue of Scrap365 in the mail a couple of days ago, and I was so excited to see that the layout I contributed made the cover!!  Normally I can't show my layouts for the mag on my blog but I got permission to share the cover image with you all!

If you haven't seen this magazine yet you've got to check it out!!  If you are looking for a magazine that is just PACKED with inspiring projects, this is the one for you.  Personally, for me what makes a good magazine is one that has a LOT of layouts and plenty of tips and tutorials.  This one has it all!  I am not a new scrapper so it takes some pretty new ideas to capture my attention.  So far every issue I've received has really impressed me with great ideas, new ways to use products, beautiful project ideas and staying on top of the newest trends.  In this article I show a step by step on how to make beautiful embellishments for your scrap pages from Polymer Clay.

Here is a link to the Scrap365 Magazine Website, if you'd like to check it out for yourself!  There is also a beautiful sketch available monthly for the readers to try out.

Hope everyone has an awesome weekend! xx 

Wednesday, May 23, 2012

A Showcase of My Work at Bo Bunny Blog!!

I'm honored that Bo Bunny is doing a Designer Showcase on my work today at the Bo Bunny Blogspot!  I thought for my project for this day I would do something with the NEW "Little Miss" collection!  I just love every collection that Bo Bunny puts out but as soon as I got a peek a 'Little Miss' I knew I found a paper collection I would want to use over and over!  I adore the vintage images and the beautiful colors in this collection....and with 2 girls to scrap it's just the perfect collection for me!  Here are a few close-ups of the above layout. 
I have a weakness for birdcage images, so I have to say the "Maree" paper has got to be one of my favourites fromt his collection!  I cut out the bird cage images and attached them with pop dots.  I 'hung' them from a couple of Dusty Attic Mini Branches. 
I made the blooms from some scrap fabric, some crepe paper (I tinted the center with some chalk ink) and some Bo Bunny Jewels) 
Another favourite for me is the Trinkets and the Brads in these collections....Bo Bunny even takes the humble brad to new heights!  Here's a detailed list of the product I used for this page:
Supplies:
Patterned Papers: Little Miss (Jaquoya front & reverse side, Maree, Alice)
6x6 Paper Pad: Little Miss
Brads: Little Miss
Jewels: Little Miss
Chipboard: Little Miss
Combo Stickers: Little Miss
Thanks again for stopping by and for all the sweet comments, I just love your feedback!  (NOTE:  I mentioned in a couple of my posts that I would be sharing pic's of my scraproom at end of month but due to some scheduling changes on my design teams I'm going to have to put it off for another week :)  But if you would like a tiny peek, come have a look at today's Bo Bunny Blogpost :)

LinkWithin

Related Posts with Thumbnails