Showing posts sorted by relevance for query canvas. Sort by date Show all posts

Monday, December 8, 2014

Autumn Mixed Media Canvas {Shimmerz Video Tutorial}

Autumn Canvas by Gabrielle Pollacco using Shimmerz Paints

Hi all! I'm so happy to share with you today a canvas I made using Fall leaves, some Gesso and a few Shimmerz Paints products!  Winter has come way to fast this year and I wanted to get this Autumn project done before there weren't any usable leaves left on the ground.  I managed to find a few after doing a little hunting around in my backyard.


These are the Shimmerz products I used on this project:
~ Punked Up Purple Coloringz
~ Treasured Hymn Spritz
~ Hot Fudge Vibez
~ Bamboo Leaf Spritz
~ Tuscan Sun Spritz
~ Oh Say Can U Sea Coloringz
~ Miner Miner 49er Inklingz

I made up a Video Tutorial to go with this canvas design....Enjoy!....


Here are a couple more views of this canvas....

Autumn Canvas by Gabrielle Pollacco using Shimmerz Paints

I just love the effect the gold 'Miner Miner 49er' Inklingz gives to the leaf and relief parts of the canvas.  One of the cool things about Inklingz is that as you let the water sit in the paint cake, and the more you stir, the thicker and more luxurious the paint becomes.  Then it's easy to 'dry brush' the metalic gold effect on your raised surfaces of your canvas design.

Autumn Canvas by Gabrielle Pollacco using Shimmerz Paints

I hope you enjoyed today's project and will give it a go either in these colors or your own favorite color combination!  REMEMBER....If you go to the SHIMMERZ STORE to or some of these yummy goodies, be sure to mention my name in the 'Instructions to Merchant....or message to seller' part of your order and you will receive a FREE/Bonus Shimmerz product in the color of your choice! xo


Wednesday, February 11, 2015

I Couldn't Resist Another {Maja Design and Dusty Attic}


Hello dear friends! Yep, I'm back again today to share another canvas I made using some older bits of my scrapping stash mixed with some beautiful Maja Design papers. As I explained yesterday, I had recently been browsing on Pinterest and found this artist out of Singapore, named Grace Ciao, who makes fashion designs out of real fresh flowers....I  thought the artwork was beautiful but at the same time thought it sad that they could not last being that they were made from fresh flowers.  It got me to thinking about some very large Prima blooms that I had bought many, many years ago when I first started out scrapping....


Remember these?  I realized that they would be perfect to make up some lovely couture canvas designs.  Yesterday I shared one canvas that I made out of one of the other flower petals (also shared a video tutorial on how I made it as well).  Today I'm sharing another canvas using some pink/cream petals from my stash.

  Vintage-Summer-Basics-P1

Vintage-Springr-Basics-P1

I used a variety of papers from the Maja, Vintage Summer Basics and Vintage Spring Basics collections. I used the center of the 'March 1st' paper (from Vintage Spring Basics) for the body of my couture figure as well as the pretty Daffodil images in the corners of the paper for my canvas background.  In the center of the canvas I used '1910' from Vintage Summer Basics, and then cut out a heart shape from '1909-bs' also from the Vintage Summer collection.

  Uniquely You_Gabrielle_Pollacco_Maja_Design_01

I always feel that the Maja papers are beautifully complimented by Dusty Attic chipboard, in this case I used a new chipboard design called 'Elegant Swirls #3' to top my canvas. I used a stencil called 'Butterfly Collage' that was designed by a lovely and super talented friend of mine, Janene Meyerowitz (yep, that's right, owner of The Scrapbook Diaries) to make the wings behind the figure and to add the lattice design in the corners.  I used the 12x12 stencil for this, but she also has this gorgeous stencil available in a 6x6 size as well :)


Uniquely You_Gabrielle_Pollacco_Maja_Design_02

Running down the side of the canvas I used a Dusty Attic chipboard piece called 'Branch #3" that I just gave a coat of Gesso and inked with some Ingvild Bolme 'Moss Garden' chalk ink, and some Branch Bark ink by her, as well.  In the bottom right corner I added a corner chippie from the DeVine Frame Set (Dusty Attic).  The dress design was made entirely of a couple of the petals I had from an old, old Prima box.  (I'm sure you can use petals from just about any silk/fabric flower you have in your stash).

  Template_Gabrielle_Pollacco_Figure_FLower_Dress

I sketched out a couture figure to create my canvas design and saved the page as a template.  Just right click on the photo and 'save image as' to your computer if you would like to try using my sketch for one of your projects.

If you are looking for Maja Design papers as well as Dusty Attic chipboard, Janene at The Scrapbook Diaries has loads uploaded to her online store (how's that for one stop shopping! :)

Thanks so much for stopping by my blog today, I really do appreciate all the lovely comments and feedback! Happy Scrapping! xo

Thursday, September 4, 2014

Mixed Media Canvas & Video Tutorial {Shimmerz Paints & The Flying Unicorn}


Hi all! I'm so excited to share with you today a small canvas design I made using goodies from the September Flying Unicorn kits and some of my favorite Shimmerz Paints Products. There were so many beautiful metal embellishments in this kit I wanted to use them on a mixed media style canvas.  Most of what is on this canvas is from the September kits from Flying Unicorn (I think the only thing from my stash is a couple of adhesive gems and a couple small Dusty Attic chipboard pieces and some Shimmerz Paintz....I will list them below).  As always, I find it easier to show than to tell, so here is a little video tutorial I made up for this piece,...enjoy!


As I said, most of the products I used on this canvas are from the Flying Unicorn kits, but here are the Shimmerz Products used on this canvas....

~ Sunset Strip Vibez
~ Before the Dawn Vibez
~Truffle Spritz
~ Jeni B Bleu Vibez (in Kit)
~ Apple Cider Blingz
~ Artechoked Texturez (in Kit)
~ Golden Wheat Shimmerz

NOTE:  If you would like to order the Shimmerz products used on this canvas you can order them directly from the Shimmerz online STORE.  And remember if you would like to get a FREE/Bonus Shimmerz product be sure to mention my name "Gabrielle' in the 'INSTRUCTIONS TO MERCHANT' part at the end of your order and Stacey will send you a bonus Shimmerz product in the color of your choice :)


Here are a few of close ups of the canvas that you can view at your leasure....


I just love that metal branch!


For the centerpiece design I took one of the label chipboard pieces in the Small Art kit and added some bronze dimensional paint to give it a metalic look.


Hope you enjoyed my project! This one came together quick and easy!  I've got another really fun canvas/and video tutorial coming up in a few days (11th) done with more goodies from this kit!  Hope you'll be able to come by and check it out!  Thanks so much for stopping by today!


Wednesday, November 18, 2015

Mixed Media Canvas - Video Tutorial {Maja Design, Shimmerz Paints & Dusty Attic}


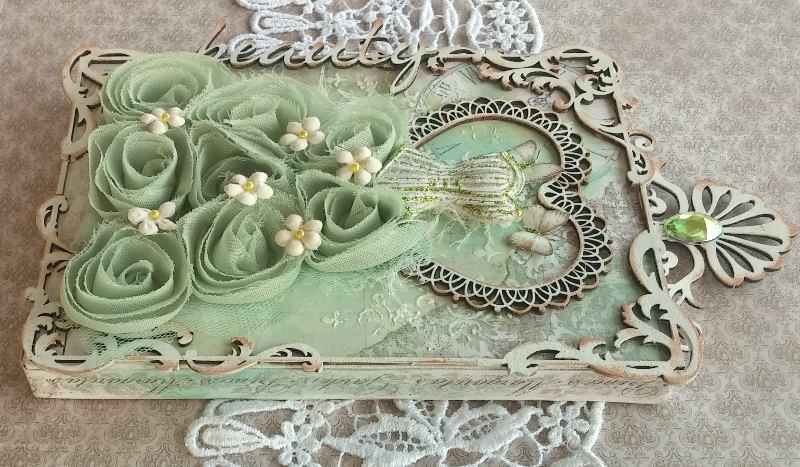
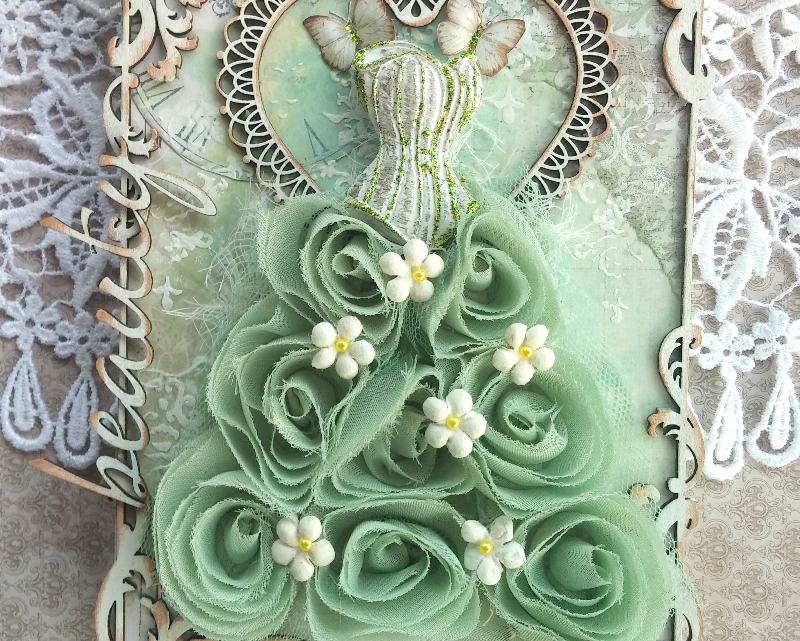
Hi everyone, I'm back today to share with you all a fun little canvas I made up yesterday.  I had this cute soft green rose ribbon in my stash (a gift from my sweet friend Kimberly!) which made me think of those pretty couture gowns I sometimes see on Pinterest.  So I gathered some of my favorite Maja Design papers some Dusty Attic chipboard pieces and some Shimmerz Paints and got started.


The majority of papers I used on this  project came from the Vintage Spring Basics collection with a couple of papers from Crea Diem, Vintage Summer Basics and Sofiero collection.  I used the following papers for this project:  Vintage Spring Basics (1st of April, 6th of May), Crea Diem (Den oersättliga tiden), Vintage Summer Basics (1903), Sofiero (Princess Margareta's Garden).


For me a canvas isn't a canvas without a liberal sprinkle of Dusty Attic chipboard on it, these are the Dusty Attic pieces I used for this project:  Baroque (Square) Frames, Word Pack #20, Lacey Hearts Frames, Flourish #8.  You can find Dusty Attic Chipboard and Maja Design papers at The Scrapbook Diaries. (Psst! Janene even has the newest winter collection from Maja Design in already!!)


I always like to use a little color/mixed media element to my pages.  For this project I used Shimmerz Paints 'Ride the Tide' and 'Sage It Isn't So' Creameez to add that subtle hint of shabby-chic color. Creameez are a soft water based paints that are activated with water. NOTE:  Get a FREE/Bonus Shimmerz Paints product in the color of your choice with your next order of Shimmerz Paints by simply mentioning my name 'Gabrielle' in the Instructions to Merchant part of your order. You can order Shimmerz Paints HERE.

I thought it would be fun to create a video tutorial to share with you all to show step by step how this little canvas was created....so grab your favorite beverage, take a little break and enjoy!....


I hope you enjoyed my little tutorial! I thought I would share some of the close-ups below so you can view them at you leisure...

Beauty View4

I like to save all my title strips from my Maja Design papers for my projects and one of my favorite uses for them is to use as borders on my canvas's.  They are a perfect fit width-wise and for a 4x6" canvas, they fit perfectly  all around as well. Here I used the paper strips from the Sofiero 'Princess Margareta's Garden' paper for this (although you can use any border that suits your fancy for this.

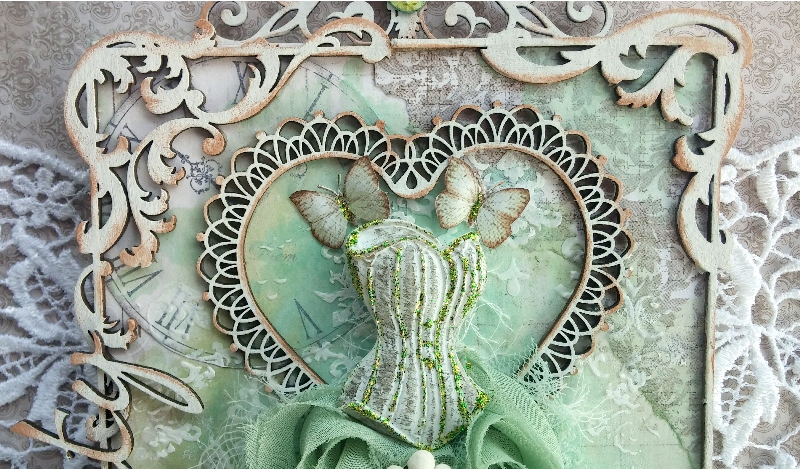
  Beauty closeup1

I found the perfect little frame for this in the Dusty Attic Baroque (Square) Frames ....using the smaller of the two frames in the set I just gave it a little snip here and there to make it fit my 6"x 4" canvas.  Prima's Shabby Chic treasures had just the right size corset in it to suit my project.  And then I found a lovely little heart frame in the Dusty Attic Lacey Heart Frames.

  Beauty closeup2

I chose my mixed media paint colors from the Kaisercraft rose ribbon a friend had sent me a little while back. I picked Shimmerz Paint's 'Ride the Tide' and 'Sage It Isn't So' Creameez to add a soft hint of color to the background of my design.  I added a little texture with some texture paste and TCW's ''Mini Brocade" 6 inch stencil.  And finally I added a scripty title by using the chipboard word 'Beauty' from Dusty Attic's Wordpack #20.


I hope you enjoyed today's project and hope you feel inspired to create your own shabby-chic wall art.  Thanks so much for stopping by my blog today, I'm always delighted by the lovely comments and feedback I get from all of you! xo xo


Thursday, June 21, 2012

Mixed Media Canvas (With a Video Tutorial!!)

I've really enjoyed dabbling with mixed media designs lately and although I've done some mixed media designs on my scrap pages I thought it was time to try out a mixed media canvas! And I'm so excited to share with you the step by step video I prepared to share with you how I put this project together!!  I've been reading books on mixed media, exploring different techniques and one that I just have to give a try was this couture figure mixed media design.  I was at Chapters over the weekend and had picked up a book called Collage Couture by Julie Nutting, so I would say this is where I drew much of my inspiration for this canvas design I made up here.  For this mixed media piece I used a whole lotta Websters Pages In Love collection papers and some Dusty Attic Chipboard as well.
I first began by sketching out a figure on some paper and then sketched out a dress design.  Below is a picture of the sketch I made... 
I then layed a piece of white paper over my sketch and began drawing out the individual pieces that would make up my couture figure.  Below is my template for the figure..... 
I know that sketching doesn't come easy to everyone so if you are not up for drawing out your own figure, you are welcome to print off the above template to make up your own couture figure.  If you right click on the picture above and 'Save Picture As' to your computer, you can print out the template and cut out the shapes to make your own couture canvas.  Just print it out on an 8.5 x 11 inch piece of paper, cut out and then trace the pieces on the patterned paper of your choice.  ....Here are some close-up photos of my finished layout (You can watch a video below and see how I put the whole canvas together).... 


The quote I used for this one I thought was fitting because of the playful movement of the figure I drew up, I found the quote on Pinterest.....it says....
"There was something in her movements that made you think
that she never walked but....
Always danced"
So, grab yourself a cup of coffee and enjoy a little video I put together showing a step by step on how I put this mixed media canvas together, I hope you enjoy it!


Mixed Media Canvas with Gabrielle Pollacco from Gabrielle Pollacco on Vimeo.
I'd like to take a moment to thank all the kind people who leave their sweet comments here at my blog, I read them all and really appreciate them....sometimes the comments are annonymous or they don't link back to your blogs so I can't always respond,  but I'd like to say how much your comments mean to me, thank-you!

I'm making a  series of these canvas's as wall decor for my scraproom (I've got another one to share with you all tomorrow!)  Hope you'll come back for a peek! xx

Thursday, April 9, 2015

Elongated Steampunk Canvas VIDEO TUTORIAL {Dusty Attic & Shimmerz Paints}


Hi All! I'm thrilled to bring to you today a new VIDEO TUTORIAL using a unique elongated canvas and some really fun Dusty Attic Chipboard and Shimmerz Paints products! I've always wanted to try doing one of these long canvas's and I found myself one in a nice manageable size for my first try, this is a 4x12 inch Artist Loft Canvas that I found at my local Michaels Craft store.


Here are some of the Dusty Attic products I used to create this canvas design:

~-Decorative Frame #1
~ Nuts & Bolts, Hinges
~ Pen Nibs
~ Cogs #1
~ Mini Cogs
~ Mini View Finders
~ Chains, Corner Flourish #3
~ Decorative Keyhole
~ Dusty In Color Cranberry (on heart)
~ Dusty in Bloom Mini Roses


I was going for a metalic/verdigris look for this one so I chose these colors and products for this project:
~ Mandarin Mai Tai Coloringz
~ Olive Branch Spritz
~ A Shade of Grey Coloringz
~ Chocolate Brownie Coloringz
~ Before the Dawn Coloringz
~ Ride the Tide Creameez
~ Miner Miner 49er Inklingz
~ Giddy about Green Inklingz

I will take you through the whole process of creating this project, from making the heart centerpiece embellishment to layering on all these lovely paint products.  So grab yourself a cup of coffee/or tea, relax and enjoy!....


I hope you enjoyed watching my step by step on creating this canvas!  Here are a few close-ups of my page .....


Close-up of the air dry clay heart I made as centerpiece for this project as well as some of the Dusty Attic chipboard pieces I used to make up the canvas design.


I added some textures with molding paste and some stencils and used the Shimmerz NEW 'Ride the Tide' Creameez and 'Giddy About Green' Inklingz with 'Miner Miner 49er' Inklingz to get the verdigris (aged metal) look.


Thanks so much for stopping by my blog today! You can order your paint products at the Shimmerz Paint Store HERE.   Remember if you would like to have a FREE/Bonus Shimmerz product in the color of your choice, just put my name 'Gabrielle' in the 'Instructions to Merchant/Seller' part of your next order!  xo

Dusty Attic products can be ordered directly from their website (Australia) HERE, or another source in North America is at The Scrapbook Diaries HERE, Janene (owner of The Scrapbook Diaries) has recently added loads of new Dusty Attic product to her shop! xo


Sunday, August 11, 2013

A NEW Mixed Media Tutorial Video! {Featuring Dusty Attic & Tresors De Luxe Lace!}

Hi Everyone!  Today I'm so excited to share with you a video on a new mixed media canvas I made using lots of my Dusty Attic Chipboard, some gorgeous Tresors De Luxe laces (I love the way the intricate laces bring up texture on the canvas design!) and lots of just odds and ends from around my house!  I will admit I do not have a lot of mists etc. in my stash so you will see that I used some mists mixed with simple acrylic paints and even a small mister filled with some steeped black tea (a tip from Finn) that I used to give the canvas a vintage look.  Here are some closer looks (Scroll down to view the video).
 
I made the bloom in the corner from some simple satin ribbon!  I will share another tutorial on this in the future.  It's also fun to used household things like bottle caps, loose beads, bits of brass from old jeans and of course little bits of  Dusty Attic chipboard.
 
 I used some stencils and texture paste to create more texture relief on the background of the canvas.  I find the busier you make the embellishments and texture, the better the finished design turns out.

You can really use any color of embellishment when doing one of these style canvas's (blooms can be a color you  have in your stash that you never use!) because you end up covering it all with gesso.

Here I used one of my favorite Dusty Attic Scrolls (Scroll #1) and I layered cheesecloth underneath for extra texture.  I tried to show all the steps in the video without making it crazy long (it's about 20 minutes).....I edited out adding some of the embellies because I think you can only watch me for so long gluing on all the nic-nacs.  So grab yourself a cup of tea (or coffee) and relax and hopefully enjoy my little tutorial! :)

 
I hope you enjoyed my tutorial.  I hope this has inspired you to try a mixed media canvas, it's messy but a lot of fun!  Here is a look in a nutshell at all the fun Dusty Attic goodies I used for this canvas...
 
Dusty Attic: Chicken Wire Panel, Scroll Border #1, Cogs #1, Jumbo Cogs, Vintage Keys, Wrought Iron Trim Set, Scalloped Circles, Nuts & Bolts, Dusty In Color (Dusty Pink, Pesto, Hot Chocolate), Hinge (not shown in photo), Dusty Roses (Claret, Caramel).

LinkWithin

Related Posts with Thumbnails