Showing posts with label Cards. Show all posts

Wednesday, November 4, 2015

Saying Thanks with Maja Design & Shimmerz Paints


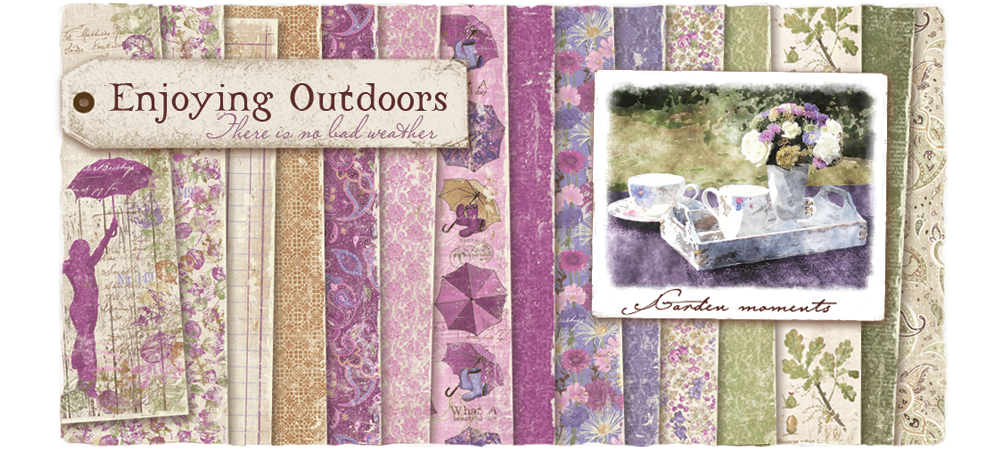
Hi Everyone, I have a fun little card to share with you today using the beautiful new Maja Design collection called Enjoying the Outdoors!  I don't know about you, but I have so much to be thankful for, so for me it's important to always have lots of pretty 'Thank-you' cards on hand.  I made this card for a dear friend who has been so generous with me, I wanted to say thanks to her in a way that shows my deep appreciation for her friendship.

  Enjoying-Outdoors-KL

For this card I mainly used papers from the Maja Design 'Enjoying the Outdoors' collection.   I used 'Late Summer Flowers-bs' for the background of my card.  Then I opened my pack of Enjoying the Outdoors 6x6 paper pack and layered a variety of the patterned papers onto my card, using one of the mini-print floral papers as the inside of my heart design.

  Autumn Card Maja Gabi close1

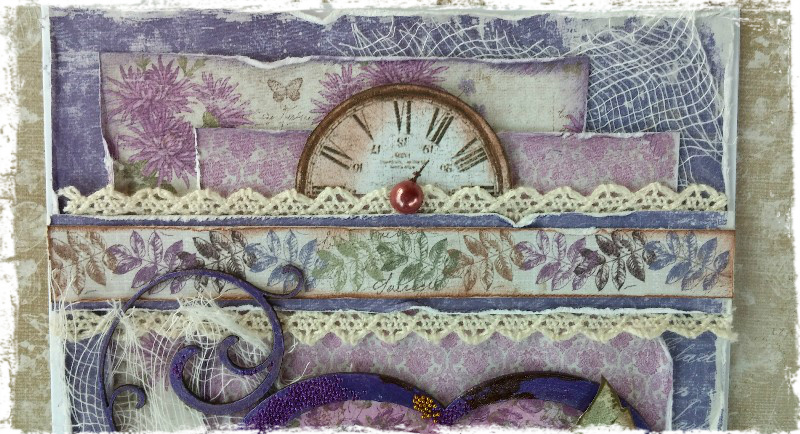
Another Maja Design paper that I find indispensable is the clock paper 'XVI' from the Vintage Autumn Basics collection.  I usually take a moment to cut out all the clocks and keep them in a little plastic baggie so I have them handy for embellishing my projects.  Another little tip:  I never throw out the paper strips from the bottom of my 12x12 paper pads, they come in so handy for decorating my projects as you can see here.

  Autumn Card Maja Gabi close2

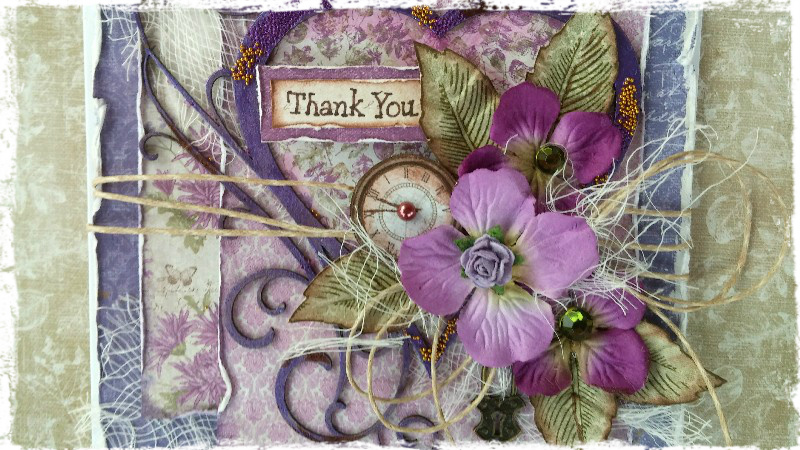
A sweet friend of my sent me a bunch of chipboard frame designs, among them was this heart design. I painted the heart with Shimmerz Paints 'Grape-tastic' Dazzlerz, this is a thick pearlescent paint that goes on beautifully in one coat.  While the paint was still wet I sprinkled on some bronze and purple micro beads (no name dollar store brand). I then finished the card design by adding a few Prima Hydrangea's in a purple color and used a leaf stamp from one of my stamp sets that I designed for The Scrapbook Diaries....these I stamped onto the 'Woodlands' paper, cut out and slightly crinkled them, then just tucked them into the floral cluster. 

I hope you enjoyed my project today and hopefully inspired you to use this gorgeous paper collection for your next cardmaking adventure!  You can find this lovely paper collection at The Scrapbook Diaries (I know so many of you are looking to find this beautiful collection in North America :)

Thanks so much for stopping by my blog today, I always enjoy your kind comments and feedback! xo

Wednesday, September 23, 2015

Making Retro Style Cards with Maja Design's Summer Crush!


Hi All! I'm so happy to share with you all today a couple of cards I made using the adorable summer collection 'Summer Crush' by Maja Design!  I just love the 'Snapshots' paper, so many fun little vignettes to serve as centerpieces to a cute retro style card!


Maja Design paper is just made for layering.  I start by choosing a favorite patterned paper like the polka-dot 'Flirty' paper.  I distress the edges with a Tim Holtz Edge Distressor, then just start layering on more and more patterned papers.  Tuck in a little burlap, some floral embellishments and a little wood-cut trellis (Scrapiniec), and you're done!


For my second card I again used the polka-dot pattern, this time in the blue and used the cute l'il blue guitar picture as my center piece.  Perfect for a fun little card to cheer up a friend!  Again, I just did lots of layering and tucked in a little burlap, embellished with a butterfly and added a little twine. In a short amount of time I had 2 fun cards ready to go!

Maja Design products used in these projects:
Summer Crush 6x6 paper pad,
Summer Crush 12x12 paper (Flirty, He Gives Her flowers, Snapshots, Long Summer Nights, Falling In Love-bs)

Thanks so much for stopping my blog today, hope you all get a chance to play this week and get creative with Maja Design's Summer Crush collection! As always I appreciate all the sweet and kindhearted feedback I get from you all! xo


Monday, April 27, 2015

Sweet Life Cards {Bo Bunny Design Team}


I know, we are all in the mood for Spring! That's why this week I chose Bo Bunny's cheerful and beautiful 'Sweet Life' collection papers and embellishments to make a couple of cards.  Spring is synonymous with weddings, so I thought it would be fun to create a bridal shower invite using 2 sizes of the Bo Bunny paper doilies.


It's super easy to create this cute little invite card using the Bo Bunny Doilies, some Sweet Life paper and some double dot cardstock.  Here is a quick little step by step on how to fold the dress design....


The key to getting a nice frothy look to the skirt is folding slightly off center so that you can see the layers.  Here is a close-up pic of the finished dress....


I simply added a strip of the green (Clover) double dot paper and made a little 'ribbon' for the dress and added a tiny white rose to finish the look.


A dear family friend just passed away and I wanted to make a sympathy card that could bring a little cheer to the family. So I used one of the pretty floral papers from Sweet Life, fussy cut some of floral images from another of the papers and added another folded doily and some coordinating buttons from this collection to add a finishing touch.


I also added a pretty pink blossom from the Blush package of Bo Bunny Blossoms. I attached my fussy cut little flowers with some foam adhesive dots to help them stand out from the page a little.

Thanks so much for stopping by my blog today! I really appreciate all the kind comments and feedback :)


Sunday, January 18, 2015

Some Krafty Cards {Bo Bunny's Star-Crossed Collection}

Love Card by Gabrielle Pollacco using Bo Bunny's Star-Crossed paper and embellishment collection

I've been enjoying seeing all the peeks of the new collections and can't wait to get my happy little hands on them!  But in the mean time I thought I'd have some fun with my stash at hand and make up some love cards! I have to say, Bo Bunny's  Star-Crossed paper and embellishments collection has quickly become on of my favorite papers for cardmaking.  I love that the elements work well for both masculine and feminine recipients.

Love Card by Gabrielle Pollacco using Bo Bunny's Star-Crossed paper and embellishment collection

I really love the neutral colors with the deep red in this collection. So for a base I used Bo Bunny's Vintage Decaf paper. I just love using these vintage cardstock papers as the base of my cards.  First I cut out a heart from the cute red and white dot paper, then did a little fussy cutting from the feather paper in the 6x6 paper pad.  I layered in some of the die-cuts from the coordinating Noteworthy pack, added a little hemp twine and some burlap and Presto! my quick little card is ready!

Bo Bunny Products used in this project:
Patterned Paper: Star-Crossed/Vanity, Star-Crossed
6x6 Paper Pad: Star-Crossed
Cardstock: Vintage Decaf
Noteworthy: Star-Crossed
Layered Chipboard: Star-Crossed
Patterned Washi-tape: Kraft Wood

Heart Card by Gabrielle Pollacco using Bo Bunny's Star-Crossed paper and embellishment collection

For my second card I used Almond Dot paper as my base.  I thought I'd do a kind of loose mixed media style card for this one. Lots of stamping with Bo Bunny's Distressed Textures and It Is Written Stamps. I added some paint spatters and some Bo Bunny Washi tape for some vertical interest to the card design.

Heart Card by Gabrielle Pollacco using Bo Bunny's Star-Crossed paper and embellishment collection

I again cut a heart out of the dot paper and added some sheer sparkle glue to give the heart some shimmer. I added a little hemp twine and some coordinating Layered Chipboard, and my 2nd card was complete.

Bo Bunny Products used in this project:
Patterned Paper: Star-Crossed/Vanity, Star-Crossed
Cardstock: Double-Dot Almond
Layered Chipboard: Star-Crossed
Noteworthy: Star-Crossed
Stamps: It Is Written, Distressed Textures
Patterned Washi-tape: Kraft Wood

Thanks so much for stopping by my blog today!  If you haven't seen the peeks at the new Bo Bunny collections that came out at the Winter CHA, you can view them HERE.  I've gotta say 'Garden Journal' and 'Heritage' collections have got me by my heartstrings!  Which are your favourites?

Monday, December 15, 2014

Unique Card Design & Tag! {Bo Bunny}

Star Fold card by Gabrielle Pollacco using Bo Bunny Madeleine paper collection.

Okay, so if you've been following my blog, you'll know that I've been into unique folded card designs lately.  I thought this was a really fun card design, and actually pretty simple to make! I gathered together some  of my favorite Bo Bunny patterned papers (for this one I used papers from the Madeleine collection)

Folded star card by Gabrielle Pollacco using Bo Bunny's Madeleine collection papers and embellishments

The card opens out and you can put your sentiment in the center.  For mine I just used a rub-on for the sentiment and added a cute lil birdie design from the matching Noteworthy die-cuts from the Madeleine collection.  Below I've posted a template for this unique card (instructions below the template).

Star Card Template by Gabrielle Pollacco For Bo Bunny

Step 1:  Take a solid color piece of 12"x12" cardstock.  Mark the center point (6") at the top (make a pencil line, a few inches down...this is the dotted line you see on my template).

Step 2:  Now put the zero mark of your ruler in the bottom left corner of your paper and pivot the ruler until the 12 " mark meets the dotted line.  Mark this line. Do the same for the right bottom corner. (this is how you get 3 equal sides).

Step 3: Mark the center point of each of the 3 sides (6 inches) These will be the score lines (valley fold).

Step 4: Now put another mark 2" from the center point along the edge of the paper (both ways from each center point).  This will be the other score lines....I flipped the card to make these scores as you want them to fold the opposite way of the other score lines).  Done! Now decorate! 

I made my decorative paper designs an 1/8" smaller around the edges  so that some of the darker cardstock border showed around the edges.

Bo Bunny Products used on this card:
Patterned Paper:  Madeleine (Symmetry, Tiles, Frames)
Double Dot Cardstock: Licorice
Noteworthy: Madeleine 
Double Dot Jewels: Think Pink

Tag by Gabrielle Pollacco using Bo Bunny 'Rose Cafe' collection

A second Tag/Card I made was using the Bo Bunny 'Rose Cafe' collection. I went with the soft sage greens and pinks for this tag.  I like to add neutral elements for this color grouping so I began by cutting a tag shape out of some craft paper corrugated card.

Tag by Gabrielle Pollacco using Bo Bunny 'Rose Cafe' collection

I layered on some scraps of the Rose Cafe 'Garden' paper I had left over from another project. I then cut out a frame design from the 'Frames' paper and added it with some foam dots.  I fussy cut out a few of the pink rose designs from the "Espresso" paper and from a scrap I had left from the name paper from the Rose Cafe collection (swag is from this paper as well).

Tag by Gabrielle Pollacco using Bo Bunny 'Rose Cafe' collection

I added a few blooms and some burlap blooms & butterfly (by Petaloo).  Put in a twine bow....easy peasy, the tag is done!  I like to put a little sentiment on the back of the tag to use on a gift. (Some of you have asked what you do with tags :)

Bo Bunny Product used on this Tag:
Patterned Paper:  Rose Cafe (Garden, Frames, Espresso, Rose Cafe)
Double Dot Jewels: Emerald

Thanks so much for stopping by my blog today, I hope you enjoyed my cards and hope you will give the folded card design a try!  If you have any questions (if my template and instructions are not clear enough) please don't hesitate to ask! :)


Wednesday, November 26, 2014

Flip Card ~ VIDEO TUTORIAL {Bo Bunny 'Star-Crossed'}

Flip card video tutorial by Gabrielle Pollacco using Bo Bunny 'Star-Crossed' collection papers and embellishments

Hi all!  So lately I've been finding myself obsessed with unique folded cards, and this one really caught my attention.  I love a card that can play tricks, and this one is so much fun!  You just have to make a couple of easy cuts into a piece of  5 1/2" x 6 1/4" paper....add a few score marks, and you get this fun card that flips and shows 2 sides as you open it!  Check out my video below to watch me put this one together!  (there is also a template with the measurements I used below) :) ....


Fun, isn't it!!  Here are a few close-ups and views of the card....

Flip card video tutorial by Gabrielle Pollacco using Bo Bunny 'Star-Crossed' collection papers and embellishments

This is the card cover when it is closed. I used the adorable Bo Bunny 'Star-Crossed' collection to make up this card.  All I needed was the 6x6 paper pad and a packet of their Double Dot Jewels for the bloom centers (inside the card).

Flip card video tutorial by Gabrielle Pollacco using Bo Bunny 'Star-Crossed' collection papers and embellishments

This is the inside view of the card when it is opened and the center piece has done it's flip (you have to see the video to see how the flip works...it's so cool! :)

Flip card video tutorial by Gabrielle Pollacco using Bo Bunny 'Star-Crossed' collection papers and embellishments

Here is a close-up of the centerpiece of the card (the front view).  I cut out some chipboard hearts and traced them on a piece of the patterned paper from the 6x6 paper pad.  I added a coat of Diamond Stickles to give the hearts some sheer shimmer.  I also cut out a couple of the feather designs from one of the patterned papers in the Star-Crossed pad to make my corner design.

Flip card video tutorial by Gabrielle Pollacco using Bo Bunny 'Star-Crossed' collection papers and embellishments

This is a close-up of the card center piece when the card is open. Oddly enough, every time I pulled out an element to add to my card, it fit perfectly.  The frame is from the Noteworthy pack that coordinates with the Star-Crossed collection, it's dimensions were perfect for the center panel!

Flip card video tutorial by Gabrielle Pollacco using Bo Bunny 'Star-Crossed' collection papers and embellishments

And here (above) is a template I drew out that has all the dimensions you'll need to make your own flip card!  (in the video I accidentally put a score line down the middle, but I didn't fold it and once I had on my center panels it kept the design true).

Hope you enjoyed my tutorial and hope you'll give this card a try! I made this one for my youngest daughter, she's been making such great progress in school and other areas in her life, I wanted to make a special card just for her....and she loved it! :)

Thanks so much for stopping by my blog today and for all the lovely comments and feedback, they make my day! xo xo

Wednesday, October 29, 2014

Braided Edge Cards {Bo Bunny}


I had so much fun making these cards! Again, I was trolling Pinterest for fun card ideas.  I don't know who did it first, there were a few people that had posted a version of this braided edge card, but the one I got my info from was a girl named Brandy Cox from Stampin' Up.  I know it looks complicated but it's really easy-peasy to do (I can see making a lot more of these in the future!).  It's basically just cutting a bunch of diagonal slits in the fold of your card, opening it up, and then folding down every second section.  She has a little video clip on how she does this, and also provides a printable template to use on a folded 8 1/2  x 5 1/2 piece of cardstock.  You can find her tutorial and template HERE.


Bo Bunny's Double Dot Cardstock is just perfect for the base of these cards.  I particularly like the Vintage Double Dot, the distressing and deep rich colors really appeal to me.  For this card I used the Vintage Decaf Double Dot for my base.  I then fussy cut some designs from Bo Bunny's 'Somewhere In Time' collection, using small pieces of patterned paper from their 6x6 paper pad to create layers.

Bo Bunny Products used to make this card:
Patterned Paper:  Somewhere In Time/Elegance
6x6 Paper Pad:  Somewhere In Time
Cardstock: Vintage Decaf Double Dot
Noteworthy: Somewhere In Time
Copper Glitter Paste (NEW Bo Bunny Mixed Media Product)
Stickable Stencil: Brocade (NEW)
Lace: Clover
Jewels: Double Dot Jewels/Emerald, Citrus


Okay, so ya, I couldn't resist making another card after I made the first!  This time I used Enchanted Garden collection.  I started with Violet Dot paper for the base. Again I fussy cut some of the whimsical images from the Enchanted Garden papers, added a bit of texture with Bo Bunny's NEW Silver Glitter paste and one of their Stickable Stencils (Brocade).


Here is a picture of the card opened out, so you can see the braided edge design. Here are the products I used to make this card:

Patterned Paper: Enchanted Garden/ Fairies, Enchanted Garden
Cardstock: Violet Double Dot
Glimmer Paste: Silver
Stickable Stencil: Brocade

I hope you enjoyed checking out my cards today! I encourage you to give these a try, they are really a lot of fun to make! Thanks for stopping by today, and for the lovely comments, your kind feedback makes my day! xo xo


Wednesday, October 8, 2014

A Cheerful Card {Maja Design}


I'm having one of those weeks.  Lot's of projects to get done for my design teams, and totally short on time.  Luckily I got this card done for Maja Design yesterday, before all the craziness started today!  My husband and I are looking to get our roof re-shingled, so we've been trying to get some quotes.  This morning while I was getting my pic's done for this post, our plumbing pipes burst, the ones leading from the street to the house!.....Major water pouring in and no way to stop it!  So the basement got flooded, and now we have to do major plumbing repairs.....fixing the plumbing from the street will require, tearing up our concrete driveway and putting in all new pipes....sigh, so much for putting in a new roof before the winter.  ...Well, at least I have a happy card to share, the bloom was fun to create using little scraps of Maja Design papers, from the Coffee in the Arbour Collection.  

One of my favourite sheets of paper from this collection is the 'Delicious Moments' paper with it's sweet little 'coffee' time or snack time vignettes.


I really like this paper because it offers great little pic's to use as center pieces to a cheerful card design. I used the coffee/roses and chocolate cake design for my card.
 

I simply cut out the coffee cup design, used an edge destressor on the edges and did a little machine stitiching around the edges of my cut papers.


I wanted to give my card a bit of a home-spun look so I created a flower design that I hope resembles a patterned quilt look.  I cut out a flower petal pattern from a bunch of the scrap papers I had from this paper collection, then moistened with water and gathered the bottom edge.


It's been a crazy week, and a busy one (two blog posts in one day!) and I have lot's more projects to share. I hope next week will prove to be a better week (not holding my breath, I have a feeling this plumbing problem is going to drag out over a week).  Maybe I should send this card to myself huh? :)


Thursday, July 3, 2014

Timeless cards with Bo Bunny


I'm a big fan of making my patterned papers stretch as far as they can, so I usually start by making a layout first (you need larger pieces for 12x12 layouts)....then I take the scraps and create cards out of them.  The tag (above) was made from some paper I had left over from the last layout I made with the Somewhere In Time collection.

 
I used a fabric flower to accent the tag and for the smaller blooms I used a punch on the 'Antiquity' paper, gave it a little crinkle and some chalk inking on the edges.  I tucked a little bit of cheesecloth in to help give more of a tattered look.

 
I love the 'You're Invited' stamp set, I think I've used this set over and over. I used the simpler font style stamps for this card because I felt it matched the look of the card/tag better.

 
Bo Bunny Products:
Patterned Paper: Antiquity, Timeless/Somewhere In Time
Cardstock Stickers: Somewhere In Time
Stamps: You're Invited Large Stamps

 
I was going for a more elegant look for this card. I love the ornate fence stamp, so I thought I'd create a little gardent scene.  I did a little fussy cutting of floral and clock elemtns and punched some blooms from the coordinated paper as well.

 
I chose the fancier font style stamps for this card because I wanted to continue the elegant styling into the title as well. 

 
Bo Bunny Products:
Patterned Paper: Timeless, Antiquity/Somewhere In Time
Cardstock Stickers: Somewhere In Time
Stamps: It is Written Large Stamp, Gateway Large Stamp
Jewels: Somewhere In Time
Blooms: Tresors de Luxe esty shop
 
Thanks so much for stopping by my blog today, your kind and generous comments are so appreciated! xo

LinkWithin

Related Posts with Thumbnails