Showing posts with label OTP. Show all posts

Monday, July 27, 2015

Nautical/Beach themed Wall Art {BoBunny - Boardwalk}


So today is a bitter-sweet post for me....as many of you know, I've been on the BoBunny Design team for over 5 years now and it's been such a joy working with all their beautiful products!  This today is my last post for the BoBunny design team as I've decided to take a little break and step down from the team.  Sometimes it's nice to just take a little breather, so I've been making a few changes this summer. It's nice to have a little more family time over the summer months and maybe a little 'me' time to do a little designing and playing with my art supplies.  .....No worries for those of you who follow my blog, I will still be doing plenty of projects and sharing them here, but it will be at a more relaxed pace, creating on my own time.


I found this shabby-chic looking printer's tray at Michaels by 7 Gypsies (half price!!), I thought the white background would work nicely with the fresh designs and colors in the Bo Bunny Boardwalk collection.  The starfish is again cut from an image in the BoBunny papers, I gave it a little 3D look by lightly misting the design with water and then pushing the hand of my mini scissors into the design (in the palm of my hand).....same with the shell.  The title is a new chippie by Dusty Attic as are the two lil corner scrolls, the chain, screw and seagull chippies. (the title shows up better against the soft aqua paint in my laundry room).


I totally love this lighthouse image, prominent in the designs of the Boardwalk collection.  Here I just cut it out and again gave the paper a little curve to give it a 3D look. I added some pieces of the coordinating chipboard to this collection (I've always loved their layered chipboard designs, like that glittery ships wheel that I linked with the chain link design.  (I gave the chain link chippie a bit of realistic metal look by using some of BoBunny's Chocolate Pearlescents on it).  And finished the design with a little nest in the corner....hey, there's a seagull so I figured a nest would be fitting (even though the eggs are more like Robins eggs, LOL).


Here's a pic of the piece sitting on the shelf in my laundry room.....I take a deep breath and feel peaceful just looking at it....even though I might be toiling away doing laundry :)

Bo Bunny Products used in this project:
Patterned Paper: Boardwalk/Bliss, Boardwalk, Sandcastle, Seaside
6x6 Paper Pad: Boardwalk
Layered Chipboard: Boardwalk
Pearlescents: Chocolate

Dusty Attic Products:
~ Seagulls
~ Mini Corner #2
~ Mini Chains
~ Nuts and Bolts
~ Word Pack #10

I'm sure you will be seeing me use Bo Bunny products in many many more projects in the future as I always adore everything their talented designers create!  This is not good-bye, just 'so long'.  I hope you enjoyed todays post, thanks so much to all of you who take the time to leave your kind comments and feedback, it means so much to me!! (Seriously....thanks everyone for the kind feedback especially on the new designs I came out with for TCW....this is a new venture for me and your positive response makes me so happy! xo xo)


Wednesday, March 25, 2015

Tattered Frame {Maja Design}


Hi there! I thought it would be fun to share with you today a frame I made using the Maja Design Walking in the Forest collection papers.  I have to say this collections is an old favorite of mine, I love the tattered, worn look of the papers.

  Walking-in-the-forest-P

I began by picking up an inexpensive unfinished wood frame at a local craft shop (Michaels).  It cost me only $1.50 (I love me a good bargain!)  I then had the daunting task of choosing which papers I wanted to use to create my frame.  I say daunting because there are so many gorgeous papers in this collection that I had a hard time choosing which I wanted to put together.

Tattered_Frame_Gabrielle_Pollacco_Maja_Design_Closeup2While I was shopping for my frame I came across these pretty tattered looking blooms (Recollections brand). When I saw the colors I immediately thought of the papers and colors in the Walking in the Forest collection.  I just love those faded denim colors and the worn craft colors.  I added a little hemp twine and some bits of burlap to finish the rustic look.  While I was digging around in my papers I came across this bit of brick mortar chipboard (left over from a brick design I had done a little while back)....well, you know me, I try to use everything...so I thought it would be nice to add a little texture to the frame by gluing on this bit of leftover chipboard.

  Tattered_Frame_Gabrielle_Pollacco_Maja_Design_Closeup1

Included in the floral package was this cute triple layer butterfly!  I also did a patchwork design on this frame so that I could use a variety of the patterned papers in this lovely collection.   I used some Bronze metalic dimensional paint to add 'rivets' to the cut edges. I also used a little water on the edge of the paper so that I could gently pull back the edge to reveal the Flannel Shirt paper.

I hope you enjoyed my project today.  I'm often asked where do I get my inspiration.  I often pull my inspiration from the products I work with. In this case I saw the blooms and my mind begins thinking about what papers would look nice with these, and what design  or project could be made with this.

Thanks for stopping by my blog today, and thanks so much for all the lovely feedback....I say it a lot but I mean it, you all make my day! xo xo


Sunday, March 8, 2015

Whimsical Party Favors {Bo Bunny Garden Journal & Flutter Stamps}


Hello everyone! I'm excited to share with you today a fun party favor project I made using the NEW Bo Bunny Garden Journal collection and their NEW Flutter Stamps!  We have a big wedding anniversary party coming up for my parents next weekend (their 57th anniversary!) and I thought it would be fun to prep some whimsical party favors (Chocolate flavoring spoons for stirring into coffee or hot chocolate) using the new Flutter Stamps and the Garden Journal collection.  

Party Favors by Gabrielle Pollacco using BoBunny's Garden Journal collection and new Flutter stamps.

I started out with this empty Panko tin I had saved (I don't throw out these nice smooth sided tins, I find they are great for off the page projects).  I began by painting the rim of the tin with some Gold Pearlescents to give a nice shimmery edge to the tin.  Then I glued a section of the Garden Journal 'Wonder' paper directly to the tin using a combination of white craft glue and water. I then cut out a piece of the Garden Journal 'Notebook' paper to perfectly fit around the tin.  I really wanted the curled out part of the paper to be green (the revers of that paper is blue) so I first glued on a little section of the green floral paper from the Garden Journal 6x6 paper pad....then I curled back the two top corners.  I added 6 metal eyelets and then adhered this paper panel to the tin, tying up the corset design with some crinkle ribbon.  

Party Favors by Gabrielle Pollacco using BoBunny's Garden Journal collection and new Flutter stamps.

I added some lace (and a chipboard zipper) as well as some pearls and topped the design with a butterfly embellishment I made using the new Flutter stamps.

embossed butterflies using Bo Bunny Flutter Stamps

I made my butterfly embellishments by stamping one of the butterfly images onto one of the green floral papers from the Garden Journal 6x6 paper pad, and the pink one's were made by stamping onto the Garden Journal 'Wonder' paper.  I added a shimmery black, gold and amethyst embossing powders.  I added a little jewel from the BoBunny jewel packets for the heads and cut out each embellishment.


Next I prepared my favors by laying out some plastic spoons, melting some semi-sweet chocolate and a couple drops of oil and pouring it into the spoons.  I decorated with some colorful sprinkles....


I then wrapped each spoon with some plastic wrap and decorated with one of the embossed butterfly embellishments

Party Favors by Gabrielle Pollacco using BoBunny's Garden Journal collection and new Flutter stamps.

I set them all in my embellished tin and my little project is finished!

Bo Bunny Products used in this project:
Patterned Paper: Garden Journal/Wonder, Notebook
6x6 Paper Pad: Garden Journal
Pearlescents: Gold
Stamps: Flutter Stamps
Jewels: Think Pink, Emerald, Mocha

I hope you enjoyed my 'off the page' project today and hope I've inspired you to play with Bo Bunny's new Flutter stamps Garden Journal collection!

Thanks to all who come by my blog and leave your kind 'rays of sunshine' behind, I appreciate all the lovely feedback on my projects! xo

Wednesday, February 25, 2015

Creating a Fresh Pretty Gift {With Maja Design}


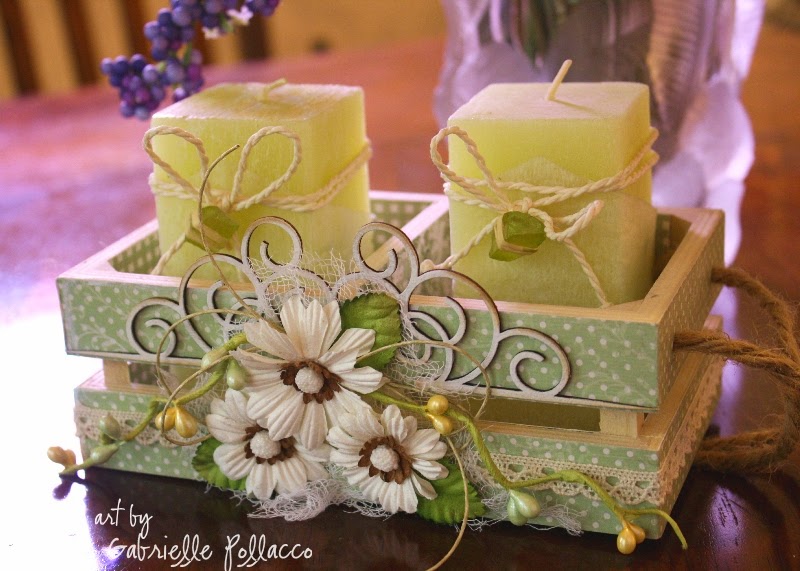
Hello friends! I thought I would share with you all a fun little 'Thinking of You' gift idea.  I found this cute little unfinished wooden crate at my local Dollar store and thought I would use some of the fresh pretty patterns in the Maja Design papers to dress it up to create a candle holder gift set.
  Lantliv-P (1)

Antligen

I used the 'Naturen doftar' paper from the 'Antligen' paper collection to cover the outside strips of the wooden crate.  I used a mixture of equal parts white glue and water to adhere my paper strips to the wooden crate.  I just love the sweet white dotted green paper for this, I think it gives the project an nice Spring feel to it.

  Crate_Gabrielle_Pollacco_Maja_Design_view2

For the inside of the box I used the pretty gingham design in the 'Kitchen Garden' paper from the 'Life in the Country' collection.  And for the middle/side walls I used the lovely script/floral paper that is on the reverse side of the Kitchen Garden paper.

  Crate_Gabrielle_Pollacco_Maja_Design_closeup

For the front of the box I wanted to keep the clean lines of the box design so I didn't over embellish the box, I just added a few paintable Prima Blooms, a twine bow and a Dusty Attic swirl chippie (Elegant Swirls#13), which I painted white and edged with some brown chalk ink (Ingvild Bolme's Branch Bark).

I hope I've inspired you to pull out some of your favorite Maja Design papers and Dusty Attic chipboard to create a little gift to cheer a friend of yours!  You can find a wide variety of Maja Design Papers and Dusty Attic Chipboard at The Scrapbook Diaries.

Thanks so much for stopping by my blog today, I always appreciate and read all your lovely comments! xo

Thursday, February 12, 2015

Favor Boxes with Template {Bo Bunny Double Dot}

Favor boxes by Bo Bunny design team member Gabrielle Pollacco, template below)

If you are like me, you love a quick and easy project.  This favor box is so easy to make from an 8 1/2" x 11" paper....not cutting, just a few easy folds.  I have lots of that pretty Double Dot paper from Bo Bunny, (I have a love of dots!!) so I grabbed a piece of Mint Double dot 8 1/2" x 11" piece and scored it as follows.....

Favor Box Template 01

Score at the 3/4", 4 1/2" mark, 6 1/2" mark and 10 1/4" mark.  If you are like me and only have the Score Buddy (meant for cards)....I just measured in 3/4" and 4 1/2" from each side edge. Now turn on the  8.5" side and score as follows

Favor Box template 02

Score at 2 inches in from each side.  Then you will want to mark 4 angles....measure 2" ALONG the edge from the two center marks.  Now draw a line from your mark to the inner corner as shown....score this line.

Favor box template 03

I personally found it a little hard to score the angle line so what I did was brought the point of the middle fold up to meet the edge of my side fold and then used my finger to make the angle fold.

Favor box template 04

I opted for the dotted design to be on the outside of my box, so I added 4 strips of 2 sided sticky tape to the four corners of the plain side as shown above.

Favor box template 05

Once you've applied your sticky tape, bring the two sides in, it will look like the picture above. Now bring the two side flaps up and you have formed your box....


It will look like the pic above!  Now the fun part....decorate!

Close up of Favor Box by Gabrielle Pollacco for Bo Bunny

For one of my boxes I used an edge punch and cut a scallop edge across the top.  I added a band of green cardstock (BoBunny Clover Dot) to hold the top together, and added some hemp twine, burlap, strip of lace and a die cut Shasta Daisy (Cheery Lynn Designs) and some leave cut from the Clover paper.

Close up of favor box by Gabrielle Pollacco for Bo Bunny

For my second box I used some left over paper I had from the Primrose collection (that collection had such pretty dot papers and butterflies!!).  I fussy cut a few butterflies from the patterned paper and cut a Fanciful Flourish from Bo Bunny's Clover Dot paper.

Hope you enjoyed today's project and that you give this easy-peasy favor bag a try the next time you want to give a good friend a little gift!  Thanks for stopping by my blog today! xo 


Saturday, January 10, 2015

Metal and Glass OTP Project {Bo Bunny Pearlescents and Jewels}


Hi all! Here is my first project for 2015!  This one was so fun and easy! ....Years ago I was shopping in a cute little art boutique and saw some lovely metal/glass art.  I wanted to create a similar look (for a LOT less money, LOL) so I used some 3D bronze paint on some inexpensive dollar store shot glasses....this was the result....


I wasn't sure how well these would hold up, but after more than 15 years, they have held up very well!  I use mild dish soap and warm water to wash them up (don't put in dishwasher).   So, when I was playing with some of the NEW Bo Bunny Pearlescents they other day, it occurred to me that the Bronze Pearlescents would work nicely for a OTP project using another glass design.


Basically you only need 3 things for this project....The Bronze tube of Bo Bunny Pearlescents, your favorite color of the Bo Bunny Jewel packets and an inexpensive glass vase to decorate.


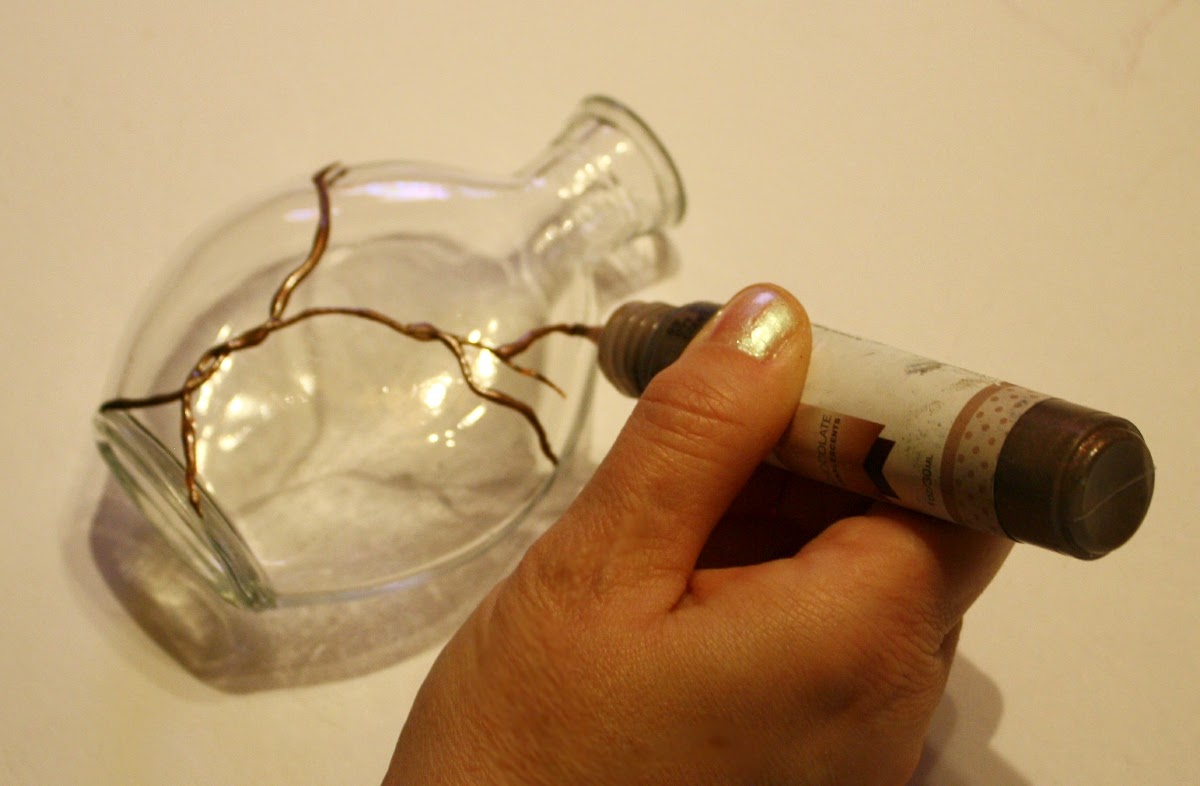
My first step was to apply some long squiggly lines to create the basic shape of my Infinity Tree.  I did a few branches and then let the paint set for 10 minutes or so.  Then I would begin layering on more branches and thickened out the trunk as well.  If you are overlapping some areas, like the trunk, try to wait a few minutes between applications so that the paint doesn't meld into the bottom layer.  This way you get nice distinct lines and good definition.


When I was almost done adding branches, I started applying some of my jewels....here I used the Bo Bunny 'Aqua' Jewels packet.  I love the way aqua looks with bronze!


Here's a close-up of the tree design.  I finished the design by carrying the branches all the way around the back, linking to each other, creating an infinity design.


Finally, I added some extra gems to decorate the neck of the bottle as well as the cork stopper, easily done with the jewel strips in the BB Jewel packet. Easy-peasy!  

I hope you enjoyed todays OTP (off the page) project and will give this technique a try in your own projects!  Thanks so much for stopping by my blog today! Your kind comments and feedback are much appreciated! xo


Wednesday, October 8, 2014

Killing Two Birds with One Stone {Bo Bunny ~ Wild Card Collection}


So two of my pet peeves, boxes lying around from appliance and entertainment purchases, and messy junk drawers!  Every time we buy a cell phone, DVD, microwave or any other electronics, my DH won't let me throw the packaging away.  He says you have to keep the box in case there is something wrong with the item down the road.  So now I have all these old cell phone boxes piling up along with other boxes.  The other thing I don't love is my junk drawer.  My hubby and kids love to play cards, but then they all get thrown into a junk drawer all willy nilly.  I finally decided I would make a nice decorative box to keep the decks of cards in and went on a hunt for a good box to alter.  


Ha!  my DH's penchant for saving boxes paid off!  I found this cell phone box and it was a perfect fit for decks of cards! (shhhh, don't tell him I used one, he'll never miss it! :)


It was actually pretty easy to put it together!  I used a 6x6 paper pad from Bo Bunny called 'Wild Card', I thought the wood grain design on one of the papers would give a nice elegant look to the box design. I cut out strips to fit along all the sides and top....all in all it took less than 2 6x6 papers.  I think the thing that might have taken the longest was adding the machine stitching to the edges of the cut papers (not a necessity but I thought it would add a nice touch)..


The next step was as easy as plucking off a few chipboard elements from the Wild Card collection and adding them to the box cover.....that's it!  All done! And now I have a pretty (or handsome ) place to keep the playing cards....and now I have 1 box down....and a hundred to go! :)

Saturday, September 20, 2014

Video Tutorial: Creating a Keepsake Box {Bo Bunny - Madeleine}


Hi Everyone!  It's my pleasure today to share my latest project using some beautiful new products from Bo Bunny!  I just LOVE the new stickable stencils, it's so cool the way they keep the stencil in place as you are working and allows you to move and re-adjust, all the while keeping that tacky backing so that your designs always come out perfect!


I thought you might enjoy watching a step by step tutorial in which I show, start to finish how I created this little keepsake book/box using the gorgeous new Madeleine collection with some of the new Bo Bunny mixed media products (Pearlescents and Shimmer Sprays) and stencils.  Just click the arrow above and enjoy!


I thought I would share a few close-up shots of the project that you can enjoy at your leisure.  The photo above lets you see how I used the stencils and texture paste on the cover and spine of the book.  I used the Gold Shimmer Spray to help the texture design stand out.


I like my projects to look pretty inside and out, so I lined my box with some of the beautiful papers from the Madeleine collection (and added a butterfly cut out from Primrose collection).


Another new product that I absolutely LOVE is the Wood Shapes! For my box cover I used a few of the elegant designs from the new Iron Works Wood Shapes packet.  I finished the look with some of the lovely pearls from the jewel packets.


Bo Bunny products used on this project:
Patterned Paper: Madeleine/Grace, Happiness, Madeleine, Symmetry, 
6x6 Paper Pad:  Primrose
Pearlescents: Blush, Island Mist, Brilliant Blue
Glimmer Spray: Gold
Stamps: Distressed Textures, It is Written
Stencil: Bliss Stickable Stencil
Iron Works Wood Shapes
Jewels: Frosting Flourish Jewels, Primrose Jewel packet
Flowers:  Madeleine Petals, Blush Zinnias 
Lace: Blush

Thanks so much for stopping by my blog today, your kind words and feedback always make my day!  I hope you enjoyed my project today and hope that you give these beautiful new Bo Bunny products a try!

LinkWithin

Related Posts with Thumbnails