Showing posts with label The Crafters Workshop. Show all posts

Saturday, March 4, 2017

Mosaic Video Tutorial! {TCW & Shimmerz Paints}


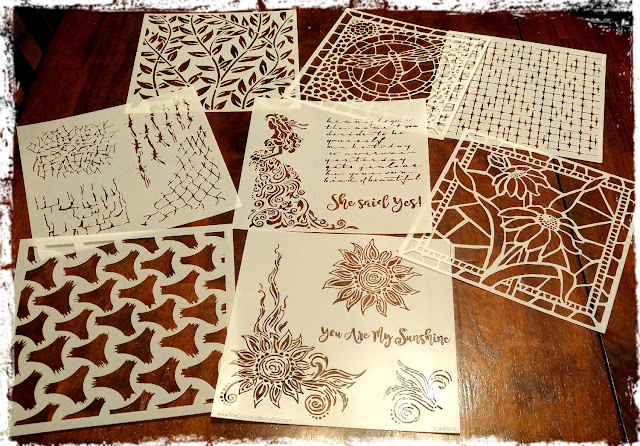
So guess what?! The stencils are finally hitting the stores!  Just got word from Janene over at The Scrapbook Diaries that the NEW stencils I designed for TCW (The Crafter's Workshop) are finally in the house!  (I was a little premature showing my last tutorial for the Bride book....got a lot of emails asking where to get,...and they weren't in yet! lol!)  This time I have somewhere to send you! :)


For this project I used the stencil I designed for The Crafters Workshop called 'Stained Glass Daisies' TCW657.  The photo you see above is an extra canvas I made using acrylic paints.  But in the following video tutorial I used a variety of Shimmerz Paints Products to create my Mosaic canvas.  Time to grab yourself a cup of coffee (or tea), kick back, relax and enjoy!


Hope you enjoyed my little tutorial....and easy, right?  Almost like painting in a coloring book!  And you get a mosaic effect without having to cut and match pieces, it's all done for you, just a few swipes with some texture paste and your can get your creative on with coloring!


This is a still shot of the stencil I created in the video tutorial using the Shimmerz paints, here I used a wash in the 'grout' lines, giving more of a vintage look.  For the canvas at the top of this blog I simply used TCW's Black Gesso for the background and TCW's Ultra Thick Molding Paste for the stencil and then painted with some favorite acrylic paint colors.


But Getting back to the canvas in the video....I used a variety of Shimmerz Paints products for this one and finished the design by adding some Dusty Attic Grasses at the bottom of the canvas.

Shimmerz Paint Products used in this Tutorial:

Creameez: Get Glowing, Peachie Keen, Sage It Isn't So, Boogie Boardin' Blue, Purple Rain, Black Cherry Cola, Strawberry Fields
Inklingz: Greener Pastures
Coloringz: Chocolate Brownie

You can pick up your Shimmerz Paints HERE.  NOTE: Be sure to mention my name 'Gabrielle' in your next order to receive a FREE/Bonus Shimmerz Paints product in the color of your choice! 

Just imagine all the places you can use this mosaic stencil design....on the cover of an art journal, ...on a tissue box cover,...on a keepsake box....I can't wait to see what you all come up with using this fun new stencil!  Be sure to tag me in if you post something using the stencil, I just love to see what you all create using them!  As I mentioned you can now find them at The Scrapbook Diaries (USA & Canada, she also ships International)....I also heard that The Mad Scrapper in the UK has them in as well!  (Just click on the links to take you there).  If you don't like to shop online you can always check your local scrap store or art shop (many now carry TCW products!)

Thanks so much for stopping by my blog today!  I always appreciate and read all the lovely comments and feedback! They make my day! xo


Tuesday, January 17, 2017

Sneak Peek Tuesday! {TCW Stencils}


It's Tuesday! And time for another sneak peek at a project I've been working on using another stencil I designed for The Crafter's Workshop Stencils!  This one is a canvas with a polymer clay centerpiece.  I will have a video tutorial up for this one soon (both on how I made the centerpiece and the whole canvas design).

The stencil I used for this background design is called "Jungle Vines" TCW658 and can be ordered soon from The Crafter's Workshop or at the CHA coming up soon!  I will be showing this canvas in it's entirety soon....ha, been saying soon a lot haven't I! :)  But I promise I've got lotsa fun video tutorials to share with you all :)

Thanks so much for stopping by my blog today, as always I really appreciate all the lovely and kind comments, they make my day! xo


Tuesday, January 10, 2017

It's Time for Another Peek! {TCW Stencils}

Hi All! It's Tuesday, and time for another peek at a project I made using a stencil I designed for The Crafter's Workshop!  I made a scrapbook page (photo of my daughter and her fiance) and used my the stencil I designed for TCW called 'Tile Mania TCW662 to create the background design.


I will be showing the rest of the layout along with a video tutorial in a future post (soon as the stencils are released - January 15th).  If you make it out to the Winter CHA be sure to stop by the TCW (The Crafter's Workshop) booth to see some of the TCW projects for yourselves.

Thanks so much for stopping by my blog today, your kind comments are much appreciated! xo


Monday, December 21, 2015

Creating a Mixed Media Texture Background {The Crafter's Workshop}


Hi all! I'm happy to share with you today a layout I made of one of my nephew's (and his wife's) engagement photos. I wanted to go with a simple background to which I added some inking, texture and stamping.

  Project01

I used two stencils that I designed for The Crafter's Workshop to help create the background design, using texture paste and inks as well as some fun mixed media products.

close2
I began by doing some light inking on the background of the area around my photo with a soft rose/brown ink.  I then used the houndstooth design found in one of the hearts on the Complicated Hearts stencil and inked with a rich brown chalk ink (Ingvild Bolme's Branch Bark Chalk Ink). After that I added a whole bunch of random stamping around my photo area.

close1


Next I added the heart design to the left side of the photo area using the 3 heart designs found on the Complicated Hearts stencil using some home-made white texture paste (recipe below).  This is an easy to make text texture paste that works very well with all my TCW stencils....and I love that dries quickly!   After I added my texture paste design, I outlined the hearts with a black pen so that they would stand out more from the page.

  1aff1b099e052bcbcfbd98520a6a678f

Homemade Smooth Texture Paste

1/4 cup Talcum Powder (I used Johnson's Baby Powder, Make it smell good too!!)
1 tablespoon White All purpose School Glue
1 tablespoon White Craft Paint
Some Water

Instructions:  Combine talcum powder, glue, white paint with disposable chopsticks (or plastic spoon) in an airtight container, adding water to get it to the consistency you are looking for.  You want a nice thick texture much like toothpaste.  The mixture will keep perfectly for many months.

close3

For my title I mixed some bronze Pearlex mica powder into some Matte Gel Medium (Golden's) and used it on the 'Love' title from the Complicated Hearts stencil.

close4

I used the same mixture on the inky butterfly design in the top left corner of the page.  The butterfly design is from the Winged Exploration stencil.  While the gel medium was still wet, I sprinkled on some tiny bronze micro beads (Prima).

After that, I simply added my photo and a few floral and chipboard embellishments (Prima flowers and Scrapeniec wood chippies)....and my layout was done!

I hope you enjoyed my project today and hope that you are inspired to play with your favorite TCW stencils while you have a little crafting 'me' time over the holidays! xoMe 2014 bannerGeneric

Wednesday, August 19, 2015

VIDEO TUTORIAL: Mixed Media Art Journal Cover Using My NEW TCW Stencils and Dusty Attic Chipboard!

Mixed Media journal cover by Gabrielle Pollacco using Dusty Attic Chipboard and The Crafter's Workshop Stencils, Organic Matter

So I've made August my "spend time with family month", just wanting to take advantage of the time the kids have off school and make the most of it!  But I have taken a few moments out of our fun time to do a little video tutorial of an art journal cover that I made up as a sample using stencils I recently designed for The Crafter's Workshop!


I created both a positive and negative stencil design for this stencil that I named "Organic Matter". For this project I used the smaller 6x6 inch stencil (for the back) and the 12x12 inch mask style stencil for the front of the book cover. (You can find all my stencils online at The Scrapbook Diaries, I just heard that Janene has all the stencils in house now! and has already begun sending out all the pre-orders!! ....you can also use the TCW store finder for a TCW dealer near you).


Dusty Attic Products used on this project:
~ Dusty Attic Journal
~ Skeleton Clock Frames
~ Geometric Corners
~ Nuts and Bolts
~ Rulers
~ Cogs #2
~ Jumbo Cogs
~ Dusty In Color Paint: Hot Chocolate, Raisin, Sunburnt Orange
~ Dusty Attic Rusting Powder

When I was designing my stencils I have to say that I already had all these wonderful Dusty Attic chipboard designs in mind to use with my stencils.  I just love the industrial look of these chipboard pieces and thought they would work well with my Organic Matter stencils.

As I was creating this cover design I decided to flip on my camera and shoot a video tutorial to show how I used the stencils and also to show how I added the rusty finish to my Dusty Attic chipboard pieces.  So if you have time, give yourself and little break, sit back and enjoy!....


I used a whole lotta mixed media products to make this project, to find the list just click on the youtube link (bottom right corner of the screen above....when it's playing).....you can find the full list in the Youtube description area underneath my youtube video (click the down arrow beside the title to open up the description area).


I always like to keep the back of my art journal book covers free of a lot of 3D elements as the back seems to take a lot of wear and tear.  So I stuck to just adding some texture with my 6x6 'Organic Matter' stencil.  I added some stamping and used the same mixed media colors and sprays I used on the front of the journal cover.


Here is a view of the front and back of the journal cover.  I like that you can open up the spin of the journal cover so that you can remove the front and back to work on them.  Then you can reattach when the painting is done. NOTE: this is more of a notebook journal.....if you are looking to have an art journal where you can paint on the papers you will want to order a art journal that has watercolor or manila papers inside them.


I used Dusty Attic's Rusting Powder on all of my chipboard pieces for this project. I so much love the effect of the rusting powder.  All I did was paint the pieces with some of my Dusty Attic paints and while wet, sprinkled on the rusting powder.  I then sprayed the pieces with a solution of 75% white vinegar and 25% water.  I gave it about 20 mins to a half hour to dry/rust.  I then lightly brushed with some Sunburnt Orange DA paint to add to the corroded look. (see video above for more details)


I used Golden Molding Paste (but really any texture paste will do the trick) with my TCW Organic Matter Mask Stencil (12x12 size) to create the veined look on my background design.  After applying all my background spritzes and inks, I hit the relief areas of the stencil with some Luminarte H20's in Egyptian Gold,  and Pearlex Mica Powders in Aztec Gold and Turquoise (see video for application).


This journal cover was so much fun to create!  I hope I've inspired you all to get out your DA chipboard (you can find a large selection of DA chipboard at The Scrapbook Diaries), TCW stencils and mixed media products and get creating your very own mixed media project!  Thanks for stopping by my blog today, I always appreciate all the kind comments and feedback and love to hear what you all think of the new products I've designed!


LinkWithin

Related Posts with Thumbnails