Showing posts with label polymer clay. Show all posts

Saturday, July 12, 2014

VIDEO TUTORIAL: How To Make a Polymer Clay Mermaid Tail


Okay my friends, you asked and I answered!  After posting my Video Tutorial on making the 'Imagine' canvas design that I made for Shimmerz Paint, I got tons of emails, messages on YouTube and Facebook asking if I would create a tutorial to show how I made the Polymer clay mermaid tail that was the centerpiece for my canvas. Above is a photo of the bare clay piece that I will show you how to make.  So sit back and enjoy! xo


Hope you enjoyed the video and that you are now able to create your own sea-scape design :)  ....If you missed the video Tutorial on painting the mermaids tail and putting together the canvas design, you can find that Video Tutorial HERE.

Here is a photo of the finished/painted mermaids tail...


I used the gorgeous NEW Shimmerz Paints 'Inklingz' to get the two toned shimmery effect....You can find Shimmerz Paints HERE.  NOTE:  You can get a free/Bonus Shimmers product (a full sized bottle of Shimmerz or Dimensionz or a sample sized jar of Dazzlerz or Texturez) if you put my name "Gabrielle" in the INSTRUCTIONS TO MERCHANT part of your order :)

Have a wonderful and creative weekend! xo


Monday, March 11, 2013

Mixed Media Dusty Attic Journal Cover!

Hi Everyone!  I thought I would share a project I made this month using the beautiful Dusty Attic Journal and some mixed media techniques.  I started out by using the Dusty Attic Soot paint on the whole outside binding of the journal book.  I love the flat black finish it gives!  I then brushed some gold paint on the edges of front cover. 
Next step was to paint the Dusty Attic Corner Scroll #2 and the Mini Cogs with some gold paint brushed with silver paint.  Then I made up my polymer clay piece.  I shared a mini verson of making a polymer clay design, if you missed it you can view the tutorial below....


I baked off my polymer clay design (adding the chipboard pieces after the piece was baked).  I added some cheesecloth spray painted black and brushed with gold paint onto the front cover, and then glued on my finished polymer clay design on top of it all.  Next step is to glue on the corner chipboard pieces and add dots of bronze 3D paint (Scribbles) to the edges of the book and on the corner scrolls.
Here below you can see a close-up view of the polymer clay piece....
I finished the whole design by adding a variety of ribbons onto the spine of the journal/book.  Below I've shown the products I used from Dusty Attic to make up this project.
Hope you give some of these techniques a try!!  Here is my full list of supplies for this project:
Supplies:
Dusty Attic Journal
Chipboard: Dusty Attic Corner Scrolls #2, Mini Cogs (16 piece)
Dusty Attic Color: Acrylic Paints (Soot, Fine Silver, Vintage Gold)
Polymer Clay: Sculpey or Fimo (Black, Gold, Green)
Mica Powders:  Pearlex (multipac)
Stamps: Prima frames, K&Company
Glass beads, seed beads
Other: Cheesecloth, Ribbon, 3D paint Scribbles

Thursday, March 7, 2013

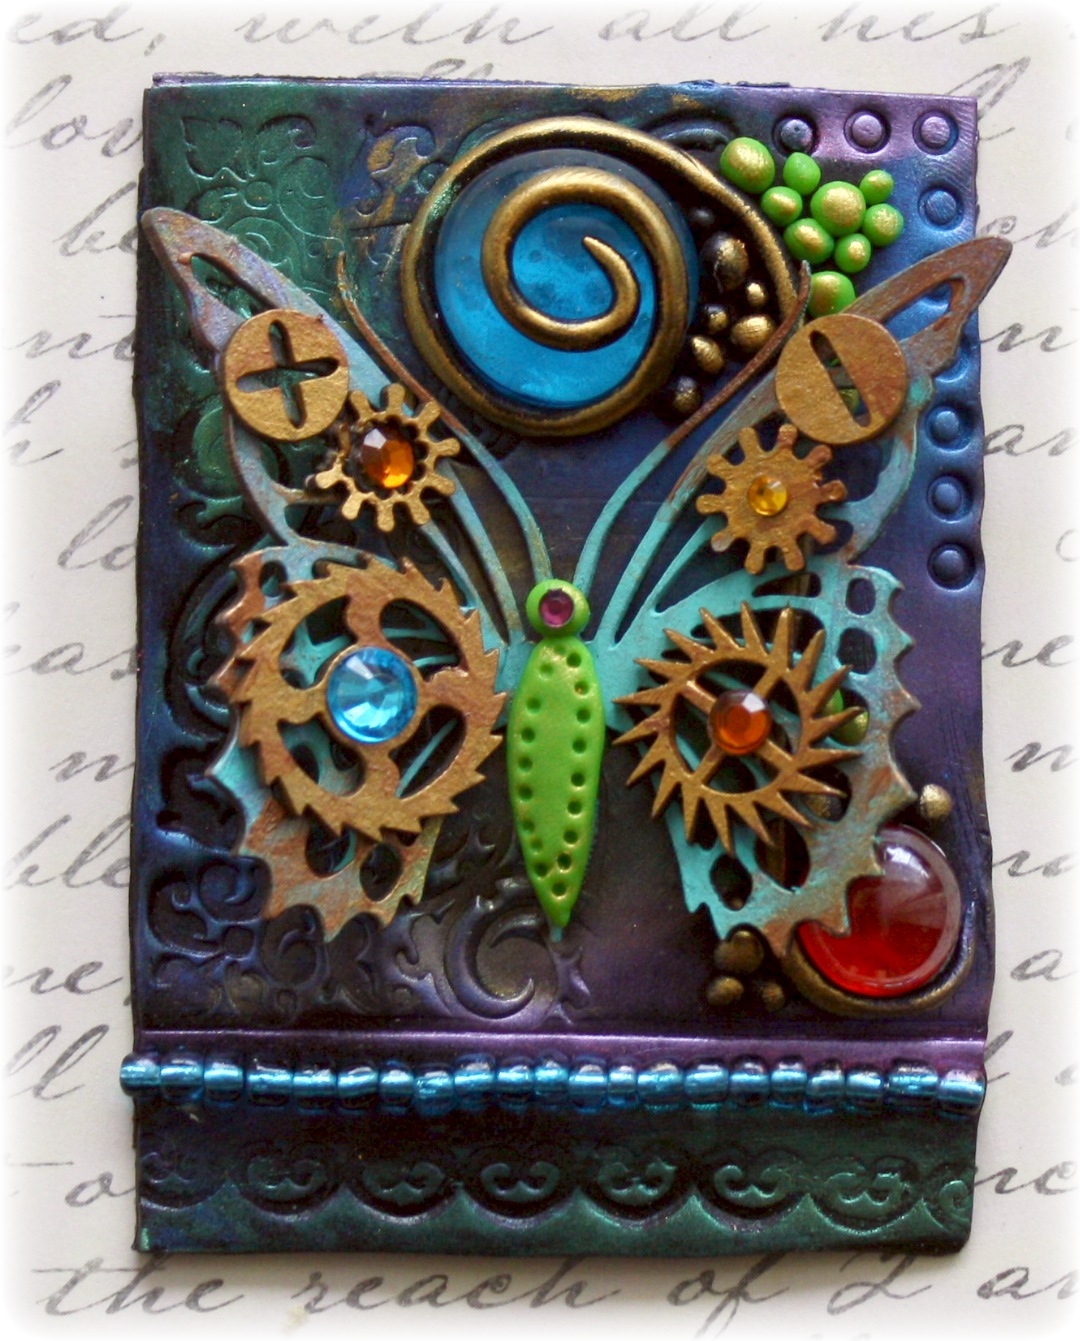
VIDEO TUTORIAL: Polymer Clay and Chipboard ATC!!

Every month Dusty Attic has a fun little ATC challenge (with a Dusty Attic Prize!) and each month they have a different theme for the challenge.  This month (March) the challenge is 'Industrial'.  I gave the theme a lot of thought and decided I wanted to take a more 'natural' element like a Dusty Attic  Monarch butterfly and making it 'industrial' by adding Dusty Attic chipboard cogs and Nuts and Bolts to dress it up. 
And in keeping with the metalic look of the butterfly, I decided to make my ATC (Artist Trading Card - 2.5"x 3.5" card) using polymer clay instead of using paper this time around.  I thought you all might enjoy watching a Video Tutorial I made up in using Polymer Clay, Mica Powders (Pearlex), and chipboard to make a mixed media ATC.  (I promise, this one is a lot shorter than the last video tutorial I made, but I think you might want to enjoy a cuppa coffee while you watch! :) 

Hope you enjoyed my video!  And I hope you give some of these techniques a try!  I have another mixed media, polymer clay/chipboard project to share with you all on the 11th, so please stop by to have a peek! ~Gabrielle xo 
 
Supplies:
Polymer clay: Sculpey or Fimo (black, green)
Chipboard: Dusty Attic: Monarch Butterflies, Mini Cogs, Nuts and Bolts
Mica Powder: Pearlex (multi-pac)
Stamps: Prima frame stamps, K& Company
Other: Glass beads, seed beads, wire, gold paint acrylic

Friday, May 4, 2012

Scrap That! Kit Club & The Color Room Special Edition Palette!!

Here is my 3rd layout that I made for the Scrap That May Anniversary kit.  As I mentioned in my post a couple of days ago, this kit had a really fun crafting item in it....some polymer clay.  Since I've already shared a clay tile tutorial here at my blog, as well as an embellishment tutorial (see right side of blog) I thought I would do something a little bit different.  I decided to use the piece of clay to make a bloom embellishment. (see below).  The kit also came with a Special Edition Palette and Sketch from our favourite color site 'The Color Room!!"  Here below is the palette as well as the sketch....and of course my l/o above was my take on this Palette & Sketch. 
Here are a few close-ups of my page.   I found the perfect quote for my page on Pinterest!  Have I said how much I love that site....I'm sooo addicted! (you can check out my pins by clicking the Pinterest badge on the right side of this blog)  The journaling on my page reads...
"If I could give you
one thing in life,
I would give you
the ability
to see yourself
through my eyes,
only then would you
realize how
special you are
to me." 

And here is a little picture tutorial on the Gardenia bloom I made for this page from Polymer Clay... 
Step 1: Soften clay by kneading it in the palm of your hand for a few seconds. Make 3 small stamen's for the center of your blooms.
Step: 2: Put the 3 stamen pieces together and set aside.

Step 3: Divide the rest of your ball of clay into 6 pieces

Step 4: Take one of your clay balls and create a triangular petal. The shape does not have to be perfect, a rough, uneven edge is just fine (even preferred!). (Make 6 of these)
Step 5: Pinch the bottom of the triangle to create a little pleat and lightly ruffle the top edge of the petal.

Step 6: Attach 3 of the six petals evenly around the stamen you made. Then attach the other 3 behind the other three offsetting them from the other petals.
Step 7: You will be left with a clump of extra clay behind the bloom you made. Clip this off with a pair of scissors. (Note: you can use the left over bit of clay to make 3 leaves for behind your bloom, or you can use the leaves included in the kit for behind your flower)
 
Now You will bake your clay piece in a 270 degree Fahrenheit oven for 15 minutes. (I like to use a disposable foil tray to bake my Polymer clay since clay is toxic and should not be used on appliances you normally cook/bake with. 
Step 8: When you pull your clay piece from the oven it may still feel slightly flexible but it will harden as it cools. Now you can paint your piece to your liking....or you can do as I did here and use some Perfect Pearls or Pearlex (mica powder) to tint up your piece. Just take a paint brush and start from the center of your bloom, dust the pearl powder outwards so that it fades out. I used a pink color for the petals and a yellow/inca gold for the stamens. I used regular green acrylic craft paint for the leaves. (Give your piece a light spray of sealant to protect the finish.....or you can do as I did and use a light spritz of hair spray to protect the piece).
 
Now you can use your finished piece on your layout or home decor project. Here is a close-up of the piece on my layout. 
Hope you give this a try! Note: You can use any type of Polymer clay for this project, Sculpey, Fimo or even your craft store name brand, I've tried them all and they work equally well.  For more idea's from the Scrap That design team and a place to share your own creations be sure to check out Scrap That's Polymer Clay Challenge this month! HERE  ...Thanks for stopping by!!

Thursday, March 22, 2012

Polymer Clay & Trinket Embellishment Tutorial (Bo Bunny DT)

A couple of years ago when I was running my Etsy shop I used to make these polymer clay embellishments for scrap pages.  I thought I'd take today to show you all how to make these unique little embellishments, they work beautifully with the Bo Bunny Metal Trinkets! 

The assignment today was to create a Signs of Spring layout with the new Alora collection.  I used a photo I took a couple of years ago in the spring of Meagan on the monkey bars at the park....to me, a sign that Spring is in the air is when the kiddies can go without coats, hat, mitts...  Although I have to say we are having crazy warm weather here for Spring, it's almost unheard of to have the kids going to school in shorts in March!  Today is another balmy 85 degrees! crazy for this time of year here in Ontario! 
Okay so for the tutorial.....You will need....
~Polymer Clay, Sculpy, Fimo or Store Brand (I used black)
~Pearlex or Perfect Pearls (Mica Powder...I bought the Pearlex Series2 12 pack ages ago and still have loads of it left....The colors I used were Turquois, Aztec Gold and Spring Green)
~Bo Bunny Metal Trinkets and Jewels
~Blade knife for trimming 
Step #1:  Soften and roll out a 1" piece of black polymer clay (I used black because I feel like the colors of Pearlex show up nicely against it).  Cut a heart shape out with a blade knife.  Now take a small piece of the black clay and roll out into a thin strip, and roll out a number of small ball shapes.  Apply to the piece with gentle pressure (when it bakes it adheres well to the base piece) 
Step #2:  Using a paint brush apply the Turquoise Pearlex (Mica Powder) to the base of the piece (I used two colours....see below).  Be sure to get the Pearlex right to the edges. 
Step #3:  You can add an additional color in and just softly blend them . 
Step #4:  Using your finger, dab it in the Pearlex and just run it along the raised design you created, this is my favourite part, the contrast of the metalic colors is just magical! ....You can add your metal accents now if you wish but don't add your jewels to it unless they are glass because they will melt in the oven when you bake off the piece.   Bake in a 275 F oven for 15 minutes (use a disposable foil tray for this, you don't want to use something that you will later cook with)
Step #5: Once my piece has cooled I spray it with a protective clear coat (I couldn't find old clear coat spray so I used some hairspray and it worked well!)  Now you can add any pearl or gem accents and glue on your metal accents if you didn't bake them with the piece.  I recomment that you spray the back of the piece with a protective coat in order to protect the scrap paper incase any residual oils come off of the polymer clay.

Experiment with different shapes, try using stamps and small and large glass beads.  Here are just a few of the designs I created using just some clay, Pearlex, stamps and glass beads. TIP:  (the trick to making a straight line with the glass beads is to string them on a piece of wire, push them into the clay and then pull out the wire strand leaving the beads behind in the clay)


I hope I've inspired you to give it a go!  Have a fun scrappy week! xx 

LinkWithin

Related Posts with Thumbnails