Showing posts with label Card. Show all posts

Wednesday, February 24, 2016

Window Easel Framed Card {Maja Design - Vintage Baby}


Hi all!  I'm excited to share with you today this uniquely shaped baby card I recently made.  I tend to be a bit frugal with scrap supplies, I save everything!  Those plastic/transparent pieces that many of your embellishments come on (blooms etc.), I don't throw them out, just in case I can use them later.  I recently found a fun use for them....making easel cards with a peek-a-boo window.  The Maja Design 'Vintage Baby Collection' had all the perfect elements to create the card I envisioned.

  Vintage-Baby-P

I used a variety of papers from the Vintage Baby collection (Die Cuts, Die Cuts-bs, Ephemera, Expecting, Our Little Miracle and Flowers for Mom), I also did a little fussy cutting from Vintage Spring Basics (5th of May) and Coffee In the Arbour (Butterflies are Free).


The bottom part of the card has an area for you to write in your own personal thoughts.  I added some fussy cut blossoms attached with foam adhesive dots so that the window part of the card has something to prop against.

  Baby card photo1

Here is a picture of the card with it's folded shut.  To make the card I cut out the framed baby design from the Vintage Baby Ephemera paper, also cutting out the area behind the baby inside the frame with an exacto-knife. I then laid the card cut out on the brown gingham paper (backside of the Die Cuts paper) and cut a piece slightly larger in wide to the frame piece...and kept the length of the strip the full 12 inches.  I then cut a second piece of the gingham paper to frame the baby frame piece, making sure there is about a 1/4 inch edge.  I then made a fold crease in the long strip at the 6" mark and at the 3" mark.  I cut out the center of the upper part of the 6" rectangle and also out of the matting piece I cut for behind the baby frame.

  Baby card photo5

I then put the card together by attaching the gingham matting paper to the upper 3" of the long card strip and then sandwiching the transparent plastic piece between the matting and the actual baby frame piece.  Now you have a cute peek-a-boo window on your easel card.  The last steps are just adding a few decorations.  I cut out a second baby image from another piece of the Ephemera paper and added it with foam pop dots, I thought it gave the card that extra pop.  I also fussy cut some flowers from the Vintage Spring Basics paper and butterflies from the Coffee In the Garden collection and added them as decorations to my card front.  A few seed beads for my flower centers and bingo, your unique baby card is done!  The cool thing?  Maja also has a beautiful baby boy framed image in this collection so you can make the card for either sex.

  Baby card photo3

It's hard to show in a photo the effect of the see through window so I thought I'd post an extra pic from the other angle, but believe me, in real life the effect is quite striking.  I had a lot of fun creating this special baby card and think you'd enjoy it too!

Don't know where to find Maja Design papers in North America?  An awesome source is The Scrapbook Diaries.  

I based this card on this months Moodboard challenge at Maja Design, I chose to work with the pinks and browns....here is a pic of the Moodboard for February....


You can win a wonderful Maja Design paper collection if you play along using this months board as your inspiration for your project using Maja Design papers.  The winner is announced on the last Monday of every month.....This month that would be Monday February 29th....so you still have time to play and possibly win a lovely Maja prize! You can find the challenge rule HERE.

Thanks so much for stopping by my blog today and for the kind comments and feedback, your words always make my day! xo

Wednesday, May 27, 2015

Nautical Cards with NEW BoBunny 'Boardwalk' Collection!!

Nautical Cards made by Gabrielle Pollacco using the BoBunny Boardwalk collection papers and embellishments

Hello my friends!  Just a few days ago I got my new Bo Bunny collections in the mail and was so excited about them, that I immediately stopped all other projects just to give this adorable 'Boardwalk' collection a play!  I just LOVE the nautical/beach elements in this collection, lighthouses, ships, starfish, weathered wood.....I just had to take a moment and do up a couple of cards!

Nautical Cards made by Gabrielle Pollacco using the BoBunny Boardwalk collection papers and embellishments

For my first card I used the Boardwalk 6x6 paper pad for my background (I chose the weather wood paper for this), and then cut out the lighthouse image from the 'Sandcastle' paper as my focal point image.  


I then took 2 of the Misc Me Boardwalk pocket square designs (the starfish) and mounted one on the card and then cut out the starfish/title from the other.  I gave the starfish a little dimension by using an embossing tool on the back and rubbing along the lines of the legs.  I also cut out some smaller starfish images from the back of the 'Beach Bliss' paper and did the same with an embossing tool.  It takes a minute to do but makes a big difference in the finished look of the card.  I finished the design with a bit of burlap, some hemp twine and a piece of trim (netting) I got from my sweet friend Janene, at The Scrapbook Diaries.

Nautical Cards made by Gabrielle Pollacco using the BoBunny Boardwalk collection papers and embellishments

For my second card I used the ship postcard design from the Boardwalk 'Beach Bliss' paper as my focal point, and matted it on the dark blue 'Sail Away' paper.  I sandwiched a piece of burlap between the two layers. 


I made the fun anchor design by using a piece of die cut paper (anchor) from the matching 'Noteworthy' pack (this is a pack full of really fun nautical and beach die cuts).  I used Bo Bunny's Chocolate Pearlescents to add a metalic 3D effect.  I added a layered chipboard medalion and added some hemp twine and some bits of denim of some old jeans.

Products used in these cards:
Patterned Paper: Bo Bunny Boardwalk/Beach Bliss, Sail Away, Sandcastle
6x6 Paper Pad: Bo Bunny Boardwalk
Noteworthy: Boardwalk
Layered Chipboard: Boardwalk
Pearlescents: Chocolate
Hemp Twine
Burlap

The new Bo Bunny products should be in your local stores now (or on their way)!  Thanks for stopping by my blog today and for the lovely comments and feedback, they always make my day! xo

Friday, March 27, 2015

Garden Journal Cards {Bo Bunny & Tresors de Luxe}


I'm just crazy in love with this beautiful new collection by Bo Bunny called Garden Journal!  It's so easy to create pretty cards using the patterned papers like 'Notebook', "Journal' and 'Postcard' to create whimsical cards.  I purposely left the type of card as blank so that I can use them for whatever purpose arises.


For this card I used some leftover 'Wonder' paper as my card background, then I layered a couple of the postcard designs from the 'Journal' paper.  I then added a bloom cluster from Tresors de Luxe, really sweet handmade blooms from my friend Lucy's etsy shop! (thanks Lucy!!).  And I finished with some natural hemp twine and some coordinating buttons from the Garden Journal collection. 


For my second card I used some paper from the Garden Journal 6x6 paper pad (green) as my background.  I had some leftover paper from a project I recently did using the weathered wood design from Bo Bunny's Heritage Collection called 'Register', I cut out a few of the wood planks and put them on the card with foam adhesive dots, laying them on in an uneven pattern.  I then layered on some images from the 'Notebook' paper from Garden Journal.  Again I used a little natural floral cluster from Tresors de Luxe, some natural twine and another coordinating button from the Garden Journal collection.


Products used in these 2 Cards:
Patterned Paper:  Garden Journal/Wonder, Notebook, Journal, Pastel, Heritage/Register (Bo Bunny)
6x6 Paper Pad: Garden Journal (Bo Bunny)
Garden Journal Buttons (Bo Bunny)
Blooms: Tresors de Luxe
Other: cheesecloth, hemp twine

Thanks so much for stopping by my blog today! These gorgeous Bo Bunny collections are in stores now!  And if you are looking for beautiful lace, trims and blooms, have a peek at the lovely offerings at the Tresors de Luxe Etsy Shop HERE.   We have the Maple Syrup Festival this weekend, hope the weather won't be too cold to have some fun!  Have a great weekend everyone!


Tuesday, June 24, 2014

Saying Thanks with Bo Bunny's Somewhere In Time collection


One of my favourite color combinations is this craft color with the soft teal/aqua that is predominent in the Somewhere In Time collection.  For this Thank-you tag/card I chose one of the simpler background papers and did a bunch of stamping on it with some of my stash of BoBunny stamps.

 
I used natural accents for the tag using hemp twine, some chipboard cogs and then just went crazy with the stamps.  The dragonfly stamp is such a fun stamp especially for tags.  (this stamp is from the Serenade collection, the measuring tape and frame design is from the Weekend Market collection and the script is from a large Bo Bunny stamp set called 'It is Written".  I finishe of the look with a couple of pearl 'jewels' from the Somewhere in Time collection.


Another stamp that I find comes in handy all the time is the large stamp collection called 'You're Invited"....I chose the simpler font design for this tag.
 
Bo Bunny Product:
Patterned Paper: Timeless, Antiquity/Somewhere In Time
Jewels: Somewhere In TIme
Stamps: Serenade, Weekend Market, You're Invited Large Stamps, It Is Written Large Stamps
Lace: Natural Earth
 
 
The 6x6 paper pad is one of the best creations for cardmakers.  The reduced size images and smaller papers work perfectly for card creating. I chose the antique corset design papers to make up this card.

 
I also utilized some of the matching cardstock stickers to make up my card title.  The BoBunny pearl flourishes always add a nice elegant finishing touch to a card or layout.
 
Bo Bunny Product:
Patterned Paper:  6x6 paper pad/Somewhere In Time
Cardstock Stickers: Somewhere In Time
Jewel Flourishes: Frosting Jewels
Stamps: You're Invited Large Stamps
 
Before I close off for the day I just wanted to share a fun little challenge link with you all.  My sweet friend Evgenia Petzer has this wonderful scraplift challenge blog and she asked if I would let them use one of my cards for their scraplifting challenge.  I happily obliged,....they chose this card....
 
 
 If you would like to play along this month (and have a chance at their prize as well), you can find her website here Scrap Lifting Challenge Blog.
 
Thanks so much for stopping by my blog today!  And thanks for the lovely comments!


Saturday, February 1, 2014

Maja Design's February Mood Board Challenge!

 
It's that time again! I know I mentioned that the new Maja Moodboard is posted the first Tuesday of every month but I have to correct that, since the beginning of the new year it is now the firs SATURDAY of the month.  That being said here is the gorgeous Moodboard for February!...
 
 
 I love that the moodboard for February is not your typical  pink/red/white color combination (although I do love to scrap pink)...this mood board has such lovely shades of violet/purple/plums with some beautiful neutrals.  The moodboard is based on colors in the 'Ska vi ta en Fika?' collection.


I used mostly papers from the above collectin but added a little bit in from the Vintage Spring Basics collection as well (striped background for the card) and a little bit of Vintage Autumn Basics (clocks).

 
The roses I used on this card are from an old package of Prima flowers I had in my stash, mixed with small white roses from Dusty Attic Designs.  The vine flourish design was cut from Maja papers using the Cheery Lynn Fanciful Flourish die cut.

 
I created a shabby-chic frame design for my card title with a Dusty Attic Design frame and some white pearl 3D paint (I used Scribbles brand found in the T-shirt section of Michaels Craft Shop).
 
 
Here is an even closer view of the frame.  I usually like to machine stitch on my cards but I ran out of the heavy duty upholstery thread I ususally use for stitching on my cards and layouts, so I had to cheat and draw on the stitch design with a brown pen.
 
Maja Design papers used on this project:
~ Ska vi ta en Fika (Favoriter, Blommor på bordet, Våffla m björnbärssylt-bs, Söders höjder - bs)
~ Vintage Spring Basics (8th of April-bs)
~ Vintage Autumn Basics (XVI) - clocks
~ Life in the Country (Sowing Seeds-bs)
 
I hope you get a chance to play along with this months moodboard challenge at Maja Design,there is a beautiful Maja Design collection (of your choice) up for grabs as the prize each month!  You can find the challenge information HERE.  You can also see more inspiration from our talented design team there, to get your creativity going! Thanks so much for stopping by today and for all the lovely comments, you guys are the best! xo xo


Wednesday, January 29, 2014

A Special Anniversary Card {Maja Design & Cheery Lynn Designs}

 
So today is my day to share a Maja Design project with everyone and it is also my last day as guest designer over at Cheery Lynn Designs (dies)...so I thought I would combine these products and make a special card.  My Mom and Dad's 55th anniversary is coming up in a few weeks so I thought I'd make up a special card for them.  Ever since I was a little girl, my parents always treasured the cards the most from us kids, especially if they were handmade.
 
 
I thought I would use the colors from the Maja Design Mood board this month (this mood board challenge is already finished but I wanted to be sure to do a project because I so loved the board this month....the next mood board challenge will be posted on the first Tuesday of the month - February 4rth ).
 

I used a bunch of pretty papers from Maja Design Vintage Frost Basics collection with some of my favorite CL dies to make this card.  For this card I went with the lovely burgundy/cream/pink papers in this beautiful new collection.


Can you tell I'm fascinated with the lattice die?  I can't seem to get enough of that one!  For this layout I mounted it behind a circle I cutout using 2 cups to trace out my circles.  For the flourishy leaf design I just had to use my favourite flourish die (I'll tell you a secret....I thought I had lost this die and was so upset, it's seriously my all-time favourite leaf/flourish die, I was ready to order myself another!....then I found it about a week ago, it was in the case for my Revolution machine (I finally remembered I put it there because I pretty much always use that die when I pull out my machine :)

I also used a couple of the lace border and lace doily designs to accent the circle design as well as the edge of the corrugated cardstock I used.  And I just love to use those lace corner designs to finish off my cards.

 
For the flowers I used the beautiful Gardenia strip die.  I just love the pretty rosy design this die gives.  The petals were cut from white cardstock and I just used some Victorian Velvet distress ink by Tim Holtz....I just randomly tinted parts of the petals using a soft make-up sponge, leaving some parts white.  I wanted a small 3rd flower for this floral cluster so I used a few of the smallest Sweet Williams die cuts to make a little rose.
 
Cheery Lynn Products used for this project:
 
Maja Design Products used for this project:
 
 
Thanks so much for stopping by my blog today!  You can find the Cheery Lynn products at many of your local scrap stores or check the links I provided in the list above.  Maja design products are becoming more and more available to the North American market, some online retailers are The Scrapbook Diaries and Moments of Tranquility.  You can also find stores in your area if you check the storefinder at the Maja Design website, I know they have been busy updating their list since the CHA. :)


Tuesday, February 28, 2012

Using Webster's Pages Journaling Cards!

Today I thought I would share a card I made using Webster's Pages Journaling Cards.  There is a package of journaling cards made to coordinate with each of the WP collections, they come in a cute little plastic jewel case.  They are 2 sided and you get 2 of each design in each case.  They are great for adding journaling or a nice design element to your scrapbook pages.  But another fun way to use them is on cards!  Here (below) are the card designs you'd get in the Western Romance package.  I used one of the cards from this package for my card above.
Supplies for this card:
Patterned Paper: Websters Pages Western Romance (Country Fresh, Sweet Romance)
Die Cut paper: Websters Pages Winter Fairy Tale
Alphabet Stickers: Western Romance
Trim: Lace from Winter Fairy Tale collection
Flower: made from cardstock
Paper doilie (literally a cake doilie :)

You can find journaling cards as well for all of the brand new collections that came out at the 2012 Winter CHA (Sunday Picnic, Everyday Poetry, Palm Beach, Game On and In Love).  Thanks for stopping by and for all your kind comments! 

Tuesday, November 1, 2011

Bo Bunny & Scor Buddy!!


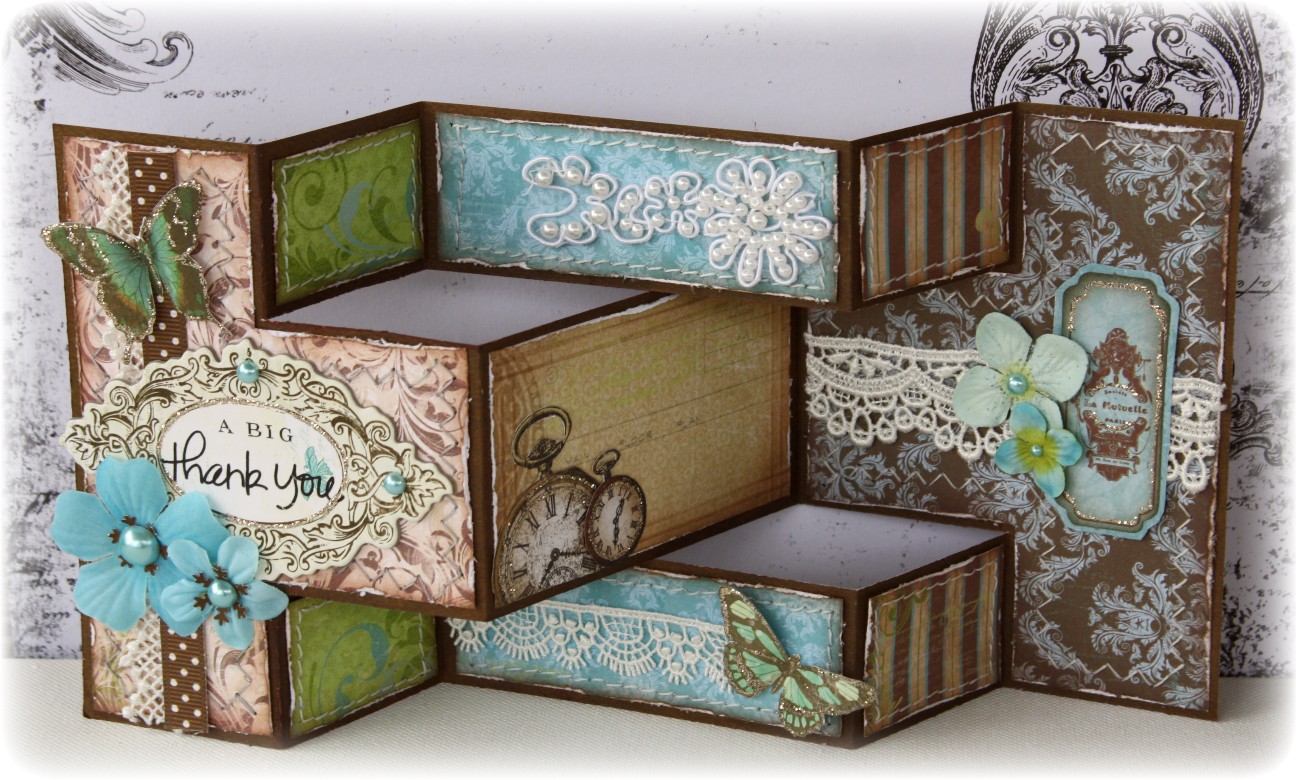
I have been wanting to try out this tri-fold shutter card for a very long time and finally got a chance to do it mainly because I got this amazing Scor Buddy sent to me!  I have a scoring tool on my cutter but for some reason it always comes out crooked (I think my cutter is not exactly square).  So I was thrilled to have this amazing tool to use!  I used the ScorBuddy two ways, to create scor lines for my card folds and to create an embossed edge for my journaling piece.  Below is the template I used to make up this card....


These are the basic Instructions:
1. Cut a 12" x 5 '1/2 " piece of Cardstock. (I used Bo Bunny's Shitake Dot paper)
2. You will create score lines at the 2", 4", 8" and 10" marks  (some will be 'valley' scores and some will be 'peaks'....see diagram above to differntiate which go where.
3.  You will cut measure 1 1/2" up (and down) from the 2 and 20 inch marks and cut 2 slits between these markings (I cut these slits first so that I knew when to stop and start my valley and peak scores).
4.  Your card is not ready to shape into the folded design (see above photo to see if you have your folds correct).
5.  Choose your patterned papers that you want to use for this card and then use the card as your template, you will need to cut patterned paper:

2 pieces of the T shapes (trim 1/16" off each edge)
4 x 1 3/8" x 1 3/8"
2 x 1 7/8" x 3 7/8"
1 x 2 3/8" x 3 7/8"

I used the Scor Buddy on the middle (2 3/8" x 3 7/8") piece to make a nice embossed edge for my journaling piece.  I flipped the piece over and used the two scores closest to the left edge to scor my border...
When you flip the piece over you end up with a nice bumped up border for your journaling piece, here is a close-up of the finished section, I added some clock cut-outs from the BB Timepiece 6x6 patterned paper pad to decorate this piece with...

Now just decorate to your hearts content!  Bo Bunny has so many beautiful embellishing products to coordinate with each of their collections,...Rub-ons, stickers, chipboard, Jewels, flowers, ribbons and Noteworthy die cut shapes!  Here is one more view of the card opened...
Supplies used:
Patterned Paper: Welcome Home ~ Porch Swing, Welcome Home, Front Door,


Cardstock: Bo Bunny Shitake Dot
6"x6" Paper Pad: Welcome Home, Timepiece
Chipboard: Gabrielle
Butterflies, dot ribbon: Gabrielle card kit
Noteworthy: Welcome Home
Jewels: Welcome Home
flowers: Bo Bunny Serenade collection

Be sure to stop by the Bo Bunny site this week to check out all the projects being made with BoBunny products and Scor Buddy!  I've seen a number of them already and they are amazing!  Bo Bunny and Scor Pal are having a Blog hop all week long so come and join the fun!


LinkWithin

Related Posts with Thumbnails