Monday, April 9, 2012

Summery & Whimsical Dusty Attic!

I had some fun playing with a bunch of my Dusty Attic chippies over the weekend!  I used a whole bunch of them both older and brand new ones!  I really wanted to used the new ornate door design so I used the words from a really sweet song "I hope when one door closes another opens"  ...My Wish for You.  I used the NEW Door chipboard design as well as the Door Handle Plates, the brick wall pieces, the topiaries, the vine and the wrought iron fence.
~ Door #3
~Door Handle Plates
~Topiary Trees #1
~Brick Wall Panel
~Vine Border
~Wrought Iron Fence Border 


For all my Dusty Attic pieces I first gave each of them a coat of white Gesso (you could also use white craft paint), this allows the ink colors I used on them to show up better.  To tint my chipboard I simply ran shades of green, brown or terracotta of chalk ink over the edges of the chipboard, allowing the color to fad towards the center....this gives the pieces a more natural effect.  After I glued on my pieces I gave the bricks a little extra dab of dry brushed white Gesso to give them an aged effect. 
I created a cute little 'door knob' (above) for the door handle panel using a large copper brad.

Did you know that Dusty Attic now has BLOOMS??? How cool is that!!  I was so excited to recieve a complete collection of their blooms a couple of weeks ago....here is a pic of some of them....
I used one of the white packets of blooms for my layout.  What I love about the white blooms is that you can tint them up to match the layout you are working on.  For my layout I wanted a two toned effect so I used a paint brush and some green ink to tint the centers of my blooms.... 

The result is this two toned bloom below..... 
I hope everyone had an amazing long weekend!  (ours is still on, the girls have a 4 day weekend here in Canada, so we've got family up visiting today :) 

Saturday, April 7, 2012

Sketch Layout for Bo Bunny! And a Sprinkle of Dusty Attic!

I made this layout with this cool sketch that was provided by Sketchy Thursdays.    The sketch called for 3 photos and I had these pic's I took of our pup when we first got her, I'm sure she thought her name was 'Zoe-No!' because that is what she heard all the time! lol!  Nothing was safe around her, I'm sure she has wrecked hundred of dollars worth of shoes, cloths, rugs, blankets......and **sigh** is still at it....hmmm, might be time for obedience school!)  This was my take on the sketch (I tend to take sketches I work with very literally and pretty much just follow the design without too much improvisation....all I really added was a little corset stitching between the strips of paper)  I used the soft and pretty Bo Bunny 'Country Garden Collection" for this one.... 
I also added one of the lovely new flourishes (Corner Flourish #2) by Dusty Attic.  While I normally add some sort of paint or inks to my chipboard pieces, this time I like the color tone the natural chipboard had so I just kept it unadorned. 

Here is the sketch I worked with from the Sketchy Thursdays blogspot....If you would like to try out this sketch and have a chance and a lovely Bo Bunny Prize be sure to link you layout to this link BO BUNNY SKETCHY THURSDAY~ You have until May 2nd to create your layout and link it!  Hope to see you there!  And hope everyone has an awesome long weekend! xx

Monday, April 2, 2012

Something NEW & EXCITING for Websters Pages!!


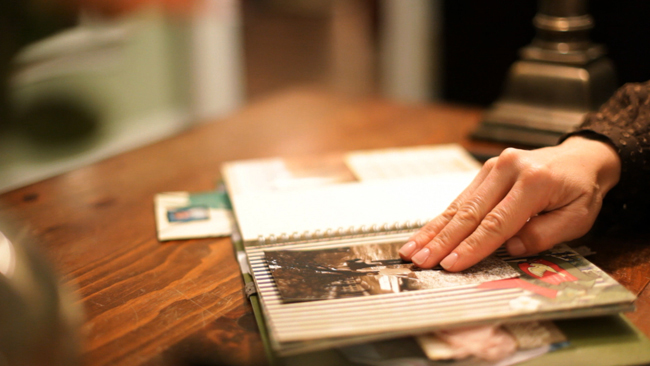
Journals have become a new and exciting way of scrapping!  And Websters Pages is bringing out a new line of Journaling books called 'Blueprints'!!  There will be various themes (for example the one you can glimpse in the photo above is themed 'A Mother's Love'.  This is a wonderful tool for all types of scrappers but most especially for those with very little time to scrap.  We all lead busy lives weather we are working women or stay at home moms and these journals are a perfect solution to helping you scrap your photos and stories!


To find out more about this awesome new release from Websters Pages check out this link and earn yourself a chance at winning one for yourself! ~~ Blueprints

Friday, March 23, 2012

Ballerina Bloom Tutorial ~ Using Webster's Pages Trims & Sparklers

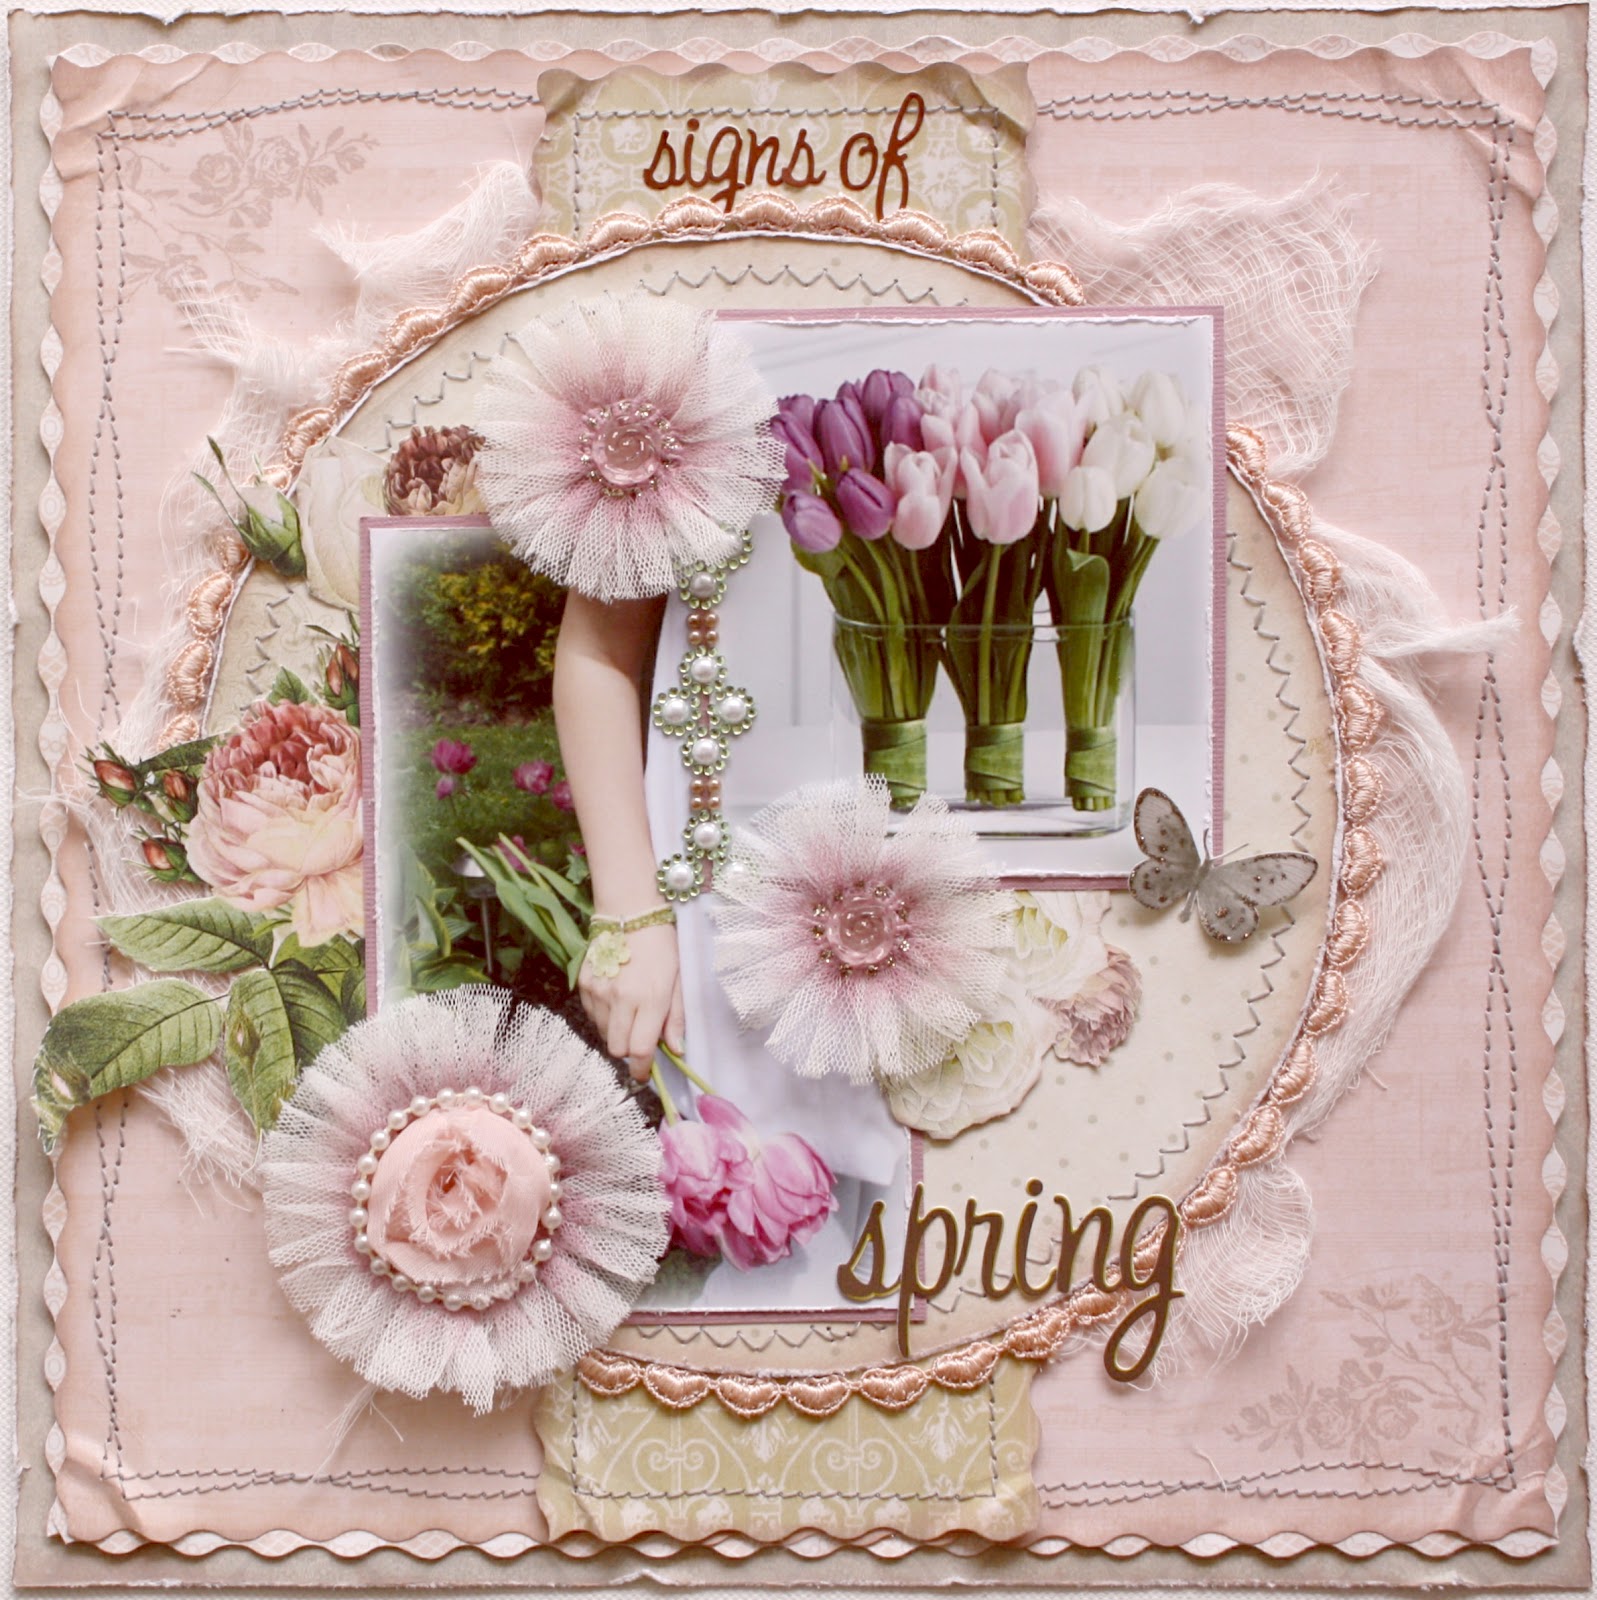
Spring is here! And for me, one of my favourite things is the early Spring tulips we have planted around our home.  A few years back we planted hundreds of tulips so that the girls can enjoy picking Spring blooms for our home, friends, family and teachers.    I so enjoyed having my first crack at using the new "In Love" collection papers and embellishments from Webster's Pages.  While they are just perfect for wedding photo's (and you WILL be seeing wedding photo's done with this collection come end of May.....my nephew is getting married!)...I do like this collection for other 'girly' type layouts!  I thought I would also share a fun little tutorial on how to use the Websters Pages trims that come with this collection and make some handmade blooms.

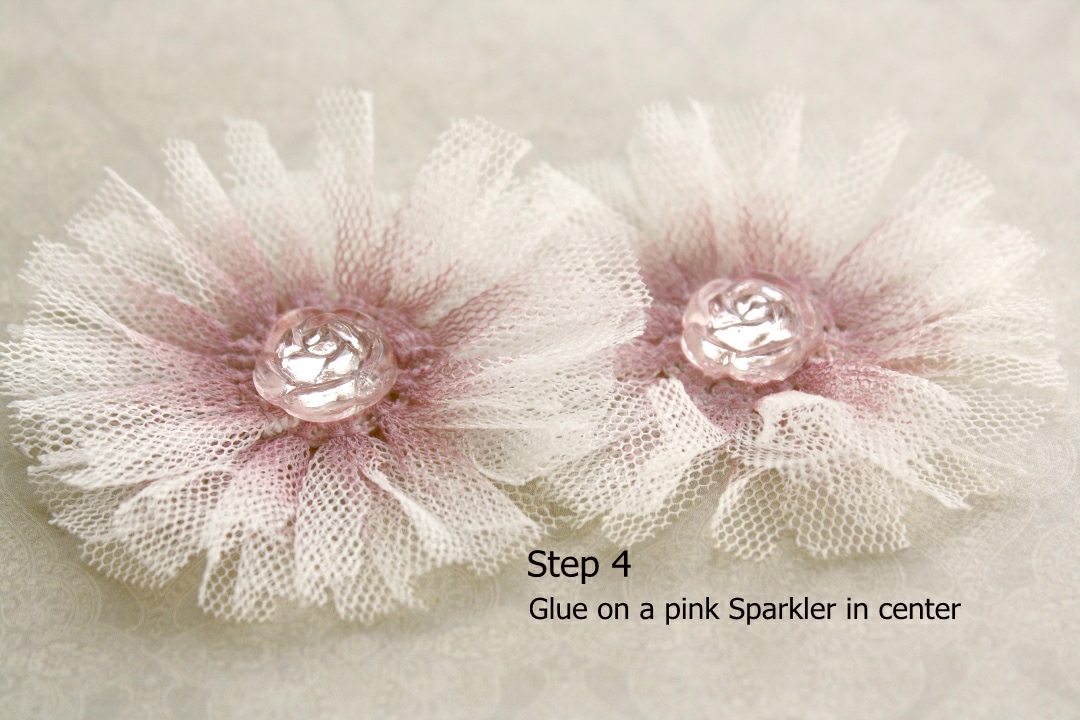
I personally love blooms that have layers of color.  So I took the pretty white fringe trim from the In Love trim kit and added a little pink tint to it with some ink.  Here is a picture of the bloom I will be showing the steps to.  Just follow the instructions in the windows to make your own! :)


You can of cours use a different ink for trim and a complementary color Sparkler for the center (the sparklers come in many colors) depending on what color bloom you want for your page. 
NOTE:  I get a lot of questions as to where to find Websters Pages products.  The best way is to let your local scrapstore owner know that you are interested in getting these products in (Check out the Websters Pages Inspire Me site for information on getting these products to your local stores ...you can earn yourself free product if you get your local store to carry WP products)  OR You can always order your product online directly from the Webster's Pages Website.....you'll notice that I try to link all the products I use on my WP pages to the website so that you can easily find the product you are looking for, just click on the product name :)

Thanks for popping in again! Happy Friday everyone, I hope you all have an amazing/creative weekend! xx 

Thursday, March 22, 2012

Polymer Clay & Trinket Embellishment Tutorial (Bo Bunny DT)

A couple of years ago when I was running my Etsy shop I used to make these polymer clay embellishments for scrap pages.  I thought I'd take today to show you all how to make these unique little embellishments, they work beautifully with the Bo Bunny Metal Trinkets! 

The assignment today was to create a Signs of Spring layout with the new Alora collection.  I used a photo I took a couple of years ago in the spring of Meagan on the monkey bars at the park....to me, a sign that Spring is in the air is when the kiddies can go without coats, hat, mitts...  Although I have to say we are having crazy warm weather here for Spring, it's almost unheard of to have the kids going to school in shorts in March!  Today is another balmy 85 degrees! crazy for this time of year here in Ontario! 
Okay so for the tutorial.....You will need....
~Polymer Clay, Sculpy, Fimo or Store Brand (I used black)
~Pearlex or Perfect Pearls (Mica Powder...I bought the Pearlex Series2 12 pack ages ago and still have loads of it left....The colors I used were Turquois, Aztec Gold and Spring Green)
~Bo Bunny Metal Trinkets and Jewels
~Blade knife for trimming 
Step #1:  Soften and roll out a 1" piece of black polymer clay (I used black because I feel like the colors of Pearlex show up nicely against it).  Cut a heart shape out with a blade knife.  Now take a small piece of the black clay and roll out into a thin strip, and roll out a number of small ball shapes.  Apply to the piece with gentle pressure (when it bakes it adheres well to the base piece) 
Step #2:  Using a paint brush apply the Turquoise Pearlex (Mica Powder) to the base of the piece (I used two colours....see below).  Be sure to get the Pearlex right to the edges. 
Step #3:  You can add an additional color in and just softly blend them . 
Step #4:  Using your finger, dab it in the Pearlex and just run it along the raised design you created, this is my favourite part, the contrast of the metalic colors is just magical! ....You can add your metal accents now if you wish but don't add your jewels to it unless they are glass because they will melt in the oven when you bake off the piece.   Bake in a 275 F oven for 15 minutes (use a disposable foil tray for this, you don't want to use something that you will later cook with)
Step #5: Once my piece has cooled I spray it with a protective clear coat (I couldn't find old clear coat spray so I used some hairspray and it worked well!)  Now you can add any pearl or gem accents and glue on your metal accents if you didn't bake them with the piece.  I recomment that you spray the back of the piece with a protective coat in order to protect the scrap paper incase any residual oils come off of the polymer clay.

Experiment with different shapes, try using stamps and small and large glass beads.  Here are just a few of the designs I created using just some clay, Pearlex, stamps and glass beads. TIP:  (the trick to making a straight line with the glass beads is to string them on a piece of wire, push them into the clay and then pull out the wire strand leaving the beads behind in the clay)


I hope I've inspired you to give it a go!  Have a fun scrappy week! xx 

Tuesday, March 20, 2012

Welcome Spring with Pretty Bloom Clusters!!

Spring is here! And what better way to welcome it in than to share a fun little paper flower cluster tutorial!  I don't know what the weather is like where you all are but here in Cambridge, it's soooo beautiful!  It's more like summer rather than spring!  I've got my window open, listening to the birds chirping and it's a balmy 77 degrees out!...the kids actually wore shorts to school! (that's very warm for this time of year in Canada!)

So I worked on a couple of fun little flower tutorials over the weekend and I'm sharing the first one with you all today (stay tuned for another one later in the week).  I pulled out my new Websters Pages 'Everyday Poetry' collection pack, a couple new Martha Stewart punches I picked up and got started!  ...I love the cherry blossom design in the new Everyday Poetry collection so I thought I would create some 3D Cherry blossoms for my page.  Here are the simple steps to make up this design... 


I like to add the smudges of ink behind the blossoms, I find it gives a unity to the page and doesn't leave your blooms just hanging there, they seem to 'belong' to the page better.  ....In the lower part of the page I made a little Hydrangea pot another flower cluster design. 

Here is a close up of the finished Hydrangea pot..... 
I also had a little fun playing with the new Websters Pages 'In Love' collection over the weekend (my second bloom tutorial will be done using the In Love collection.....I had some pretty scraps left and wanted to make a tag with them....here is the tag I made with these scraps and the punched bloom method.... 


Thanks so much for stopping by!  And again, thank you for the sweet comments you all leave here at my blog...I read every one of them.  I did want to comment on a question I often get with regard to my work as to how to store it.  I have to admit that I'm wayyyy behind on getting my pages into albums and sometimes have them sitting in plastic storage boxes waiting for their albums.  But here are a few things you can do with your more 3D style pages.  I have 12 x 12 frames that I hang in my scrap room inwhich I like to rotate out some of my more 3D style pages.  As for albums, there are a couple of ways to store them.  If you are using the post bound style, I like to put in lots of 'spacers' (these are the cardboard strips that often come with the plastic sleeves (K&Company makes these)....this allows for room between your pages so they don't get too squished).  Another very good option is to use 3 ring binders, these allow your plastic sleeves lots of room so that again your elements down get too squashed.  Hope this helps! :)

At Websters Pages we've been celebrating shipping week!  Yep! All the newest collections are now shipping to the stores so watch for your local store to get them in!  Failing that you can also order online at the Websters Pages Website!  And while you're there, check out Brandin's cute cute video clip, it will put a smile on your face! (If you are anything like me and are stalking the mailman when you know a scrapping package is coming, you will totally 'get' this video clip! lol!)

Thursday, March 15, 2012

Simply Renee & Dusty Attic Blog Hop!

Welcome to the Simply Renee and Dusty Attic Blog Hop!  We have much inspiration to share with you today!  Oh and of course... some fabulous prizes!

Simply Renee manufactures quality products that help you customize your organizational needs.  You may be familiar with their Clip it Up products.  You can view Simply Renee’s complete product line on their website.  They are having an amazing sale right now!  

For this blog hop, Simply Renee has teamed up with The Dusty Attic, an Australian owned and operated laser cutting business that designs and manufactures craft items and embellishments.  You can view some of these wonderful products as well as beautiful projects by fellow crafters on the Dusty Attic Ning site.  As you hop along with us today, you will see inspirational projects made by some of the talented Dusty Girls!  Here is the project I created for you using Dusty Attic chipboard embellishments.
I wanted to create a page with an 'overload' of Dusty Attic chippies, (I really think you can never have enough 'dusty' on a page! lol!)....I used one of the new chippies 'Birdcage #5', and the gorgeous NEW Corner Flourish #3 as well as the 'Birds on a Branch #2'
For the 'Birds on the Branch' chippie I painted the piece with Gesso, then just used chalk inks in green, brown and blue to tint the piece in the appropriate places, I added a little detailing with a brown felt tip pen. 


The papers I used here are a combination of K&Company & Prima, the fabric ribbon is Recollections.

What prizes are we giving away today?
Simply Renee is giving away a Clip it Up Base Unit, an Upper Tier and Zip Bags!
(Product Not Included)

The Dusty Attic is also giving away a prize pack filled with gorgeous chipboard elements and a few surprise goodies!  

So what do you need to do for a chance to win?
* Become a follower of the Simply Renee Blog and the Dusty Attic Blog
* Become a fan of the Simply Renee and Dusty Attic Facebook fan page
* Leave a comment on each blog of the hop

A winner will be chosen on March 22, 2012 and will be announced on both the Simply Renee and Dusty Attic blogs.

Wait!  There’s more!  Simply Renee is having another giveaway at this very moment!  
They are giving away one of these...
 (Product not included.  All-In-One accessories awarded may differ from those shown.)

An All-In-One with accessories!  The All-In-One Giveaway ends on March 20, 2012.  To enter, become a follower of their blog, a fan of their Facebook fan page and check their blog each day to find out what you need to do to receive extra entries.  Plus every item purchased on their website during the giveaway gives you an extra entry!

Now head on over to Michelle’s blog to see what my Dusty Sister has created for you!  
If you get lost along the way, you can return to the Simply Renee Blog for the full list of blogs to visit.

Good Luck!

LinkWithin

Related Posts with Thumbnails